Daniel Micanek virtual Blog – Like normal Dan, but virtual.
Category: ESXi
The “ESXi” blog category focuses on VMware ESXi, a bare-metal hypervisor provided by VMware. This specific category offers an in-depth look at ESXi, with an emphasis on ESXCLI commands, ESXCLI Mindmap, and VMware Tools version mapping with Release Notes. The content includes detailed guides and tutorials for using ESXCLI commands, essential for efficient management and troubleshooting in ESXi environments. It also features illustrative ESXCLI Mindmaps, helping users better understand and navigate the complex structure of ESXCLI. The section on mapping VMware Tools versions with Release Notes provides useful information about different versions of VMware Tools and their specific features and enhancements.
vSphere 8U1 – Deep dive on configuring NVMe-oF (Non-Volatile Memory Express over Fabrics) for VMware vSphere datastores.
What’s new
With vSphere 8.0 update 1, VMware has completed their journey to a completely native end-to-end NVMe storage stack. Prior to 8.0U1, there was a SCSI translation layer which added some complexity to the stack and slightly decreased some of the efficiencies inherent in the NVMe protocol.
Hardware machine is configured to boot in legacy BIOS mode.
Booting stops early in the boot process with messages displayed in red on black with wording similar to “Error 10 (Out of resources) while loading module”, “Requested malloc size failed”, or “No free memory”.
“Error 10 (Out of resources) while loading module”, “Requested malloc size failed”, or “No free memory”
VMware’s recommended workaround is to transition the machine to UEFI boot mode permanently, as discussed in KB article 84233 . There will not be a future ESXi change to allow legacy BIOS to work on this machine again.
VMware’s plans to deprecate support for legacy BIOS in server platforms.
If you upgrade a server that was certified and running successfully with legacy BIOS to a newer release of ESXi, it is possible the server will no longer function with that release. For example, some servers may fail to boot with an “Out of resources” message because the newer ESXi release is too large to boot in legacy BIOS mode. Generally, VMware will not provide any fix or workaround for such issues besides either switching the server to UEFI
Motivation
UEFI provides several advantages over legacy BIOS and aligns with VMware goals for being “secure by default”. UEFI
UEFI Secure Boot, a security standard that helps ensure that the server boots using only software that is trusted by the server manufacturer.
Automatic update of the system boot order during ESXi installation.
After installing Windows Server 2022 update KB5022842 (OS Build 20348.1547), guest OS can not boot up when virtual machine(s) configured with secure boot enabled running on vSphere ESXi 6.7 U2/U3 or vSphere ESXi 7.0.x.
In VM vmware.log, there is ‘Image DENIED’ info like the below:
2023-02-15T05:34:31.379Z In(05) vcpu-0 - SECUREBOOT: Signature: 0 in db, 0 in dbx, 1 unrecognized, 0 unsupported alg.
2023-02-15T05:34:31.379Z In(05) vcpu-0 - Hash: 0 in db, 0 in dbx.
2023-02-15T05:34:31.379Z In(05) vcpu-0 - SECUREBOOT: Image DENIED.
To identify the location of vmware.log files:
Establish an SSH session to your host. For ESXi hosts
Log in to the ESXi Host CLI using root account.
To list the locations of the configuration files for the virtual machines registered on the host, run the below command:
#vim-cmd vmsvc/getallvms | grep -i "VM_Name"
The vmware.log file is located in virtual machine folder along with the vmx file.
Record the location of the .vmx configuration file for the virtual machine you are troubleshooting. For example:
Currently there is no resolution for virtual machines running on vSphere ESXi 6.7 U2/U3 and vSphere ESXi 7.0.x. However the issue doesn’t exist with virtual machines running on vSphere ESXi 8.0.x.
[~] /opt/intel/intelmas/intelmas show -intelssd 1
- 1 Intel(R) Optane(TM) SSD 905P Series PHMB839000LW280IGN -
Bootloader : EB3B0416
Capacity : 260.83 GB (280,065,171,456 bytes)
DevicePath : nvmeMgmt-nvmhba5
DeviceStatus : Healthy
Firmware : E201HPS2
FirmwareUpdateAvailable : The selected drive contains current firmware as of this tool release.
Index : 1
MaximumLBA : 547002287
ModelNumber : INTEL SSDPED1D280GAH
NamespaceId : 1
PercentOverProvisioned : 0.00
ProductFamily : Intel(R) Optane(TM) SSD 905P Series
SMARTEnabled : True
SectorDataSize : 512
SerialNumber : PHMB839000LW280IGN
S.M.A.R.T information
[~] /opt/intel/intelmas/intelmas show -nvmelog SmartHealthInfo -intelssd 1
- PHMB839000LW280IGN -
- NVMeLog SMART and Health Information -
Volatile memory backup device has failed : False
Temperature has exceeded a critical threshold : False
Temperature - Celsius : 30
Media is in a read-only mode : False
Power On Hours : 0x0100
Power Cycles : 0x03
Number of Error Info Log Entries : 0x0
Controller Busy Time : 0x0
Available Spare Space has fallen below the threshold : False
Percentage Used : 0
Critical Warnings : 0
Data Units Read : 0x02
Available Spare Threshold Percentage : 0
Data Units Written : 0x0
Unsafe Shutdowns : 0x0
Host Write Commands : 0x0
Device reliability has degraded : False
Available Spare Normalized percentage of the remaining spare capacity available : 100
Media Errors : 0x0
Host Read Commands : 0x017F
Show all the SMART properties for the Intel® SSD at index 1
[~] /opt/intel/intelmas/intelmas show -intelssd 1 -smart
- SMART Attributes PHMB839000LW280IGN -
- B8 -
Action : Pass
Description : End-to-End Error Detection Count
ID : B8
Normalized : 100
Raw : 0
- C7 -
Action : Pass
Description : CRC Error Count
ID : C7
Normalized : 100
Raw : 0
- E2 -
Action : Pass
Description : Timed Workload - Media Wear
ID : E2
Normalized : 100
Raw : 0
- E3 -
Action : Pass
Description : Timed Workload - Host Read/Write Ratio
ID : E3
Normalized : 100
Raw : 0
- E4 -
Action : Pass
Description : Timed Workload Timer
ID : E4
Normalized : 100
Raw : 0
- EA -
Action : Pass
Description : Thermal Throttle Status
ID : EA
Normalized : 100
Raw : 0
ThrottleStatus : 0 %
ThrottlingEventCount : 0
- F0 -
Action : Pass
Description : Retry Buffer Overflow Count
ID : F0
Normalized : 100
Raw : 0
- F3 -
Action : Pass
Description : PLI Lock Loss Count
ID : F3
Normalized : 100
Raw : 0
- F5 -
Action : Pass
Description : Host Bytes Written
ID : F5
Normalized : 100
Raw : 0
Raw (Bytes) : 0
- F6 -
Action : Pass
Description : System Area Life Remaining
ID : F6
Normalized : 100
Raw : 0
Disk firmware update
[~] /opt/intel/intelmas/intelmas load -intelssd 1
WARNING! You have selected to update the drives firmware!
Proceed with the update? (Y|N): Y
Checking for firmware update...
- Intel(R) Optane(TM) SSD 905P Series PHMB839000LW280IGN -
Status : The selected drive contains current firmware as of this tool release.
How to fix network after adding to vDS. When you add NX6412 to vDS and reboot ESXi. I don’t have uplink for vDS. You could check it with:
# esxcfg-vswitch -l
DVS Name Num Ports Used Ports Configured Ports MTU Uplinks
vDS 2560 6 512 9000 vusb0
--cut
DVPort ID In Use Client
468 0
469 0
470 0
471 0
We will have to note DVPort ID 468 – example. vDS is name of your vDS switch.
esxcfg-vswitch -P vusb0 -V 468 vDS
It is necessary add it to /etc/rc.local.d/local.sh before exit 0. You could have similar script from source Persisting USB NIC Bindings
vusb0_status=$(esxcli network nic get -n vusb0 | grep 'Link Status' | awk '{print $NF}')
count=0
while [[ $count -lt 20 && "${vusb0_status}" != "Up" ]]
do
sleep 10
count=$(( $count + 1 ))
vusb0_status=$(esxcli network nic get -n vusb0 | grep 'Link Status' | awk '{print $NF}')
done
esxcfg-vswitch -R
esxcfg-vswitch -P vusb0 -V 468 vDS
exit 0
I am using Intel SSD Optane 900P PCIe in my HomeLAB as ZIL L2ARC drives for TrueNAS, but in July of 2022 Intel announced their intention to wind down the Optane business. I will try summary information about Intel Optane from Simon Todd presentation.
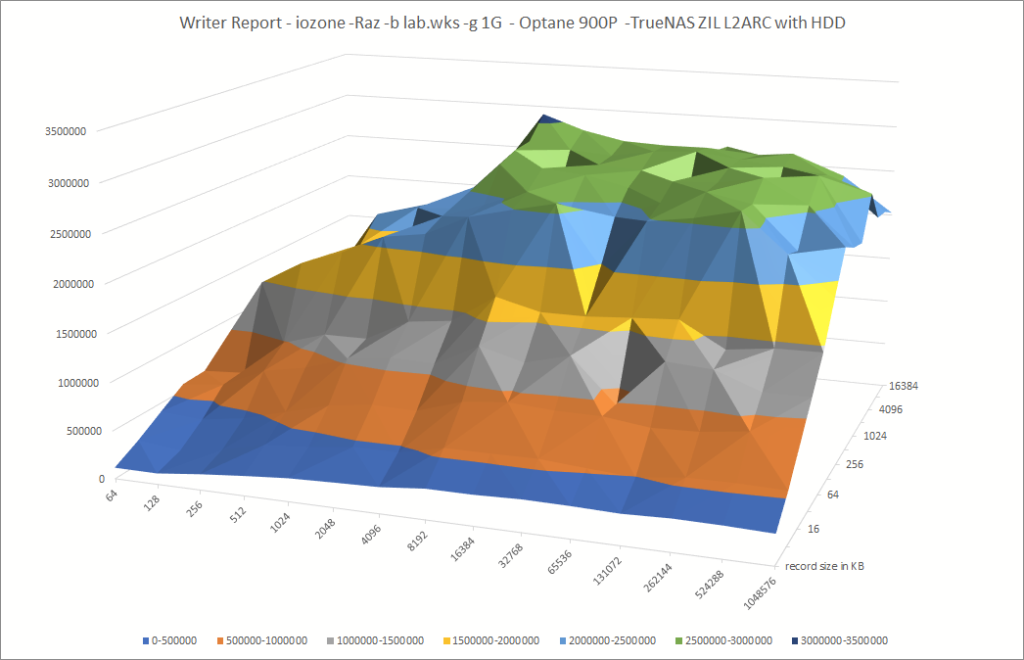
My HomeLAB benchmark Optane 900P -TrueNAS ZIL L2ARC with HDD
Optane help a lot with IOPs for RAID with normal HDD. I reach 2,5GB/s peak write performance.
We call see great write performance for 40GB file size set about 1,7GB/s.
# perftests-nas ; cat iozone.txt
Run began: Sun Dec 18 08:02:39 2022
Record Size 128 kB
File size set to 41943040 kB
Command line used: /usr/local/bin/iozone -r 128 -s 41943040k -i 0 -i 1
Output is in kBytes/sec
Time Resolution = 0.000001 seconds.
Processor cache size set to 1024 kBytes.
Processor cache line size set to 32 bytes.
File stride size set to 17 * record size.
kB reclen write rewrite read reread
41943040 128 1734542 1364683 2413381 2371527
iozone test complete.
# dd if=/dev/zero of=foo bs=1G count=1
1+0 records in
1+0 records out
1073741824 bytes transferred in 1.517452 secs (707595169 bytes/sec) 707 MB/s
# dd if=/dev/zero of=foo bs=512 count=1000
1000+0 records in
1000+0 records out
512000 bytes transferred in 0.012079 secs (42386853 bytes/sec) 42 MB/s
As announced in Intel’s Q2 2022 earnings, after careful consideration, Intel plans to cease future development of our Optane products. We will continue development of Crow Pass on Sapphire Rapids as we engage with key customers to determine their plans to deploy this product. While we believe Optane is a superb technology, it has become impractical to deliver products at the necessary scale as a single-source supplier of Optane technology.
We are committed to supporting Optane customers and ecosystem partners through the transition of our existing memory and storage product lines through end-of-life. We continue to sell existing Optane products, and support and the 5-year warranty terms from date of sale remain unchanged.
Get to know intel® optane™ technology Source Simon Todd – vExpert – Intel Webinar Slides
What makes Optane SSD’s different?
NAND SSD
NAND garbage collection requires background writes. NAND SSD block erase process results in slower writes and inconsistent performance.
Intel® Optane™ technology
Intel® Optane™ technology does not use garbage collection Rapid, in-place writes enable consistently fast response times
Intel® Optane™ SSDs are different by design Source Simon Todd – vExpert – Intel Webinar SlidesConsistent performance, even under heavy write loads Source Simon Todd – vExpert – Intel Webinar Slides
Model
Dies per channel
Channels
Raw Capacity
Spare Area
Intel Optane SSD 900p 280GB
3
7
336 GB
56 GB
Intel Optane SSD DC P4800X 375GB
4
7
448 GB
73 GB
Intel Optane SSD 900p 480GB
5
7
560 GB
80 GB
Intel Optane SSD DC P4800X 750GB
8
7
896 GB
146 GB
The Optane SSD DC P4800X and the Optane SSD 900p both use the same 7-channel controller, which leads to some unusual drive capacities. The 900p comes with either 3 or 5 memory dies per channel while the P4800X has 4 or 8. All models reserve about 1/6th of the raw capacity for internal use Source
The Intel Optane SSD DC P4800X is slightly faster than the Optane SSD 900p throughout this test, but either is far faster than the flash-based SSDs. Source
TPM_VERSION WARNING: Support for TPM version 1.2 is discontinued. With Apply –no-hardware-warning option to ignore the warnings and proceed with the transaction.
esxcli software profile update -d /vmfs/volumes/datastore1/_ISO/ESXi-8.0.1-20842819-USBNIC.zip -p ESXi-8.0.1-20842819-USBNIC --no-hardware-warning
Update Result
Message: The update completed successfully, but the system needs to be rebooted for the changes to be effective.
Reboot Required: true
During VMware Explore 2022 Barcelona, I’ve been given a gift as a vExpert. You could read it in my previous article. NX6412 doesn’t support onboard NICs. We will need Custom ISO with USB Network Native Driver for ESXi. Because of problem using latest PowerCLI 13 release Nov 25, 2022 with export ISO. I decided to install Custom ISO ESXi 7u2e and than upgrade to ESXi 8.0 with depot zip.
Thank You Cohesity. Power consumpion is only 10 Watts …
How to prepare ESXi Custom ISO image 7U2e for NX6412 NUC?
Currently there is a limitation in ESXi where USB NIC bindings are picked up much later in the boot process and to ensure settings are preserved upon a reboot, the following needs to be added to /etc/rc.local.d/local.sh based on your configurations.
vusb0_status=$(esxcli network nic get -n vusb0 | grep 'Link Status' | awk '{print $NF}')
count=0
while [[ $count -lt 20 && "${vusb0_status}" != "Up" ]]
do
sleep 10
count=$(( $count + 1 ))
vusb0_status=$(esxcli network nic get -n vusb0 | grep 'Link Status' | awk '{print $NF}')
done
esxcfg-vswitch -R
esxcli software profile update -d /vmfs/volumes/datastore1/_ISO/ESXi-8.0.0-20513097-USBNIC.zip -p ESXi-8.0.0-20513097-USBNIC
Hardware precheck of profile ESXi-8.0.0-20513097-USBNIC failed with warnings: <TPM_VERSION WARNING: TPM 1.2 device detected. Support for TPM version 1.2 is discontinued. Installation may proceed, but may cause the system to behave unexpectedly.>
You could fix TPM_VERSION WARNING: Support for TPM version 1.2 is discontinued. With Apply –no-hardware-warning option to ignore the warnings and proceed with the transaction.