“STS Signing Certificates are about to expire”: vCenter STS Certificate Guide (7, 8, 9)

vCenter alarm “STS Signing Certificates are about to expire”? Check the STS certificate, renew it in vSphere Client or vCert, avoid No Healthy Upstream.

Short answer: the vCenter alarm “STS Signing Certificates are about to expire” means the Security Token Service signing certificate, which signs every vCenter SSO token, is within 90 days of expiry. Renew it before it lapses: in the vSphere Client (Administration → Certificate Management → STS signing certificate → Refresh with vCenter certificate) while vCenter still works, or with vCert over SSH if it doesn’t. An expired STS certificate breaks logins and can cause No healthy upstream.

Certificates in vCenter are usually associated with Machine SSL, Solution Users, or trusted roots. However, there is another certificate that can have a very large operational impact: the Security Token Service signing certificate, commonly known as the STS signing certificate.

The STS certificate is not the certificate you see in your browser when opening the vSphere Client. It is part of the vCenter Single Sign-On authentication flow. When a user or internal service authenticates, STS validates the primary credentials and issues a SAML token containing user or service attributes. That token is then used by vCenter services to trust the authenticated identity.

In short: if STS cannot issue valid tokens, vCenter authentication starts to break.

Broadcom describes the STS certificate as critical for vSphere SSO because it is responsible for issuing, validating, and renewing security tokens.


What is the STS signing certificate?

The Security Token Service is part of vCenter Single Sign-On. Its job is to issue signed SAML tokens after successful authentication.

By default, the VMware Certificate Authority, or VMCA, generates the STS signing certificate. In most environments, the default VMCA-issued STS certificate is sufficient. A fresh installation of vSphere 7.0 Update 1 or later creates an STS signing certificate valid for 10 years, while KB 318968 describes a lifetime of around two years in its replacement scenarios, so check the actual date on your system rather than assume. You can refresh it with a new VMCA-issued certificate, or import a custom / third-party STS signing certificate if your company security policy requires all certificates to be replaced.

However, replacing the STS certificate should not be treated as a routine cosmetic change. Broadcom specifically warns that refreshing the STS certificate with a vCenter-issued certificate can replace third-party/custom certificates and may take the environment out of compliance if custom certificates are required.


Why does STS expiration matter?

When the STS signing certificate expires, vCenter may no longer be able to issue valid SAML tokens. This affects both users and internal solution users.

The result can be severe:

  • vSphere Client login failures
  • vCenter services failing to start after reboot
  • vmware-stsd service not starting
  • vpxd authorization errors
  • Signing certificate is not valid
  • No Healthy Upstream
  • failures in Enhanced Linked Mode environments
  • problems exporting OVF templates
  • certificate replacement workflows failing because authentication itself is broken

Broadcom’s KB for "Signing certificate is not valid" or "No healthy upstream" explains that these issues occur when the STS certificate or its signing root certificate has expired, preventing internal services and solution users from acquiring valid tokens.

This is why an STS certificate problem can look much bigger than a normal certificate warning. It can make the entire vCenter feel broken.


Typical symptoms

If the STS certificate is already expired, you may see errors such as:

HTTP Status 400 – Bad Request
Signing certificate is not valid
Cannot connect to vCenter Single Sign-On server
https://VC_FQDN/sts/STSService/vsphere.local
503 Service Unavailable
No Healthy Upstream

You may also see service startup failures after reboot. Broadcom notes that an expired STS certificate can prevent the vmware-stsd service from starting, which then causes dependent vCenter services to fail as well.


The warning: “STS Signing Certificates are about to expire”

In newer vCenter versions, you may receive the following alarm in the vSphere UI:

STS Signing Certificates are about to expire

This alarm means that the STS certificate for the vCenter Server Appliance is nearing expiration. Broadcom states that if the STS signing certificates expire without being replaced, vCenter will no longer be functional.

That warning should not be ignored.

When the alarm fires, and why it says 90 days when vCert says 91

The alarm starts 90 days before expiry and repeats once a week, then daily from seven days before expiry (Broadcom TechDocs). It actually triggers 90.999 days before the expiration date, so the alarm can say “expires in 90 days” while vCert reports 91. That is expected behaviour, not a second problem (KB 429527).

VMware Security Token Service “Healthy with warnings”

If the VMware Security Token Service shows warnings in the service health view or triggers a health alarm, two documented causes are worth checking:

  • The STS signing certificate is close to expiry. Check its Valid until date as described below and renew it.
  • The appliance is short on memory. During workload spikes the STS Java process can fail to allocate memory, exit with code 143 and be restarted by vMon, so its health briefly turns red and then green again. The SSO log directory then contains hs_err_sts_pid<PID>.log files. One-off events can be ignored; if it keeps happening, add RAM to the VCSA (KB 433542).

How to check the STS certificate

For vCenter 7.0 Update 2 and later, the STS certificate can be checked from the vSphere Client:

vSphere Client
→ Administration
→ Certificates
→ Certificate Management
→ STS signing certificate

The UI shows the Valid until date, certificate status, and certificate chain details. Broadcom recommends checking the STS certificate periodically, because the general certificate expiry alarm does not account for the STS certificate in the same way.

checksts.py is deprecated: use vCert instead

For command-line or advanced checks, Broadcom now recommends using vCert instead of the older checksts.py script. The checksts.py script is deprecated, and vCert is the current recommended tool for certificate management and replacement workflows.


Recommended tool: vCert

Broadcom provides vCert.py, a menu-driven tool for certificate management on vCenter Server 7.0, 8.0, and 9.0. Its purpose is to simplify certificate replacement when certificates expire or are about to expire.

Basic usage:

unzip -q vCert-<version>.zip
cd vCert-<version>
chmod +x vCert.py
./vCert.py

Useful menu paths:

2. View certificate info
→ 8. STS signing certificates
3. Manage certificates
→ 8. STS signing certificates

Broadcom’s KB also states that vCert creates logs under:

/var/log/vmware/vCert

and uses a working directory under:

/root/vCert-master

for staging and backups.


Replacing or refreshing the STS certificate before it expires

If the STS certificate is still valid and the vSphere Client is accessible, the preferred approach is usually to refresh it from the UI.

Path:

vSphere Client
→ Administration
→ Certificate Management
→ STS signing certificate
→ Actions
→ Refresh with vCenter certificate

Broadcom marks Refresh with vCenter certificate as the recommended UI option. It generates a new VMCA-issued STS certificate. In vSphere 8.0 and later, refreshing or replacing the STS signing certificate no longer requires a vCenter restart (TechDocs).

There is also an Import and Replace Certificate option for custom or third-party certificates. Use this only when required by your company security policy.

Important: Before making certificate changes, create proper offline snapshots of all vCenter Server appliances in the environment. In Enhanced Linked Mode, this means all vCenter / PSC nodes in the same SSO domain. Broadcom explicitly recommends snapshots before STS certificate replacement operations.


What if vCenter is already broken?

If the STS certificate has already expired, the vSphere Client may not be usable. You may be stuck with:

No Healthy Upstream

or:

Signing certificate is not valid

In that case, use vCert directly on the VCSA via SSH. Broadcom recommends vCert for checking and replacing STS signing certificates when vCenter is inaccessible.

The high-level recovery flow is:

1. Take offline snapshot / backup.
2. SSH to VCSA as root.
3. Upload and extract vCert.
4. Run ./vCert.py.
5. Check STS signing certificate.
6. Replace STS signing certificate.
7. Restart services if required.
8. Validate vSphere Client login.

Never skip the snapshot step. Certificate repair can make the situation worse if performed incorrectly.


Important note for vSphere 8

In vSphere 8.0, vCenter Single Sign-On can automatically renew a VMCA-generated STS signing certificate before it expires. However, Broadcom has documented rare cases where an STS refresh happening during long-running vSphere Lifecycle Manager operations can cause task failures due to cached STS certificate data.

So even with automatic renewal, it is still useful to know where the STS certificate is, how to check it, and how it affects authentication.


Best practices

My practical checklist:

1. Check STS certificate validity regularly.
2. Do not wait until the last week before expiration.
3. Replace if the certificate expires within 6 months.
4. Use vSphere Client if vCenter is still healthy.
5. Use vCert if vCenter login or services are already broken.
6. Take offline snapshots before any certificate operation.
7. In ELM, snapshot all vCenter/PSC nodes in the SSO domain.
8. Be careful with custom/third-party STS certificates.
9. Document the certificate state before and after replacement.
10. Validate vCenter login, service health, and integrations after replacement.

Broadcom recommends replacing the STS certificate if it is set to expire within six months. If expiration is more than six months away, schedule the replacement for an appropriate maintenance window.


Summary

The STS signing certificate is easy to overlook because it is not the browser-facing Machine SSL certificate. But it is one of the most important certificates in vCenter authentication.

When it expires, the impact can be dramatic: broken SSO, failed service startup, Signing certificate is not valid, and even No Healthy Upstream.

The key lesson is simple:

Do not wait for STS expiration to become an outage. Check it, plan it, snapshot first, and use the supported Broadcom workflows.

Not the same certificate: the STS signing certificate is different from the STS service’s TLS certificate on port 3128. If vCert reports STS_INTERNAL_SSL_CERT as LEGACY, or a scanner flags an old certificate on 3128 after you renewed Machine SSL, see STS_INTERNAL_SSL_CERT Explained: What vCert’s LEGACY Result Means. For which certificates vCenter now renews on its own, see vCenter Certificate Auto-Renewal: When You Still Need vCert.

Related vCenter certificate guides


References

  • Broadcom KB 318197 — "STS Signing Certificates are about to expire" alert received in vSphere UI
  • Broadcom KB 316619 — "Signing certificate is not valid" or "No healthy upstream" error in vCenter Server Appliance
  • Broadcom KB 385107 — vCert - Scripted vCenter expired certificate replacement
  • Broadcom KB 318968 — Checking the STS certificate expiration and replacing expired STS certificates on vCenter Servers
  • Broadcom KB 423367 — How to Export the STS Certificate from vCenter Server
  • Broadcom KB 429527 – The alarm "STS Signing Certificates are about to expire" is issued but it actually expires in 91 days
  • Broadcom KB 433542 – sts status changed from green to red alarm triggered in vCenter Server
  • Broadcom TechDocs – Managing the vCenter Security Token Service

lsdoctor: Check and Repair the vCenter Lookup Service (6.7 to 9.x)

Broadcom lsdoctor for vCenter 6.7-9.x: where to download it (KB 320837), how to run it safely, and which option fixes which Lookup Service problem.

lsdoctor (Lookup Service Doctor, lsdoctor.py) is Broadcom’s script for checking and repairing the vCenter Lookup Service: stale registrations, SSL trust mismatches, solution users and broken service registrations. The current build is lsdoctor-260716 (July 2026) and it supports vCenter 6.7 and later, including 7.x, 8.x and 9.x. Download it only from Broadcom KB 320837, take offline snapshots of every node in the SSO domain, and always start with the read-only --lscheck.

If the problem is an expired or mismatched certificate rather than the Lookup Service itself, check and replace certificates with vCert first.

lsdoctor at a glance

Current buildlsdoctor-260716.zip, added 16 Jul 2026 (always take the latest attachment from KB 320837)
SupportedvCenter Server 6.7 and later, VCSA or Windows-based, including 7.x, 8.x and 9.x. Support for the newest builds can lag behind a vCenter release.
DownloadOnly from Broadcom KB 320837. Verify the SHA256 listed in the KB.
Where to run itMost options run on any node in the same SSO site as the affected node. --stalefix and --solutionusers run on the affected node itself.
OutputFindings per node, shown as SSO site plus hostname/PNID, and the path to a JSON report
Safe first step--lscheck makes no changes

Before you run lsdoctor

  • Take offline snapshots of the whole SSO domain. KB 320837 is explicit: shut down all vCenter Servers and PSCs in the SSO domain at the same time, snapshot them, then power them on again. If you need to roll back, shut them all down and revert them together, otherwise replication between nodes breaks.
  • Pick the right node. Run checks from a node in the same SSO site as the one with the problem. For --stalefix and --solutionusers, log in to the affected node.
  • Check for a custom login banner. lsdoctor reads the vCenter version from /etc/issue. A custom banner makes it fail with IndexError: list index out of range (see fixing lsdoctor’s IndexError on 8.0.3).
  • Plan for follow-up work. Every option except --lscheck ends with a service restart, and most require re-registering external solutions such as backup, storage or monitoring plugins.

Download and install lsdoctor

Download the zip from KB 320837 and copy it to the node, for example with WinSCP. If WinSCP can’t connect to the appliance, set root’s login shell to bash first (chsh -s /bin/bash root). On the VCSA:

# cd /root
# sha256sum lsdoctor-260716.zip      # compare with the SHA256 in KB 320837
# unzip lsdoctor-260716.zip
# cd lsdoctor-*
# python lsdoctor.py --help

Always run lsdoctor from the extracted directory. On a Windows-based vCenter 6.7, extract the zip with Extract All, then run it with the bundled Python:

cd "C:\Program Files\VMware\vCenter Server\python"
.\python.exe <path_to_lsdoctor.py> <option>

lsdoctor options

OptionWhat it doesRun onFollow-up
-l, --lscheckChecks for common Lookup Service issues. Makes no changes.Any node in the SSO siteReview the output and the JSON report; it tells you which fix applies
-t, --trustfixCorrects SSL trust mismatches in the Lookup ServiceAny node in the SSO siteRestart services on all nodes in the SSO site; re-register external solutions
-s, --stalefixCleans up stale configuration left over from systems upgraded from 5.xThe affected nodeRestart all services; re-register external solutions
-u, --solutionusersRecreates the solution users for a nodeThe affected nodeRestart services on that node
-r, --rebuildRebuilds one or all service registrations for a nodeAny node in the SSO siteRestart services; re-register external solutions
-p, --pscHaUnconfigureRemoves a PSC High Availability (load balancer) configurationSee KB 320837Restart services on all PSCs; repoint vCenter; re-register external solutions

--rebuild uses registration templates that match your vCenter build. If lsdoctor has no template for your exact build, it asks you to pick the closest one. It also keeps automatic backups of the registrations it changes, and the same menu can restore them.

Which lsdoctor option for which problem

What you seeStart withThen
Upgrade, patch or repoint pre-checks fail with Lookup Service or registration errors--lscheckThe fix it recommends (usually --trustfix, --stalefix or --rebuild)
Plugins or solutions fail after replacing the Machine SSL certificate; certificate mismatch in Lookup Service registrations--lscheck--trustfix, or vCert option 4 (Manage SSL trust anchors)
Leftover registrations from a vCenter upgraded from 5.x--lscheck--stalefix on the affected node
Solution user errors on one node--lscheck--solutionusers on that node
Missing or broken service registrations--lscheck--rebuild
Retiring a PSC HA load balancer–--pscHaUnconfigure, then repoint vCenter
lsdoctor itself fails with IndexError: list index out of rangeCheck /etc/issueRestore the default banner temporarily

lsdoctor vs vCert

ToolFixesUse it when
lsdoctorLookup Service data: registrations, trust in registrations, solution users, stale entriesServices can’t find or trust each other, or upgrades fail on registration checks
vCertThe certificates themselves: Machine SSL, Solution Users, STS, VMCA, ESXi, trust anchorsCertificates are expired, expiring or replaced, or you see no healthy upstream after an expiry

The two overlap on trust anchors. A common sequence is: fix the certificates with vCert, then run lsdoctor --lscheck to confirm the Lookup Service registrations trust the new certificate.

Related vCenter guides

Full reference: Broadcom KB 320837 – Using the lsdoctor tool.

Critical Security Alert: Update to Fixed Version 8.0 U3d Immediately

CVE-2024-38812 is a CVSS 9.8 vCenter RCE exploited in the wild. Versions before 8.0 U3d and 7.0 U3t are affected: patch steps with software-packages.

Urgent Notice from VMware by Broadcom

Short answer: CVE-2024-38812 (CVSS 9.8, a heap overflow in vCenter’s DCERPC implementation) and CVE-2024-38813 are covered by VMSA-2024-0019. All vCenter versions before 8.0 U3d and 7.0 U3t are affected, the September 2024 patches were incomplete, and Broadcom confirmed exploitation in the wild in November 2024. If you are still below those builds, patch now, and always take the latest build from the advisory’s Response Matrix.

VMware has announced that the security patches released on September 17, 2024, intended to address CVE-2024-38812, did not fully mitigate the vulnerability. As a result, all customers are strongly advised to update to the latest version, 8.0 U3d, immediately. Patches for the 8.0 U2 line are also available to address this issue.

This urgent advisory applies to all vCenter Server users, as the newly identified vulnerabilities pose a significant security risk. Notably, two critical vulnerabilities were reported in vCenter Server, including a heap-overflow vulnerability and a privilege escalation vulnerability. These have been responsibly reported to VMware, which has now provided updates to address them.

Key Vulnerability: Heap-Overflow in vCenter Server (CVE-2024-38812)

Vulnerability Description:

A critical heap-overflow vulnerability was discovered in vCenter Server, specifically in its implementation of the DCERPC protocol. The issue has been assigned CVE-2024-38812 and carries a CVSSv3 base score of 9.8, placing it in the Critical severity range.

Known Attack Vectors:

This vulnerability can be exploited by a malicious actor who has network access to the vCenter Server. By sending a specially crafted network packet, the attacker could trigger the heap-overflow, potentially leading to remote code execution (RCE) on the affected system.

Why You Should Patch Now

This vulnerability could allow attackers to gain control over your vCenter Server environment, putting your infrastructure at risk for unauthorized access, data breaches, or service disruptions. Given the widespread use of vCenter Server for managing virtual environments, this threat is extremely serious, especially for businesses relying on VMware for critical operations.

Patch Availability

The new patches, which can be found in the Response Matrix, have been made available for both the 8.0 U3, 8.0 U2 and 7.0 U3 versions of vCenter Server. Customers should apply the new patches immediately to ensure their systems are protected.

What to Do:

  1. Check your version: Identify if your vCenter Server version is affected.
  2. Apply the patches: Use the Response Matrix provided by VMware to download and install the necessary updates.
  3. Follow VMware’s best practices: Regularly update your systems, review security advisories, and apply patches as soon as they are released to minimize security risks.

Mount VMware-vCenter-Server-Appliance-8.0.3.00400-24322831-patch-FP.iso to VCSA VM. Log in to the appliance shell as a user with super administrative privileges (for example, root) and run the following commands:

# To stage the ISO:
software-packages stage --iso

# To see the staged content:
software-packages list --staged

# To install the staged rpms:
software-packages install --staged

vCenter 8 Session Timeout Settings and the 8.0 U3b vSphere Client Idle Session Bug (Fixed in 8.0 U3c)

How to set the vSphere Client session timeout in vCenter 8.0 and 9.x, and why sessions broke after 50 idle minutes on 8.0 U3b until the 8.0 U3c fix.

Short answer: In vCenter 8.0, the vSphere Client session timeout is set in Administration > Deployment > Client Configuration > Edit > Session timeout (minutes, default 120). Alternatively, set session.timeout in /etc/vmware/vsphere-ui/webclient.properties. If sessions die after about 50 idle minutes on vCenter 8.0 U3b (8.0.3.00200), that is a Tomcat bug, not a setting. It is fixed in 8.0 U3c (build 24305161) and later.

vCenter 8 session timeout settings (vSphere Client)

By default, vSphere Client sessions close after 120 minutes of inactivity. You need the Global > Settings privilege to change it.

  1. In the vSphere Client Home menu, select Administration.
  2. Under Deployment, click Client Configuration.
  3. Click Edit. The Edit client configuration dialog opens.
  4. Enter the new value in minutes in Session timeout and click Save.
  5. Log in to the vSphere Client again for the change to take effect.

Alternative: webclient.properties

The same value lives in the vSphere Client properties file on the appliance. The file method is documented for vSphere 7.0 and 9.1:

# /etc/vmware/vsphere-ui/webclient.properties
session.timeout = 60

# apply
service-control --restart vsphere-ui

Uncomment the line if needed. The value is in minutes. The documentation says that a negative value or 0 means the client never times out. That is convenient in a lab but a bad idea in production. The vSphere Security guide recommends setting timeouts so that idle sessions cannot be misused.

vCenter 9 session timeout

The vSphere 9.1 documentation keeps both methods: Home > Administration > Deployment > Client Configuration > Edit, or session.timeout in /etc/vmware/vsphere-ui/webclient.properties. Default is still 120 minutes. After the change, restart the VMware vSphere Client service. Use service-control --restart vsphere-ui over SSH, or VAMI (https://<vcenter>:5480) > Services > VMware vSphere Client > Restart.

VersionUI pathFileApply
vCenter 8.0Administration > Deployment > Client Configurationwebclient.properties (session.timeout)Re-login (UI); restart vsphere-ui (file)
vCenter 9.xAdministration > Deployment > Client Configuration/etc/vmware/vsphere-ui/webclient.propertiesRestart VMware vSphere Client service

What went wrong in vCenter 8.0 U3b (8.0.3.00200)

vCenter Server 8.0 Update 3b (17 Sep 2024, build 24262322, patch VMware-vCenter-Server-Appliance-8.0.3.00200-24262322-patch-FP.iso) upgraded Apache Tomcat to 9.0.91. That Tomcat version changed the default of org.apache.catalina.connector.RECYCLE_FACADES from FALSE to TRUE. As a result, a vSphere Client session left idle for more than 50 minutes became invalid (PR 3439359). You could not log in or out, or use the client in that browser, until you cleared all cookies.

Symptoms listed in Broadcom KB 377734, usually after 1 to 2 idle hours:

  • The loading circle keeps spinning, and session timeouts occur.
  • Inventory errors: You have no privileges to view this object or it is deleted.
  • The login button is greyed out, or login fails with An error occurred while fetching identity providers.
  • ServiceClosedException: AsyncTokenProvider has been closed in /var/log/vmware/vsphere-ui/vsphere_client_virgo.log and /var/log/vmware/apig/apigw.log.

Raising the session timeout does not help here. The session breaks because of the Tomcat change, not because the configured timeout expires.

The fix: vCenter 8.0 U3c or later

vCenter Server 8.0 Update 3c (09 Oct 2024, ISO build 24305161, patch VMware-vCenter-Server-Appliance-8.0.3.00300-24305161-patch-FP.iso) contains only this fix (PR 3439359). Any later 8.0 U3 patch also includes it. Download the patch from the Broadcom Support Portal; this requires a login with an entitled account. If you patch now, go straight to the latest 8.0 U3 build rather than to U3c.

Workaround for 8.0 U3b (KB 377734)

If you cannot patch yet, disable RECYCLE_FACADES for the vSphere Client. SSH to vCenter as root:

root@vcsa-home [ ~ ]# cp /usr/lib/vmware-vsphere-ui/server/conf/catalina.properties /root/catalina.properties.bak

root@vcsa-home [ ~ ]# echo "org.apache.catalina.connector.RECYCLE_FACADES=false" >> /usr/lib/vmware-vsphere-ui/server/conf/catalina.properties

root@vcsa-home [ ~ ]# service-control --restart vsphere-ui

I ran exactly this on my home lab vCenter before 8.0 U3c was out. It only restarts the vSphere Client service.

Same symptoms on a newer build?

KB 377734 says that if you see this behaviour on a later version, you should hide third-party client plug-ins to find the cause. Go to Administration > Solutions > Client Plugins, select the third-party plug-in and click HIDE. This removes the plug-in’s UI extensions while its service keeps running.

Sources

Related on vdan.cz

vSphere Client Instability After vCenter 8.0.3.00200 (8.0 U3b): Moved

This note moved. The full article covers the vCenter 8.0 U3b idle session bug, KB 377734, the 8.0 U3c fix and vCenter session timeout settings.

This note has been merged into a single, updated article.

After upgrading to vCenter Server 8.0.3.00200 (8.0 Update 3b), the vSphere Client could become unresponsive after a long idle period. The cause was a changed Tomcat default (RECYCLE_FACADES), described in Broadcom KB 377734. It is fixed in vCenter 8.0 Update 3c and later.

The full article covers the symptoms, the KB workaround, the fixed builds and how to set the vSphere Client session timeout in vCenter 8.0 and 9.x:

vCenter 8 Session Timeout Settings and the 8.0 U3b vSphere Client Idle Session Bug (Fixed in 8.0 U3c)

VMSA-2024-0019: Critical VMware vCenter Server Vulnerabilities (CVE-2024-38812, CVE-2024-38813) Addressed

VMSA-2024-0019 covers vCenter heap-overflow CVE-2024-38812 and privilege escalation CVE-2024-38813. Affected versions and fixed builds (8.0 U3d, 7.0 U3t).

VMware has released an important security advisory, VMSA-2024-0019, detailing updates for VMware vCenter Server that address two significant vulnerabilities: a heap-overflow vulnerability (CVE-2024-38812) and a privilege escalation vulnerability (CVE-2024-38813). Both of these vulnerabilities could have severe implications if exploited, making it crucial for administrators to apply the necessary patches promptly.

Heap-Overflow Vulnerability (CVE-2024-38812)

Description: The first vulnerability, identified as CVE-2024-38812, is a heap-overflow vulnerability found in the vCenter Server’s implementation of the DCERPC protocol. This issue has been classified by VMware as Critical, with a maximum CVSSv3 base score of 9.8, indicating the potential for severe impact.

Known Attack Vectors: A malicious actor with network access to the vCenter Server can exploit this vulnerability by sending a specially crafted network packet. Successful exploitation could lead to remote code execution (RCE), allowing the attacker to execute arbitrary code on the vCenter Server with potentially full system privileges. This level of access could be used to disrupt services, exfiltrate sensitive data, or further compromise the virtual environment.

Privilege Escalation Vulnerability (CVE-2024-38813)

Description: The second vulnerability, CVE-2024-38813, is a privilege escalation flaw within the vCenter Server. VMware has rated this issue as Important, with a CVSSv3 base score of 7.5. While not as severe as the heap-overflow vulnerability, it still poses a significant risk.

Known Attack Vectors: An attacker with network access to the vCenter Server can exploit this vulnerability by sending a specially crafted network packet. If successful, the attacker could escalate their privileges to root, gaining full administrative control over the vCenter Server. This level of access could enable the attacker to make unauthorized changes, access sensitive information, or disrupt the entire virtual infrastructure.

More info VMSA-2024-0019:VMware vCenter Server updates address heap-overflow and privilege escalation vulnerabilities (CVE-2024-38812, CVE-2024-38813)

vmss2core: Where to Download It and How to Convert VM Snapshots (.vmsn/.vmss + .vmem) into Windows and Linux Memory Dumps

vmss2core in 2026: where to download it, which .vmsn/.vmss/.vmem files it needs, -W/-W8/-N commands, WinDbg analysis and common errors.

Short answer: vmss2core converts a VM checkpoint (a snapshot with memory, .vmsn + .vmem, or a suspend file, .vmss + .vmem) into a memory dump for WinDbg or the Linux crash utility. Get the current build from VMware Workstation Pro or Fusion; the standalone Fling in Broadcom’s Free Downloads is older (build 8456865) and does not support Windows 11, Server 2019 or Server 2025. Run vmss2core.exe -W8 vm.vmsn vm.vmem for modern Windows, -N for Linux.

vmss2core converting a VMware VM snapshot (.vmsn and .vmem) into a memory dump

What the vmss2core tool does and which files it needs

vmss2core reads VMware checkpoint state and writes a core or memory dump that standard debuggers understand: memory.dmp for Windows (WinDbg) or vmss.core for Linux (crash, GDB). It is useful when a guest hangs and you cannot force a crash dump from inside the OS.

MethodFiles to copyNotes
Snapshot with memory<name>-SnapshotN.vmsn + <name>-SnapshotN.vmemVM keeps running. Pick the newest pair by timestamp.
Suspend<name>.vmss + <name>.vmemHardware version 11 or newer, or VMs on vVols, write a separate .vmem. Hardware version 10 or lower keeps everything in the .vmss.

The .vmem file is the guest memory image. The .vmsn/.vmss file holds the device and CPU state. You always pass the state file first and the .vmem second.

vmss2core download: where to get it now

The old Flings site and vmwa.re/flings links are gone. Flings now live in the Free Downloads section of the Broadcom Support Portal, which needs a free Broadcom account (personal email addresses are accepted).

SourceVersionUse it for
Broadcom Support Portal > Free Downloads > Flings > VMSS2CoreLegacy standalone build 8456865 (Windows and Linux binaries)Older guests only. Not for Windows 11, Server 2019 or Server 2025.
VMware Workstation Pro (Free Downloads)Current, bundledAny supported guest, including Windows 11 and Server 2025
VMware Fusion Pro (Free Downloads)Current, bundledSame, on macOS

Once Workstation or Fusion is installed, the binary is here:

  • Windows 64-bit: C:\Program Files (x86)\VMware\VMware Workstation\vmss2core.exe
  • Windows 32-bit: C:\Program Files\VMware\VMware Workstation\
  • Linux: /usr/bin/ (Broadcom’s KB calls the Linux binary vmss2core-Linux64; same syntax)
  • macOS (Fusion): /Library/Application Support/VMware Fusion/

Get the latest vmss2core.exe without installing Workstation

  1. Download the VMware Workstation Pro installer from Free Downloads (Broadcom’s example: VMware-Workstation-Full-25H2u1-25219725.exe).
  2. Open the installer with 7-Zip, then open Workstation.cab inside it.
  3. Copy vmss2core.exe and _zlib1.dll to one folder, for example C:\Temp\vmss2core.
  4. Rename _zlib1.dll to zlib1.dll. Without this you get “The code execution cannot proceed because zlib1.dll was not found.”

Get the snapshot or suspend files from ESXi

vSphere Client datastore browser showing the .vmsn and .vmem snapshot files to download for vmss2core
  1. Reproduce the problem so the guest is in the state you want to capture. The guest kernel must be loaded; a VM stuck in BIOS/POST or before the OS boots gives no usable data.
  2. In the vSphere Client, right-click the VM and take a snapshot with the VM’s memory included, or suspend it (Power > Suspend). From the ESXi Shell you can suspend with vim-cmd vmsvc/getallvms and vim-cmd vmsvc/power.suspend <VMID>.
  3. Browse the datastore to the VM folder (/vmfs/volumes/<datastore>/<vm_name>/) and download the .vmsn or .vmss file and the matching .vmem.
  4. Copy them to the folder that contains vmss2core.

On vSAN the .vmem is an object; Broadcom KB 326327 describes reading its object ID and exposing it with objtool before copying. For Horizon desktops, put full clones in maintenance mode before suspending; for instant clones, use a memory snapshot instead. The Broadcom KBs are written for ESXi 8.x; memory snapshots and suspend work the same way in vSphere 9.

vmss2core for Windows: -W or -W8

OptionGuest OS (Broadcom KB 323788)
-WWindows 7, Windows 10, Windows Server 2008, 2008 R2
-W8Windows 8, 8.1, Windows 11, Windows Server 2012, 2016, 2019, 2025
-NLinux
vmss2core.exe -W8 test-vm.vmsn test-vm.vmem
vmss2core.exe -W8 test-vm.vmss test-vm.vmem
vmss2core.exe -W  old-vm.vmsn old-vm.vmem

KB 181598 phrases it slightly differently: -W8 for Windows 8 / Server 2012 and later, -W for older Windows. The two KBs disagree on Windows 10. Success produces memory.dmp in the current folder.

vmss2core for Linux guests: -N

./vmss2core-Linux64 -N vm-Snapshot1.vmsn vm-Snapshot1.vmem
vmss2core.exe -N vm-Snapshot1.vmsn vm-Snapshot1.vmem

The result is vmss.core, a Red Hat crash-format core. The tool’s help says -N uses kernel structure offsets passed with -l, generated by getlinuxoffsets. Here is my own -N run from the original version of this post (vmss2core build 20800274, about 2,000 MB written, progress lines shortened):

vmss2core.exe -N VM-Snapshot1.vmsn VM-Snapshot1.vmem
vmss2core version 20800274 Copyright (C) 1998-2022 VMware, Inc. All rights reserved.
Started core writing.
Writing note section header.
Writing 1 memory section headers.
Writing notes.
... 100 MBs written.
... 200 MBs written.
...
... 1900 MBs written.
... 2000 MBs written.
Finished writing core.

Analyze the VMware memory dump

  • Windows, WinDbg: windbg -y <SymbolPath> -z memory.dmp, or File > Open Crash Dump (Ctrl+D). Start with !analyze -v, then .bugcheck, lm and !process 0 0.
  • Linux, crash: crash vmlinux vmss.core. crash needs two arguments for a dump file: the uncompressed kernel (vmlinux with debug info matching the guest kernel) and the dump.

vmss2core errors and fixes

SymptomCause and fix
Unrecognized .vmss file (magic 4f434e45), 0 KB memory.dmpVM files are encrypted (Windows 11 / Server 2025 with vTPM). Suspend the VM, decrypt on ESXi with crypto-util (below), convert the decrypted files with the current vmss2core.
Error parsing Windows data. Cannot create memory.dmpWindows kernel was not loaded yet (stuck in POST, no boot device, boot failure). Capture again after the OS is up.
0 KB dump, or a .core file instead of memory.dmpVBS or Hyper-V is enabled in the guest. Check vhv.enable = "TRUE" in the .vmx; the KB says to set it to "FALSE". Also update old Windows builds.
Access is DeniedUse the latest vmss2core from Workstation Pro.
EFI VM freezes on a black screen, Cannot translate linear addressEFI SMM deadlock on hardware version below 14 (ESXi 7.0). Fixed in ESXi 8.0; workaround is hardware version 14 or later (KB 318382).
crypto-util encobj decrypt --related vm-###.vmx vm-###.vmem vm-###-decrypted.vmem
crypto-util encobj decrypt --related vm-###.vmx vm-###.vmss vm-###-decrypted.vmss
vmss2core.exe -W8 vm-###-decrypted.vmss vm-###-decrypted.vmem

Do not remove the vTPM to get around encryption: Broadcom warns that this makes encrypted data unrecoverable and stops Windows 11 from booting.

vmss2core options reference

Output of vmss2core.exe without arguments on my machine (build 20800274, abridged):

Usage:
GENERAL:  vmss2core [[options] | [-l linuxoffsets options]] \
          <vmss file> [<vmem file>]

Without options one vmss.core<N> per vCPU with linear view of
memory is generated.
-q      Quiet(er) operation.
-M      Create core file with physical memory view (vmss.core).
-l str  Offset stringset expressed as 0xHEXNUM,0xHEXNUM,... .
-N      Red Hat crash core file for arbitrary Linux version
        described by the "-l" option (vmss.core).
-N4     Red Hat crash core file for Linux 2.4 (vmss.core).
-N6     Red Hat crash core file for Linux 2.6 (vmss.core).
-O <x>  Use <x> as the offset of the entrypoint.
-U <i>  Create linear core file for vCPU <i> only.
-P      Print list of processes in Linux VM.
-P<pid> Create core file for Linux process <pid> (core.<pid>).
-S      Create core for 64-bit Solaris (vmcore.0, unix.0).
-S32    Create core for 32-bit Solaris (vmcore.0, unix.0).
-W      Create WinDbg file (memory.dmp) with commonly used
        build numbers ("2195" for Win32, "6000" for Win64).
-W<num> Create WinDbg file (memory.dmp), with <num> as the
        build number (for example: "-W2600").
-WK     Create a Windows kernel memory only dump file (memory.dmp).
-WDDB<num> or -W8DDB<num>
        Create WinDbg file (memory.dmp), with <num> as the
        debugger data block address in hex.
-WSCAN  Scan all of memory for Windows debugger data blocks
        (instead of just low 256 MB).
-W8     Generate a memory dump file from a suspended Windows 8 VM.
-X32    <mach_kernel> Create core for 32-bit Mac OS.
-X64    <mach_kernel> Create core for 64-bit Mac OS.
-F      Create core for an EFI firmware exception.

Sources

Related on vdan.cz

How to Rebuild a VMX File from vmware.log on an ESXi 8 Host via SSH

Lost or corrupted .vmx? Rebuild it from vmware.log on ESXi 8 with a short shell script over SSH (KB 1023880), including the #!/bin/ash fix for ESXi 8.

Introduction

Short answer: if a VM’s .vmx file is lost or corrupted, you can rebuild it from the configuration that ESXi writes into the VM’s vmware.log. SSH to the host, change to the VM’s folder, and run the small shell script below. On ESXi 8 the script needs #!/bin/ash as its first line, otherwise it fails with Operation not permitted. Back up the VM folder first.

Rebuilding a VMX file from vmware.log in VMware ESXi can be crucial for restoring a virtual machine’s configuration. This guide will walk you through the process using SSH according KB 1023880, but with update for ESXi 8.0. It was necessary add #!/bin/ash because of error “Operation not permitted”.

Step 1: SSH into Your ESXi Host

First, ensure SSH is enabled on your ESXi host. Then, use an SSH client to connect to the host.

Step 2: Navigate to the Virtual Machine’s Directory

Change to the directory where your VM resides. This is usually under /vmfs/volumes/.

cd /vmfs/volumes/name-volume/name-vm

Step 3: Create and Prepare the Script File

Create a new file named vmxrebuild.sh and make it executable:

touch vmxrebuild.sh && chmod +x vmxrebuild.sh

Step 4: Edit the Script File for ESXi 8

Edit the vmxrebuild.sh file using the vi editor:

  1. Run vi vmxrebuild.sh.
  2. Press i to enter insert mode.
  3. Copy and paste the following script (adjust for your ESXi host version).
  4. Press ESC, then type :wq! to save and exit.

Script Content for ESXi 8.0:

#!/bin/ash
VMXFILENAME=$(sed -n 's/^.*Config file: .*\/\(.\+\)$/\1/p' vmware.log)
echo -e "#\041/usr/bin/vmware" > ${VMXFILENAME}
echo '.encoding = "UTF-8"' >> ${VMXFILENAME}
sed -n '/DICT --- CONFIGURATION/,/DICT ---/ s/^.*DICT \+\(.\+\) = \(.\+\)$/\1 = \2/p' vmware.log >> ${VMXFILENAME}

Step 5: Run the Script

Execute the script to rebuild the VMX file:

./vmxrebuild.sh

Conclusion

This process extracts the necessary configuration details from the vmware.log file and recreates the VMX file, which is vital for VM configuration. Always back up your VM files before performing such operations.

vCenter Server 8.0 U2 Issue with Edit Settings Virtual Machine Hardware 9 or older

vCenter 8.0 U2 can’t edit settings of powered-on VMs with virtual hardware 9 or older in the vSphere Client. Symptoms, workarounds and resolution.

Introduction

I was unable to manage Virtual Machines with virtual Hardware Version 9 or older via the vSphere Client while they are in a powered on state.

Symptoms

  1. vCenter Server Version: The problem is specific to vCenter Server version 8.0 U2 – 22385739.
  2. Virtual Machine Hardware Version: Affected VMs are those with hardware version 9 or below.
  3. VM State: The issue occurs when the Virtual Machine is in a powered-on state.
  4. UI Glitches: In the vSphere Client, when attempting to open the ‘Edit Settings’ for the affected VMs, users notice red exclamation marks next to the Virtual Hardware and VM Options tabs. Additionally, the rest of the window appears empty, hindering any further action.

Impact and Risks:

The primary impact of this issue is a significant management challenge:

  • Users are unable to manage Virtual Machines with Virtual Hardware Version 9 or older through the vSphere Client while they remain powered on. This limitation can affect routine operations, maintenance, and potentially urgent modifications needed for these VMs.

Workarounds:

In the meantime, users can employ either of the following workarounds to manage their older VMs effectively:

  1. Power Off the VM: By powering off the VM, the ‘Edit Settings’ window should function correctly. While this is not ideal for VMs that need to remain operational, it can be a temporary solution for making necessary changes.
  2. Use ESXi Host Client: Alternatively, users can connect directly to the ESXi Host Client to perform the ‘Edit Settings’ operations. This method allows the VM to remain powered on, which is beneficial for critical systems that cannot afford downtime.

Resolution:

Keep an eye on updates from VMware for a permanent resolution to this issue Edit settings window fails to load on Virtual Machines with virtual hardware version 9 or older on vCenter Server 8.0U2 (94979).

Cisco UCS Manager Plugin for vSphere: Remote Plugin 4.0(0) and 4.0(1) for vCenter 8.0 U2, 8.0 U3 and 9.0

Cisco UCS Manager remote plugin for the vSphere HTML client: 4.0(0) vs 4.0(1), supported vCenter 7.0 U1 to 9.0, appliance sizing, install and Proactive HA.

Short answer: The Cisco UCS Manager plugin for vSphere is a remote plugin for the vSphere HTML client. It runs from its own OVA appliance. Version 4.0(0) was released in November 2023 and added support for vSphere 8.0 U2. The current release is 4.0(1). Cisco’s release notes list both versions for vSphere 7.0 U1 to U3, 8.0 GA to 8.0 U3, and 9.0, with UCS Manager 3.2 or later. The appliance needs 4 vCPU and 8 GB RAM.

I first wrote this post in November 2023 after rolling out 4.0(0) across about 13 UCS Manager domains and 411 ESXi 8.0 U2 hosts. This September 2026 update adds 4.0(1) and the current compatibility matrix from Cisco’s release notes, and keeps my hands-on notes.

Cisco UCS Manager plugin vSphere compatibility

vSphere HTML clientCisco UCS Manager plugin versions
7.03.0(4), 3.0(5), 3.0(6)
7.0 U1, 7.0 U23.0(5), 3.0(6), 4.0(0), 4.0(1)
7.0 U33.0(5), 3.0(6), 4.0(0), 4.0(1)
8.0, 8.0 U1, 8.0 U2, 8.0 U34.0(0), 4.0(1)
9.04.0(0), 4.0(1)

UCS Manager support is listed as “Release 3.2 and later”. Two known limitations are still open: CSCwi01415, where vCenter 7.0 GA is not supported (use 7.0 U1 or later), and CSCwi01422, where vSphere 8.0.1 does not show some appliance network fields (IP address, gateway, netmask).

Cisco UCS Manager remote plugin 4.0(0) vs 4.0(1)

ReleaseDateNew in this release
4.0(0)6 November 2023Plugin registration through the Cisco UCS Manager plugin appliance, registration of multiple vCenter Servers, support bundle logs (vCenter and appliance), adding and deleting custom faults, list of Proactive HA faults
4.0(1)Release notes created March 2024, last updated December 2025Plugin upgrade from the CLI, adding a certificate, changing the appliance IP and password, and actions removed for unmanaged servers. Fixes CSCwi01416, CSCwi01417, CSCwi01420, CSCwi01423, CSCwi03516 and CSCwj65650 (including FQDN registration and upper-case hostname issues).

If you are still on 4.0(0), move to 4.0(1). It fixes several registration bugs, and the CLI upgrade makes later updates easier.

What the plugin does in vCenter

  1. Physical hierarchy view of the UCS domain: chassis, blades, rack servers.
  2. Inventory: installed firmware, faults, and power and temperature statistics.
  3. Mapping of ESXi hosts to physical servers.
  4. Firmware management for B-Series and C-Series servers.
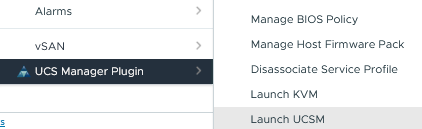
  5. Launch of the UCS Manager GUI and the KVM console from vCenter.
  6. Locator LED control.
  7. Cisco UCS provider for vSphere Proactive HA, with configurable faults.
Cisco UCS Manager plugin menu in the vSphere HTML client

Install the plugin and register vCenter

  1. Download the plugin OVA from Cisco Software Download (Cisco.com login required).
  2. Deploy the OVA with 4 vCPU and 8 GB RAM, on a 4 GB thin-provisioned or 100 GB thick-provisioned datastore.
  3. Log in to the appliance and register one or more vCenter Servers. The steps are in the chapter “Installing the Plug-in OVA and Registering the VMware vCenter Servers” of the user guide.
  4. In the vSphere client, open the plugin and register your UCS Manager domains.
  5. Optional: enable the Cisco UCS provider for Proactive HA on the cluster and choose which faults it should act on.
Cisco UCS Manager plugin login screen

Proactive HA experience from production

Proactive HA worked as intended with fault F1236. When it was raised, the plugin’s provider put the blade’s ESXi host into Quarantine mode automatically.

I had trouble with a custom fault, F1705: Proactive HA did not trigger on it. It was probably a configuration issue on my side, but I would like Cisco to include F1705 in the default fault list. I describe the setup in Add F1705 alert to Cisco UCS Manager plugin 4.0(0).

Sources

Related on vdan.cz