vCenter Appliance (VCSA) root Partition full

Symptons: VCSA cannot provide an update or Unable to connect to the vCenter Server as services are not started.

Validate filesystem

Check disk space

root@vcsa [ /var/spool/clientmqueue ]# df -h
 Filesystem                                     Size  Used Avail Use% Mounted on
 /dev/sda3                                       11G  8.2G  1.9G  82% /

Check INODES

root@vcsa [ ~ ]# df -i
 Filesystem                   Inodes IUsed    IFree IUse% Mounted on
 /dev/sda3                     712704 97100   615604   14% /

Problem is with disk space.

How to resize partition

It is possible to increase the disk space of a specific VMDK , according KB. But After some time You could have the same issues.

https://kb.vmware.com/s/article/2126276

How to cleanup partition

It is necessary find where is a problem:

root@vcsa [ ~ ]# cd /var
root@vcsa [ /var ]# du -sh *
 2.1G    log
 5.2G    spool

clientmqueue

Problem with clientmqueue directory could be related with config for SMTP relay. It is possible to cleanup easily:

find /var/spool/clientmqueue -name "*" -delete

audit.log

Problem with audit.log is describe in KB. Size of audit.log file is very large and /var/log/audit folder consumes majority of the space.

https://kb.vmware.com/s/article/2149278

root@vcsa [ /var/log/audit ]# ls -l
 total 411276
 -rw------- 1 root root 420973104 Mar 31 00:53 audit.log
 truncate -s 0 audit.log
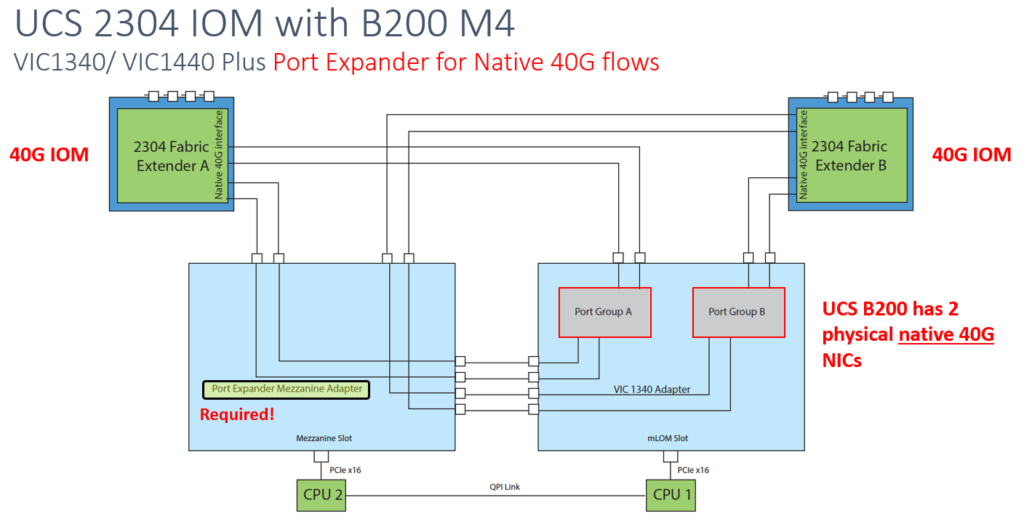
Multiple-NIC vMotion tunning 2x 40Gbps

Because for Monster SAP HANA VM (1-3 TB RAM) I tuned several AdvSystemSettings.

In the end I was able to speedup vMotion 4x times and utilize 2x flow with 40 Gbps – VIC 1340 with PE.

Inspiration was:

It is in production from 04/2018, My tuned final settings is:

AdvSystemSettingsDefaultTunningDesc
Migrate.VMotionStreamHelpers08Number of helpers to allocate for VMotion streams
Net.NetNetqTxPackKpps300600Max TX queue load (in thousand packet per second) to allow packing on the corresponding RX queue
Net.NetNetqTxUnpackKpps6001200Threshold (in thousand packet per second) for TX queue load to trigger unpacking of the corresponding RX queue
Net.MaxNetifTxQueueLen200010000Maximum length of the Tx queue for the physical NICs – toto stačí pro urychlení VM komunikace

VMware vNIC placement order not adhered to Cisco UCS configuration – How to fix it?

It is better to use Cisco UCS Consistent Device Naming CDN + ESXi 6.7, but in same casses. It is necessary fix manualy according KB – How VMware ESXi determines the order in which names are assigned to devices (2091560) .

Here is an example How to fix it:

Check current mapping

[~] esxcfg-nics -l
 Name    PCI           MAC Address       
 vmnic0  0000:67:00.0  00:25:b5:00:a0:0e 
 vmnic1  0000:67:00.1  00:25:b5:00:b2:2f 
 vmnic2  0000:62:00.0  00:25:b5:00:a0:2e 
 vmnic3  0000:62:00.1  00:25:b5:00:b2:4f 
 vmnic4  0000:62:00.2  00:25:b5:00:a0:3e 

[~] localcli --plugin-dir /usr/lib/vmware/esxcli/int/ deviceInternal alias list
 Bus type  Bus address            Alias
 pci       s00000002:03.02        vmnic4
 pci       s00000002:03.01        vmnic3
 pci       s0000000b:03.00        vmnic0
 pci       s0000000b:03.01        vmnic1
 pci       p0000:00:11.5          vmhba0
 pci       s00000002:03.00        vmnic2
 logical   pci#s0000000b:03.00#0  vmnic0
 logical   pci#s0000000b:03.01#0  vmnic1
 logical   pci#s00000002:03.01#0  vmnic3
 logical   pci#s00000002:03.02#0  vmnic4
 logical   pci#p0000:00:11.5#0    vmhba0
 logical   pci#s00000002:03.00#0  vmnic2

Fix transfer table for physical devices

Bus type  Bus address            Alias
 pci       s0000000b:03.00        vmnic0 --> vmnic3
 pci       s0000000b:03.01        vmnic1 --> vmnic4
 pci       s00000002:03.00        vmnic2 --> vmnic0
 pci       s00000002:03.01        vmnic3 --> vmnic1
 pci       s00000002:03.02        vmnic4 --> vmnic2

Fix commands for physical devices

localcli --plugin-dir /usr/lib/vmware/esxcli/int/ deviceInternal alias store --alias vmnic0 --bus-address s00000002:03.00 --bus-type pci

 localcli --plugin-dir /usr/lib/vmware/esxcli/int/ deviceInternal alias store --alias vmnic1 --bus-address s00000002:03.01 --bus-type pci

 localcli --plugin-dir /usr/lib/vmware/esxcli/int/ deviceInternal alias store --alias vmnic2 --bus-address s00000002:03.02 --bus-type pci

 localcli --plugin-dir /usr/lib/vmware/esxcli/int/ deviceInternal alias store --alias vmnic3 --bus-address s0000000b:03.00 --bus-type pci

 localcli --plugin-dir /usr/lib/vmware/esxcli/int/ deviceInternal alias store --alias vmnic4 --bus-address s0000000b:03.01 --bus-type pci

Fix transfer table for logical devices

[~] localcli --plugin-dir /usr/lib/vmware/esxcli/int/ deviceInternal alias list
 Bus type  Bus address            Alias
 logical   pci#s0000000b:03.00#0  vmnic0 --> vmnic3
 logical   pci#s0000000b:03.01#0  vmnic1 --> vmnic4
 logical   pci#s00000002:03.00#0  vmnic2 --> vmnic0
 logical   pci#s00000002:03.01#0  vmnic3 --> vmnic1
 logical   pci#s00000002:03.02#0  vmnic4 --> vmnic2

Fix commands for logical devices

localcli --plugin-dir /usr/lib/vmware/esxcli/int/ deviceInternal alias store --alias vmnic0 --bus-address pci#s00000002:03.00#0 --bus-type logical

localcli --plugin-dir /usr/lib/vmware/esxcli/int/ deviceInternal alias store --alias vmnic1 --bus-address pci#s00000002:03.01#0 --bus-type logical

localcli --plugin-dir /usr/lib/vmware/esxcli/int/ deviceInternal alias store --alias vmnic2 --bus-address pci#s00000002:03.02#0 --bus-type logical

localcli --plugin-dir /usr/lib/vmware/esxcli/int/ deviceInternal alias store --alias vmnic3 --bus-address pci#s0000000b:03.00#0 --bus-type logical

localcli --plugin-dir /usr/lib/vmware/esxcli/int/ deviceInternal alias store --alias vmnic4 --bus-address pci#s0000000b:03.01#0 --bus-type logical

Reboot

reboot

Crosscheck – Now we have target order

[~] esxcfg-nics -l
 Name    PCI           MAC Address       
 vmnic0  0000:62:00.0  00:25:b5:00:a0:2e 
 vmnic1  0000:62:00.1  00:25:b5:00:b2:4f 
 vmnic2  0000:62:00.2  00:25:b5:00:a0:3e 
 vmnic3  0000:67:00.0  00:25:b5:00:a0:0e 
 vmnic4  0000:67:00.1  00:25:b5:00:b2:2f 

Cisco UCS supports Consistent Device Naming CDN in ESXi 6.7

Cisco introduced Consistent Device Naming in Cisco UCS Manager Release 2.2(4).

In the past I could saw that VMware vNIC placement order not adhered to Cisco UCS configuration. But his issue will not be seen in the latest ESXi updates – ESXi 6.5 U2 and ESXi 6.7 U1.

How VMware ESXi determines the order in which names are assigned to devices (2091560)

When there is no mechanism for the Operating System to label Ethernet interfaces in a consistent manner. It becomes difficult to manage network connections with server configuration changes.

Allows Ethernet interfaces to be named in a consistent manner. This makes Ethernet interface names more persistent when adapter or other configuration changes are made.

To configure CDN for a vNIC, do the following:

This makes Ethernet interface names more uniform, easy to identify, and persistent when adapter or other configuration changes are made.

 set consistent-device-name-control cdn-name

Whether consistent device naming is enabled or not. This can be one of the following:

  • enabled—Consistent device naming is enabled for the BIOS policy. This enables Ethernet interfaces to be named consistently.
  • disabled—Consistent device naming is disabled for the BIOS policy.
  • platform-default—The BIOS uses the value for this attribute contained in the BIOS defaults for the server type and vendor.

Homelab considerations for vSphere 7

Homelab considerations for vSphere 7

Homelab considerations for vSphere 7

With the vSphere 7 Launch Event just a few days away, I know many of you are eager to get your hands on this latest release of vSphere and start playing with it in you homelab. A number of folks in the VMware community have already started covering some of the amazing capabilities that will […]


VMware Social Media Advocacy

vSpeaking Podcast Ep 150: What’s New in vSphere 7

vSpeaking Podcast Ep 150: What’s New in vSphere 7

This month VMware announced vSphere 7 touting it as the biggest innovation since the launch of ESXi. This is a prettty signifigant release. So far the virtually speaking podcast covered part of the release in two previous episodes (vSphere with Kubernetes and vSphere Lifecycle Manager in the …Read More


VMware Social Media Advocacy

Getting started with VCF 4.0 Part 3 – vSphere…

Getting started with VCF 4.0 Part 3 – vSphere with Kubernetes in a Workload Domain

Getting started with VCF 4.0 Part 3 – vSphere…

At this point, we have a fully configured workload domain which includes an NSX-T Edge deployment. Check here for the previous VCF 4.0 deployment steps. We are now ready to go ahead and deploy vSphere with Kubernetes, formerly known as Project Pacific. Via SDDC Manager in VMware Cloud Foundation 4.0, we ensure that an NSX-T Edge is available, and we also ensure that the the Workload Domain is sufficiently licensed to enable vSphere with Kubernetes. Disclaimer: “To be clear, this post is based…Read More


VMware Social Media Advocacy

Getting started with VCF 4.0 Part 2 –…

Getting started with VCF 4.0 Part 2 – Commission hosts, Create Workload Domain, Deploy NSX-T Edge

Getting started with VCF 4.0 Part 2 –…

Now that a VCF 4.0 Management Domain has been deployed, we can move onto creating our very first VCF 4.0 Virtual Infrastructure Workload Domain (VI WLD). We will require a VI WLD with an NSX-T Edge cluster before we can deploy Kubernetes on vSphere (formerly known as Project Pacific). Not too much has changed in the WLD creation workflow since version 3.9. We still have to commission ESXi hosts before we can create the WLD. But something different to previous versions of VCF is that today in…Read More


VMware Social Media Advocacy

Getting started with VMware Cloud Foundation…

Getting started with VMware Cloud Foundation (VCF) 4.0

Getting started with VMware Cloud Foundation…

On March 10th, VMware announced a range of new updated products and features. One of these was VMware Cloud Foundation (VCF) version 4.0. In the following series of blogs, I am going to show you the steps to deploy VCF 4.0. We will begin with the deployment of a Management Domain. Once this is complete, we will commission some additional hosts and build our first workload domain (WLD). After that, we will deploy an NSX-T 3.0 Edge Cluster to our Workload Domain. The great news here is that…Read More


VMware Social Media Advocacy