lsdoctor: Check and Repair the vCenter Lookup Service (6.7 to 9.x)

Broadcom lsdoctor for vCenter 6.7-9.x: where to download it (KB 320837), how to run it safely, and which option fixes which Lookup Service problem.

lsdoctor (Lookup Service Doctor, lsdoctor.py) is Broadcom’s script for checking and repairing the vCenter Lookup Service: stale registrations, SSL trust mismatches, solution users and broken service registrations. The current build is lsdoctor-260716 (July 2026) and it supports vCenter 6.7 and later, including 7.x, 8.x and 9.x. Download it only from Broadcom KB 320837, take offline snapshots of every node in the SSO domain, and always start with the read-only --lscheck.

If the problem is an expired or mismatched certificate rather than the Lookup Service itself, check and replace certificates with vCert first.

lsdoctor at a glance

Current buildlsdoctor-260716.zip, added 16 Jul 2026 (always take the latest attachment from KB 320837)
SupportedvCenter Server 6.7 and later, VCSA or Windows-based, including 7.x, 8.x and 9.x. Support for the newest builds can lag behind a vCenter release.
DownloadOnly from Broadcom KB 320837. Verify the SHA256 listed in the KB.
Where to run itMost options run on any node in the same SSO site as the affected node. --stalefix and --solutionusers run on the affected node itself.
OutputFindings per node, shown as SSO site plus hostname/PNID, and the path to a JSON report
Safe first step--lscheck makes no changes

Before you run lsdoctor

  • Take offline snapshots of the whole SSO domain. KB 320837 is explicit: shut down all vCenter Servers and PSCs in the SSO domain at the same time, snapshot them, then power them on again. If you need to roll back, shut them all down and revert them together, otherwise replication between nodes breaks.
  • Pick the right node. Run checks from a node in the same SSO site as the one with the problem. For --stalefix and --solutionusers, log in to the affected node.
  • Check for a custom login banner. lsdoctor reads the vCenter version from /etc/issue. A custom banner makes it fail with IndexError: list index out of range (see fixing lsdoctor’s IndexError on 8.0.3).
  • Plan for follow-up work. Every option except --lscheck ends with a service restart, and most require re-registering external solutions such as backup, storage or monitoring plugins.

Download and install lsdoctor

Download the zip from KB 320837 and copy it to the node, for example with WinSCP. If WinSCP can’t connect to the appliance, set root’s login shell to bash first (chsh -s /bin/bash root). On the VCSA:

# cd /root
# sha256sum lsdoctor-260716.zip      # compare with the SHA256 in KB 320837
# unzip lsdoctor-260716.zip
# cd lsdoctor-*
# python lsdoctor.py --help

Always run lsdoctor from the extracted directory. On a Windows-based vCenter 6.7, extract the zip with Extract All, then run it with the bundled Python:

cd "C:\Program Files\VMware\vCenter Server\python"
.\python.exe <path_to_lsdoctor.py> <option>

lsdoctor options

OptionWhat it doesRun onFollow-up
-l, --lscheckChecks for common Lookup Service issues. Makes no changes.Any node in the SSO siteReview the output and the JSON report; it tells you which fix applies
-t, --trustfixCorrects SSL trust mismatches in the Lookup ServiceAny node in the SSO siteRestart services on all nodes in the SSO site; re-register external solutions
-s, --stalefixCleans up stale configuration left over from systems upgraded from 5.xThe affected nodeRestart all services; re-register external solutions
-u, --solutionusersRecreates the solution users for a nodeThe affected nodeRestart services on that node
-r, --rebuildRebuilds one or all service registrations for a nodeAny node in the SSO siteRestart services; re-register external solutions
-p, --pscHaUnconfigureRemoves a PSC High Availability (load balancer) configurationSee KB 320837Restart services on all PSCs; repoint vCenter; re-register external solutions

--rebuild uses registration templates that match your vCenter build. If lsdoctor has no template for your exact build, it asks you to pick the closest one. It also keeps automatic backups of the registrations it changes, and the same menu can restore them.

Which lsdoctor option for which problem

What you seeStart withThen
Upgrade, patch or repoint pre-checks fail with Lookup Service or registration errors--lscheckThe fix it recommends (usually --trustfix, --stalefix or --rebuild)
Plugins or solutions fail after replacing the Machine SSL certificate; certificate mismatch in Lookup Service registrations--lscheck--trustfix, or vCert option 4 (Manage SSL trust anchors)
Leftover registrations from a vCenter upgraded from 5.x--lscheck--stalefix on the affected node
Solution user errors on one node--lscheck--solutionusers on that node
Missing or broken service registrations--lscheck--rebuild
Retiring a PSC HA load balancer–--pscHaUnconfigure, then repoint vCenter
lsdoctor itself fails with IndexError: list index out of rangeCheck /etc/issueRestore the default banner temporarily

lsdoctor vs vCert

ToolFixesUse it when
lsdoctorLookup Service data: registrations, trust in registrations, solution users, stale entriesServices can’t find or trust each other, or upgrades fail on registration checks
vCertThe certificates themselves: Machine SSL, Solution Users, STS, VMCA, ESXi, trust anchorsCertificates are expired, expiring or replaced, or you see no healthy upstream after an expiry

The two overlap on trust anchors. A common sequence is: fix the certificates with vCert, then run lsdoctor --lscheck to confirm the Lookup Service registrations trust the new certificate.

Related vCenter guides

Full reference: Broadcom KB 320837 – Using the lsdoctor tool.
VMSA-2024-0019: Critical VMware vCenter Server Vulnerabilities (CVE-2024-38812, CVE-2024-38813) Addressed

VMSA-2024-0019 covers vCenter heap-overflow CVE-2024-38812 and privilege escalation CVE-2024-38813. Affected versions and fixed builds (8.0 U3d, 7.0 U3t).

VMware has released an important security advisory, VMSA-2024-0019, detailing updates for VMware vCenter Server that address two significant vulnerabilities: a heap-overflow vulnerability (CVE-2024-38812) and a privilege escalation vulnerability (CVE-2024-38813). Both of these vulnerabilities could have severe implications if exploited, making it crucial for administrators to apply the necessary patches promptly.

Heap-Overflow Vulnerability (CVE-2024-38812)

Description: The first vulnerability, identified as CVE-2024-38812, is a heap-overflow vulnerability found in the vCenter Server’s implementation of the DCERPC protocol. This issue has been classified by VMware as Critical, with a maximum CVSSv3 base score of 9.8, indicating the potential for severe impact.

Known Attack Vectors: A malicious actor with network access to the vCenter Server can exploit this vulnerability by sending a specially crafted network packet. Successful exploitation could lead to remote code execution (RCE), allowing the attacker to execute arbitrary code on the vCenter Server with potentially full system privileges. This level of access could be used to disrupt services, exfiltrate sensitive data, or further compromise the virtual environment.

Privilege Escalation Vulnerability (CVE-2024-38813)

Description: The second vulnerability, CVE-2024-38813, is a privilege escalation flaw within the vCenter Server. VMware has rated this issue as Important, with a CVSSv3 base score of 7.5. While not as severe as the heap-overflow vulnerability, it still poses a significant risk.

Known Attack Vectors: An attacker with network access to the vCenter Server can exploit this vulnerability by sending a specially crafted network packet. If successful, the attacker could escalate their privileges to root, gaining full administrative control over the vCenter Server. This level of access could enable the attacker to make unauthorized changes, access sensitive information, or disrupt the entire virtual infrastructure.

More info VMSA-2024-0019:VMware vCenter Server updates address heap-overflow and privilege escalation vulnerabilities (CVE-2024-38812, CVE-2024-38813)

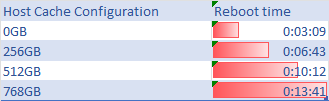
Host Cache can significantly extend reboot times

Exploring the vSphere environment, I’ve found that configuring a large Host Cache with VMFS Datastore can significantly extend reboot times.

It’s a delicate balance of performance gains versus system availability. For an in-depth look at my findings and the impact on your VMware setup, stay tuned.

Host Cache can significantly extend reboot times

ESXi Check Secure Boot Status: secureBoot.py, Enabling Secure Boot (Cisco UCS) and the “Host secure boot was disabled” Alarm

Check ESXi Secure Boot status and readiness with secureBoot.py -s/-c, enable it in firmware or a Cisco UCS boot policy, and fix unsigned-VIB failures.

Short answer: SSH to the host and run /usr/lib/vmware/secureboot/bin/secureBoot.py -s. It prints Enabled or Disabled. Before you switch Secure Boot on in the firmware, run the same script with -c; it reports either “Secure boot can be enabled” or “Secure boot CANNOT be enabled” and lists the VIBs that block it. On hosts with a TPM, esxcli system settings encryption get also shows whether Secure Boot is enforced.

ESXi check Secure Boot status with secureBoot.py

ESXi (and ESX 9) ships with a validation script. It has three modes. This is the help output from one of my hosts:

/usr/lib/vmware/secureboot/bin/secureBoot.py -h
usage: secureBoot.py [-h] [-a | -c | -s]

optional arguments:
  -h, --help            show this help message and exit
  -a, --acceptance-level-check
                        Validate acceptance levels for installed vibs
  -c, --check-capability
                        Check if the host is ready to enable secure boot
  -s, --check-status    Check if UEFI secure boot is enabled
OptionWhat it answersTypical output
-sIs UEFI Secure Boot enabled right now?Enabled / Disabled
-cCan Secure Boot be enabled on this install?Secure boot can be enabled: ... or Secure boot CANNOT be enabled: ...
-aDo the installed VIBs meet the required acceptance levels?Acceptance level validation result

Status on a host that still boots with Secure Boot off:

/usr/lib/vmware/secureboot/bin/secureBoot.py -s
Disabled

Check whether the host is ready for Secure Boot (-c)

Run the capability check before you change anything in the firmware. This matters most on hosts that were upgraded from older releases. Here is a host that passes:

/usr/lib/vmware/secureboot/bin/secureBoot.py -c
Secure boot can be enabled: All vib signatures verified. All tardisks validated. All acceptance levels validated

According to the Broadcom upgrade documentation, the result depends on how the host was upgraded:

  • Every installed VIB needs an acceptance level of at least PartnerSupported. A single CommunitySupported VIB blocks Secure Boot.
  • The signature of every installed VIB must be stored on the system. Older ESXi versions did not save the signatures, and an upgrade done with ESXCLI commands doesn’t save them either. An ISO-based upgrade, including a vSphere Lifecycle Manager upgrade that uses the ISO, does save them.
  • An old third-party driver VIB that the upgrade did not replace stays on the host without a stored signature, so it blocks Secure Boot.
  • The script does not check whether the bootloader is up to date, and Secure Boot needs a current one.

ESXi Secure Boot enable: firmware and Cisco UCS boot policy

ESXi doesn’t turn Secure Boot on by itself. You enable it in the server firmware, and the host must boot in UEFI mode. On most servers you do this in the BIOS/UEFI setup, usually under Boot or Security. Shut the host down gracefully first.

On Cisco UCS Manager-managed servers the setting lives in the boot policy. Set Boot Mode to UEFI and check Boot Security (UEFI Secure Boot), then associate the policy through the service profile. Cisco lists these points in its boot configuration guide:

  • UEFI boot mode must be enabled in the boot policy before you can use UEFI Secure Boot.
  • Cisco UCS Manager and the BIOS firmware must be Release 2.2 or later. User-generated encryption keys are not supported.
  • On UCSM-managed servers, only Cisco UCS Manager can control UEFI Secure Boot.
  • You cannot mix UEFI and legacy boot mode on the same server. Moving an existing legacy-BIOS ESXi install to UEFI is a separate task (see the related post below).
Cisco UCS Manager boot policy with Boot Mode set to UEFI and Boot Security (UEFI Secure Boot) enabled for an ESXi host
Cisco UCS Manager boot policy: UEFI boot mode with Boot Security (UEFI Secure Boot) enabled

After the host reboots with the new policy, check the status again:

/usr/lib/vmware/secureboot/bin/secureBoot.py -s
Enabled

Secure Boot enforcement on hosts with a TPM

On vSphere 7.0 Update 2 and later, a host with an active TPM can enforce Secure Boot on every boot. This setting is separate from the firmware toggle and you manage it with ESXCLI:

esxcli system settings encryption get
   Mode: TPM
   Require Executables Only From Installed VIBs: false
   Require Secure Boot: true

If Mode shows NONE, activate the TPM in the firmware and run esxcli system settings encryption set --mode=TPM. Broadcom warns that you cannot undo this once it is set. To enforce Secure Boot, first enable it in the firmware and restart. Then run the following:

esxcli system settings encryption set --require-secure-boot=T
esxcli system settings encryption get
/bin/backup.sh 0

To turn enforcement off, use --require-secure-boot=F and run /bin/backup.sh 0 again.

“Host secure boot was disabled”: the vCenter alarm

Broadcom KB 369525 documents this condition as the Host TPM attestation alarm in the vSphere Client (vCenter 8.x, ESXi 7.x/8.x). The main cause is that vCenter sees Secure Boot disabled on a host that has a TPM. Secure Boot is a requirement for successful attestation. The alarm can also fire when host and vCenter data get out of sync after a network glitch, a restart or a new host being added. The KB resolution:

  1. Check the current state with secureBoot.py -s.
  2. If it’s disabled, run secureBoot.py -c. If the host is compatible, enable Secure Boot in the firmware and boot ESXi.
  3. If Secure Boot is already enabled and the alarm stays, disconnect and reconnect the host. Then go to Monitor > Issues and Alarms and use Reset to Green on the alarm.
  4. If Secure Boot can’t be enabled on that hardware, the KB says you can use Reset to Green to suppress the alarm.

Fixing “Secure boot CANNOT be enabled” and unsigned VIB failures

  • Find the blocking VIB. The -c output names the VIBs whose signatures it could not verify. Compare them with esxcli software vib list, which includes an AcceptanceLevel column.
  • Replace or remove it. Install the vendor’s current signed driver or add-on, or remove a VIB you no longer need. Then run -c again.
  • Reboot after patching. KB 319600 describes a false failure on esx-base with “Failed to verify checksum for payload btldr”. It appears when you run the check after a live VIB install but before the reboot. Reboot and check again.
  • Purple screen “UEFI Secure Boot failed: Failed to verify signatures of the following vibs”. TechDocs says to reboot with Secure Boot disabled, run the validation script, and check /var/log/esxupdate.log.
  • VIB install fails on a host that already has TPM and Secure Boot. KB 384314 covers the error “Could not find a trusted signer”. The VIB must be signed through the VMware partner program. Disabling Secure Boot is not the recommended fix.
vSphere Secure Boot

Sources

Related on vdan.cz

“SECUREBOOT: Image DENIED.” – Virtual Machine with Windows Server 2022 KB5022842 (OS Build 20348.1547) configured with secure boot enabled not booting up (90947)

Windows Server 2022 VMs with Secure Boot fail to boot with “SECUREBOOT: Image DENIED” after KB5022842. Cause and the fix on ESXi (KB 90947).

Reference error “SECUREBOOT: Image DENIED.” for Linux VMs

Important KB90947 Symptoms

After installing Windows Server 2022 update KB5022842 (OS Build 20348.1547), guest OS can not boot up when virtual machine(s) configured with secure boot enabled running on vSphere ESXi 6.7 U2/U3 or vSphere ESXi 7.0.x.

In VM vmware.log, there is ‘Image DENIED’ info like the below:

2023-02-15T05:34:31.379Z In(05) vcpu-0 - SECUREBOOT: Signature: 0 in db, 0 in dbx, 1 unrecognized, 0 unsupported alg.
2023-02-15T05:34:31.379Z In(05) vcpu-0 - Hash: 0 in db, 0 in dbx.
2023-02-15T05:34:31.379Z In(05) vcpu-0 - SECUREBOOT: Image DENIED.
To identify the location of vmware.log files:
  1. Establish an SSH session to your host. For ESXi hosts
  2. Log in to the ESXi Host CLI using root account.
  3. To list the locations of the configuration files for the virtual machines registered on the host, run the below command:
#vim-cmd vmsvc/getallvms | grep -i "VM_Name"
  1. The vmware.log file is located in virtual machine folder along with the vmx file.
  2. Record the location of the .vmx configuration file for the virtual machine you are troubleshooting. For example:
/vmfs/volumes/xxxxxxxx-xxxxxxx-c1d2-111122223333/vm1/vm1.vmx
/vmfs/volumes/xxxxxxxx-xxxxxxx-c1d2-111122223333/vm1/vmware.log

Resolution

Currently there is no resolution for virtual machines running on vSphere ESXi 6.7 U2/U3 and vSphere ESXi 7.0.x. However the issue doesn’t exist with virtual machines running on vSphere ESXi 8.0.x.

Note: vSphere ESXi 6.7 is End of general Support. For more information, see The End of General Support for vSphere 6.5 and vSphere 6.7 is October 15, 2022.

Workaround

There are three methods to avoid this issue

  1. Upgrade the ESXi Host where the virtual machine in question is running to vSphere ESXi 8.0
  2. Disable “Secure Boot” on the VMs.
  3. Do not install the KB5022842 patch on any Windows 2022 Server virtual machine until the issue is resolved.

See the Microsoft article for details on the updates within the patch release

To disable virtual machine “Secure Boot “option, please follow the below steps:

  1. Power off the VM.
  2. Right-click the virtual machine and click Edit Settings.
  3. Click the VM Options tab.
  4. Under Boot Option, uncheck the “Secure Boot enabled“

Related Information

Uninstalling the KB5022842 patch will not resolve the issue. If the Virtual machine has already been updated, then the only available options are
 

  1. Upgrade the ESXi Host where the virtual machine in question is running to vSphere ESXi 8.0
  2. Disable “Secure Boot” on the VMs.

“SECUREBOOT: Image DENIED.” – Linux VMs created with Hardware version 20 will fail to start installation when Secure Boot is enabled (88737)

Linux VMs created with hardware version 20 fail to start installation with Secure Boot enabled: “SECUREBOOT: Image DENIED” (KB 88737) and the fix.

Reference “SECUREBOOT: Image DENIED.” for Windows Server 2022
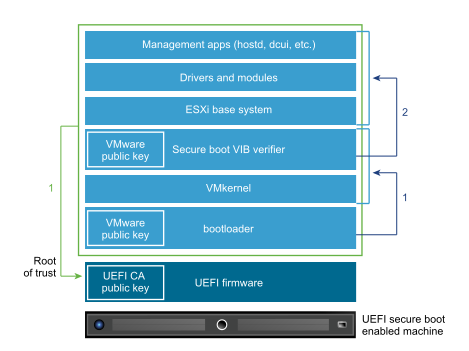
How ESXi Uses UEFI Secure Boot

Important 88737 Symptoms

The installation of the Operating System image will be denied and “SECUREBOOT: Image DENIED.” will be reported in vmware.log.

Below goes the list of the impacted Linux Operating Systems.

  • RHEL 8.0~8.4, 7.x 
  • CentOS 8.0~8.5, 7.x
  • Oracle Linux 8.0~8.3, 7.x
  • AlmaLinux 8.4    
  • Rocky Linux 8.4    
  • Photon OS 4.0GA, 3.0 GA & Rev 2 & Rev 3, 2.0    
  • Ubuntu LTS 20.04~20.04.4, 18.04~18.04.5 and earlier
  • Ubuntu Non-LTS 21.04, 20.10, 19.10, 19.04, 18.10 and earlier     
  • Debian 10.9 and earlier     
  • SLE 12SP0~SP5, 15SP0-SP2

Cause

This is caused due to the Secure Boot deny list (dbx) is updated to prevent vulnerable bootloaders from being used. For more information, refer to VMware response to GRUB2 security vulnerability CVE-2020-10713 (80181)

Resolution

  1. Create the SecureBoot Virtual Machine with Hardware version 19 (or earlier).
  2. After the installation is completed, update the vulnerable bootloader of the VM to a newer and fixed version, refer to VMware response to GRUB2 security vulnerability CVE-2020-10713 (80181)
  3. Upgrade the Virtual Machine’s Hardware version to 20.

Workaround

Create the Virtual Machine with Secureboot disabled instead.

UCS-M2-HWRAID ESXi Boot: RAID 1 on the Cisco Boot-Optimized M.2 RAID Controller (UCS Manager, Intersight, CIMC)

Boot ESXi from a RAID 1 M.2 volume on Cisco UCS-M2-HWRAID: controller limits, UCS Manager, Intersight and CIMC steps, and ESXi 8/9 boot device rules.

Short answer: UCS-M2-HWRAID is Cisco’s boot-optimized M.2 RAID controller for UCS M5 and M6 servers. It holds two identical M.2 SATA SSDs and supports only RAID 1 or JBOD (default JBOD). It boots only in UEFI mode, and one virtual drive always uses the full capacity. To boot ESXi, create a RAID 1 LUN in UCS Manager, Intersight or CIMC, set a UEFI boot policy to local disk (MSTOR-RAID), and install ESXi to that volume.

What is UCS-M2-HWRAID

The Cisco Boot-Optimized M.2 RAID Controller (PID UCS-M2-HWRAID) is a module that plugs into the mini-storage connector on the motherboard. It has two slots for SATA M.2 SSDs and an integrated 6 Gbps SATA RAID controller. In UCS Manager, Intersight and CIMC the controller shows as MSTOR-RAID. Its job is to give ESXi a mirrored local boot device without using the front drive bays or an SD card.

PropertyValue (Cisco documentation)
ServersUCS C220 M5, C240 M5, C480 M5, B200 M5, B480 M5 (UCS Manager 4.1 guide); also required for M.2 SATA on C220 M6 (spec sheet)
Minimum firmwareUCS Manager 4.0(4a) for the RAID procedure (tech note); Cisco IMC / UCS Manager 4.2(1) on M6
M.2 drives240 GB and 960 GB SATA M.2 (UCSM 4.1 guide); C220 M6 spec sheet lists UCS-M2-240G, UCS-M2-480G, UCS-M2-960G
RAID levelsRAID 1 or JBOD only (default JBOD)
Boot modeUEFI only; legacy boot not supported
Virtual drivesOne, using the entire disk capacity
Mixing drivesNot supported (use two identical SSDs)
Hot-plugNot supported; power the server off to replace a drive (M6 spec sheet)

Other UCS Manager limitations: the Local Disk Configuration policy is not supported, the LUN must be created in the Local LUNs tab of a storage profile (not with controller definitions), and existing LUN migration is not supported.

UCS-M2-HWRAID in UCS Manager: create the RAID 1 boot LUN

These screenshots are from my UCS Manager setup.

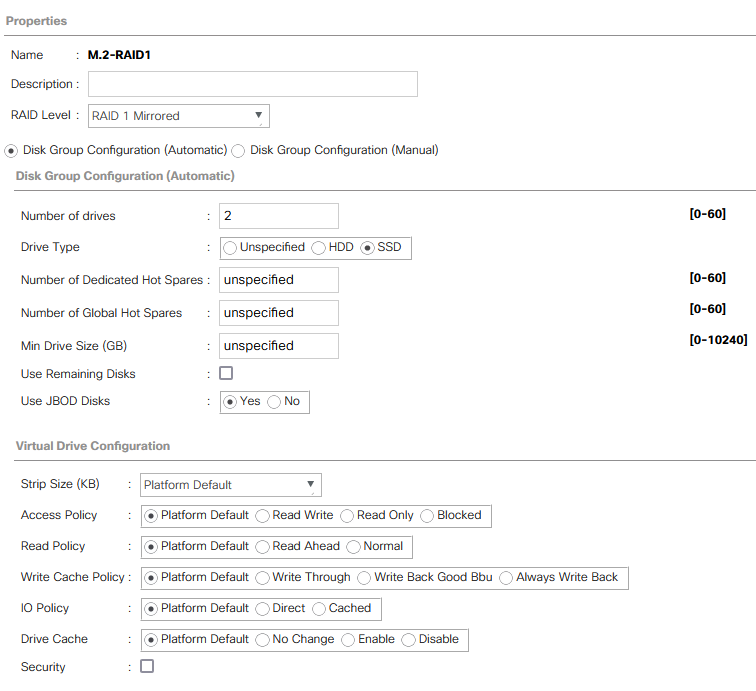
1. Disk group policy: Storage > Storage Policies > root > Disk Group Policies

Create a policy (here M.2-RAID1) with RAID Level RAID 1 Mirrored, 2 drives, drive type SSD.

UCS Manager disk group policy M.2-RAID1 with RAID 1 Mirrored, 2 SSD drives, automatic disk group configuration

If the service profile association fails with Server does not fulfill Local Disk config requirements, Cisco’s tech note says to use Disk Group Configuration (Manual) with the two M.2 slots and to disable pSATA. With manual configuration, leave the span ID unspecified and set the disk role to normal.

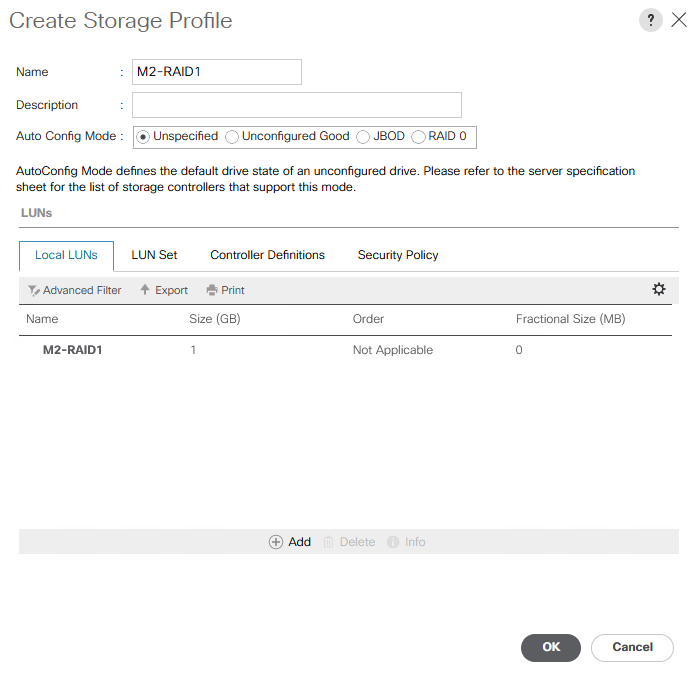
2. Storage profile: Storage > Storage Profiles > root

UCS Manager Create Storage Profile dialog M2-RAID1 with one local LUN M2-RAID1

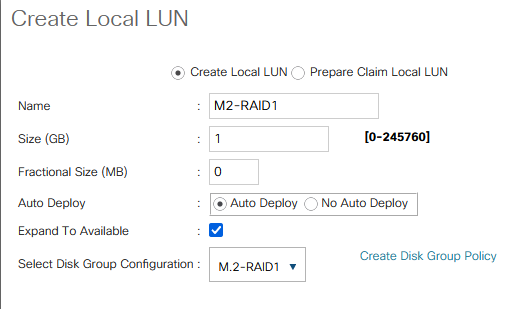
3. Local LUN inside the storage profile

Add a local LUN, select the disk group policy and enable Expand To Available. The controller supports only one LUN over the whole mirror anyway.

UCS Manager Create Local LUN M2-RAID1 with Expand To Available and disk group configuration M.2-RAID1

4. Attach the storage profile to the service profile

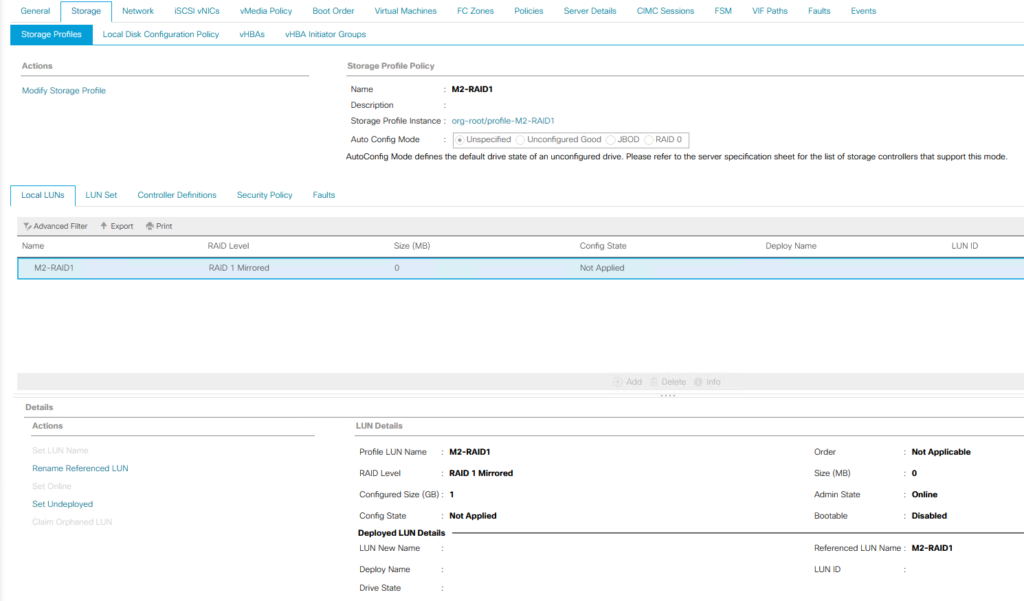
In the service profile, open Storage > Storage Profiles > Modify Storage Profile and select the profile. The LUN shows Not Applied until the profile is associated.

UCS Manager service profile Storage tab with storage profile M2-RAID1 and local LUN RAID 1 Mirrored

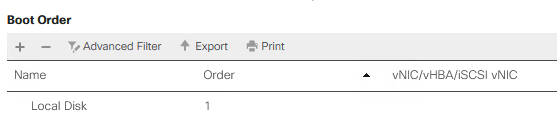
5. Boot policy: UEFI, Local Disk first

Use a boot policy with boot mode UEFI (the controller does not boot in legacy mode) and put the local disk first.

UCS Manager boot order with Local Disk as the first boot device

UCS-M2-HWRAID in Intersight Managed Mode

  1. Create a Storage policy and enable M.2 RAID Configuration. Keep the default virtual drive name MStorBootVd or set your own. Select the M.2 controller slot: MSTOR-RAID-1 for C-Series and X-Series. Only the B200 M6 can have a second controller (MSTOR-RAID-2).
  2. Create a Boot Order policy (Policies > Create Policy > UCS Server > Boot Order) in UEFI mode. Add Local Disk with the slot set to the M.2 controller from the server inventory (MSTOR-RAID), then add virtual media for the installer.
  3. Add both policies to the server profile and deploy it. The RAID 1 volume should be visible in the ESXi installer.

UCS-M2-HWRAID in standalone CIMC

  1. Storage > Cisco Boot optimized M.2 Raid controller (MSTOR-RAID). In Physical Drive Info, check that both drives are healthy.
  2. Create Virtual Drive from Unused Physical Drives, move both M.2 drives to the drive group, choose RAID 1 (the only option on this controller) and click Create Virtual Drive.
  3. Compute > Configure Boot Order > Advanced. Add Local HDD with slot MSTOR-RAID, or use Add Embedded Storage.

Without CIMC access, the same controller menu is in BIOS setup: press F2 during POST, then go to Advanced > Cisco Boot optimized M.2 RAID Controller.

UCS-M2-HWRAID ESXi driver and support

Cisco does not ship a separate ESXi driver download for this controller in the documents above. Whether a given ESXi release is supported on your server with this controller is defined by the Cisco UCS Hardware and Software Compatibility tool (ucshcltool.cloudapps.cisco.com) and the Broadcom Compatibility Guide. Check both for your exact server, firmware bundle and ESXi build before you upgrade. Install from the Cisco custom ESXi ISO so that the Cisco drivers match the firmware.

After installation, confirm which driver ESXi bound to the controller, and that the boot device is the RAID volume:

esxcli storage core adapter list
esxcli storage core device list

ESXi 7, 8 and 9 boot device requirements

Broadcom KB 317631 (formerly 85685, “SD card/USB boot device revised guidance”) is the reference for boot media. A RAID 1 M.2 SATA SSD volume is exactly the kind of local persistent boot device it recommends:

RequirementESXi 8.xESX 9.x
Boot device size32 GB minimum, 128 GB recommended128 GB minimum
Endurance128 TBW over 5 years
IO performanceAt least 100 MB/s
MediaPCIe NVMe, SAS, SATA/SATADOM SSD; industrial-grade flash (SLC or pSLC)
SD card / USBStill supported through VCF 9.0 on previously certified servers, but not recommended; new platforms are not certified with SD/USB boot

Every M.2 size listed above (240, 480 or 960 GB) meets the ESX 9 minimum of 128 GB. Check the endurance rating of your specific SSD model against the 128 TBW requirement. On ESXi 7.x, SD cards can still hold all partitions, but Broadcom strongly recommends moving to a persistent device. If you are replacing SD cards on M5/M6 servers, UCS-M2-HWRAID is the natural choice.

Sources

Related on vdan.cz

New ESXCLI Commands in vSphere 7.0: What Changed in 7.0 GA, Update 1, Update 2 and Update 3

New ESXCLI namespaces in ESXi 7.0 GA vs 6.x, and what 7.0 U1, U2 and U3 added, verified against Broadcom’s ESXCLI command reference.

Short answer: ESXi 7.0 GA added the image-based esxcli software commands (baseimage, addon, component, apply, sources), the esxcli nvme namespace with NVMe over Fabrics, system ntp/system ptp, SMART daemon control, PCI passthrough and uplink attachment commands. Later updates added more. 7.0 U1 brought daemon, network nic hwCap, vm appinfo and vsan network security. 7.0 U2 brought system settings encryption, system health report and syslog logfilter. 7.0 U3 brought network ip hosts, NVMe telemetry logs and vsan hardware vcg.

The per-update lists below come from comparing Broadcom’s ESXCLI Command Reference for 7.0.0, 7.0.1, 7.0.2 and 7.0.3. Broadcom’s online reference starts at 7.0.0, so the “new in 7.0 GA” list is based on my own ESXCLI dump from an ESXi 6.x host (ESXCLI commands for ESXi 6.x). For every 7.0 command with a description, see ESXCLI commands for ESXi 7.0 and the ESXCLI 7.0 mindmap.

New ESXCLI commands in vSphere 7.0 GA (compared with 6.x)

NamespaceCommandsWhat it is for
software baseimage, software addongetShow the installed base image and vendor add-on (vLCM image model)
software componentapply, get, list, remove, signature verify, vib listManage components instead of individual VIBs
software apply(command)Apply a complete image from a software spec (base image, add-on, components)
software sources addon / baseimage / componentget, list, component vib listBrowse add-ons, base images and components in a depot
nvme adapter / controller / namespace / infolist, identify, getNVMe adapters, controllers, namespaces and host information
nvme fabricsenable, disable, discover, connect, disconnect, connection list/deleteNVMe over Fabrics discovery and persistent connections
system ntp, system ntp configget, setConfigure the ESXi NTP agent from ESXCLI
system ptp, system ptp statsget, setPrecision Time Protocol configuration and state
storage core device smart daemon, ... smart statusstart, stop, status get, get, setControl smartd and SMART statistics gathering per device
hardware pci pcipassthrulist, setConfigure a PCI device for passthrough
network nic attachmentadd, list, removeAttach a branch uplink to a trunk uplink with a VLAN ID
network nic dcb statusgetDCB information for a NIC
system settings advancedadd, removeUser-defined options under /UserVars/
system module parametersclearClear load-time parameters of a VMkernel module

Removed in 7.0: storage vflash cache get/list and storage vflash cache stats get/reset appear in the 6.x dump but not in the 7.0.0 reference.

ESXCLI commands added in vSphere 7.0 Update 1

  • daemon control start/stop/restart and daemon info get/list: manage daemons built with the DSDK, by solution ID.
  • network nic hwCap activated list and network nic hwCap supported list: activated and supported hardware capabilities of physical NICs.
  • rdma iser params set: change iSER kernel driver settings.
  • vm appinfo get/set: state of the appinfo component on the host.
  • vsan network security get/set: vSAN network security settings.
  • vsan cluster list and vsan cluster preferredfaultdomain list: the vSAN clusters the host is joined to, and the preferred fault domain of stretched clusters.

ESXCLI commands added in vSphere 7.0 Update 2

  • system settings encryption get/set and system settings encryption recovery list/rotate: host encryption mode and policy (require Secure Boot, executables only from installed VIBs), plus recovery keys.
  • system security keypersistence enable/disable: the key persistence daemon.
  • system health report get/list: health reports generated on the host.
  • system syslog config logfilter add/get/list/remove/set: syslog log filtering.
  • system settings gueststore repository get/set: the GuestStore repository URL.
  • storage vvol stats add/disable/enable/get/list/remove/reset: vVols statistics tracking.
  • nvme info set and vsan network security list: extensions of existing namespaces.

ESXCLI commands added in vSphere 7.0 Update 3

  • network ip hosts add/list/remove: static IP-to-hostname entries.
  • nvme device log persistentevent get, nvme device log telemetry controller get and ... telemetry host get: NVMe persistent event log and telemetry data.
  • system ntp stats get, system ntp test and system ptp test: operational state and a service check for NTP/PTP.
  • system slp get/set: SLP agent configuration.
  • vsan hardware vcg add/get: map an unidentified vSAN device to a VCG ID.
Reference releaseCommands listedAdded vs previous
7.0.0 (GA)692–
7.0.1 (U1)706+14
7.0.2 (U2)730+24
7.0.3 (U3)743+13

These counts come from the leaf commands on Broadcom’s reference pages. None of the 7.0 updates removed a command.

Quick examples (no options required)

# 7.0 GA: image-based software inventory
esxcli software baseimage get
esxcli software addon get
esxcli software component list
esxcli system ntp get

# 7.0 U2
esxcli system settings encryption get
esxcli system health report list

# 7.0 U3
esxcli network ip hosts list
esxcli system ntp stats get

What came next in vSphere 8.0

Several namespaces that are often described as “new in 8.0” were already in 7.0 U2/U3 (see above). The commands that first appear in the 8.0.0 reference include daemon entitlement, hardware devicecomponent, storage osdata and vsan storagepool. See New ESXCLI Commands Details in vSphere 8.0.

Sources

Related on vdan.cz

ESXi 7.0 and Mellanox ConnectX 2 – support fix patch

Mellanox ConnectX-2 NICs stop working after upgrading a homelab host from ESXi 6.7 to 7.0. Why, and the patch that brings them back. Unsupported, lab only.

I upgraded vCenter to version 7 successfully but failed when it came to updating my hosts from 6.7 to 7.

I got some warning stating PCI devices were incompatible but tried anyways. Turns out that failed, my Mellanox ConnectX 2 wasn’t showing up as an available physical NIC.

At first It was necessary to have VID/DID device code for MT26448 [ConnectX EN 10GigE , PCIe 2.0 5GT/s].

PartnerProductDriverVIDDID
MellanoxMT26448 [ConnectX EN 10GigE , PCIe 2.0 5GT/s]mlx4_core15b36750
Whole table We could check here or search mlx to see all Mellanox cards list.

Deprecated devices supported by VMKlinux drivers

Devices that were only supported in 6.7 or earlier by a VMKlinux inbox driver. These devices are no longer supported because all support for VMKlinux drivers and their devices have been completely removed in 7.0.
PartnerProductDriverVID
MellanoxMT26428 [ConnectX VPI - 10GigE / IB QDR, PCIe 2.0 5GT/s]mlx4_core15b3
MellanoxMT26488 [ConnectX VPI PCIe 2.0 5GT/s - IB DDR / 10GigE Virtualization+]mlx4_core15b3
MellanoxMT26438 [ConnectX VPI PCIe 2.0 5GT/s - IB QDR / 10GigE Virtualization+]mlx4_core15b3
MellanoxMT25408 [ConnectX VPI - 10GigE / IB SDR]mlx4_core15b3
MellanoxMT27560 Familymlx4_core15b3
MellanoxMT27551 Familymlx4_core15b3
MellanoxMT27550 Familymlx4_core15b3
MellanoxMT27541 Familymlx4_core15b3
MellanoxMT27540 Familymlx4_core15b3
MellanoxMT27531 Familymlx4_core15b3
MellanoxMT25448 [ConnectX EN 10GigE, PCIe 2.0 2.5GT/s]mlx4_core15b3
MellanoxMT25408 [ConnectX EN 10GigE 10GBaseT, PCIe Gen2 5GT/s]mlx4_core15b3
MellanoxMT27561 Familymlx4_core15b3
MellanoxMT26468 [ConnectX EN 10GigE, PCIe 2.0 5GT/s Virtualization+]mlx4_core15b3
MellanoxMT26418 [ConnectX VPI - 10GigE / IB DDR, PCIe 2.0 5GT/s]mlx4_core15b3
MellanoxMT27510 Familymlx4_core15b3
MellanoxMT26488 [ConnectX VPI PCIe 2.0 5GT/s - IB DDR / 10GigE Virtualization+]mlx4_core15b3
MellanoxMT26448 [ConnectX EN 10GigE , PCIe 2.0 5GT/s]mlx4_core15b3
MellanoxMT25418 [ConnectX VPI - 10GigE / IB DDR, PCIe 2.0 2.5GT/s]mlx4_core15b3
MellanoxMT27530 Familymlx4_core15b3
MellanoxMT27521 Familymlx4_core15b3
MellanoxMT27511 Familymlx4_core15b3
MellanoxMT25408 [ConnectX EN 10GigE 10BASE-T, PCIe 2.0 2.5GT/s]mlx4_core15b3
MellanoxMT25408 [ConnectX IB SDR Flash Recovery]mlx4_core15b3
MellanoxMT25400 Family [ConnectX-2 Virtual Function]mlx4_core15b3

Deprecated devices supported by VMKlinux drivers – full table list

How to fix it? I tuned small script ESXi7-enable-nmlx4_co.v00.sh to DO IT. Notes:

  • edit patch to Your Datastore example is /vmfs/volumes/ISO
  • nmlx4_co.v00.orig is backup for original nmlx4_co.v00
  • New VIB is without signatures – ALERT message will be in log during reboot:
    • ALERT: Failed to verify signatures of the following vib
  • ESXi reboot is needed for load new driver
cp /bootbank/nmlx4_co.v00 /vmfs/volumes/ISO/nmlx4_co.v00.orig
cp /bootbank/nmlx4_co.v00 /vmfs/volumes/ISO/n.tar
cd /vmfs/volumes/ISO/
vmtar -x n.tar -o output.tar
rm -f n.tar
mkdir tmp-network
mv output.tar tmp-network/output.tar
cd tmp-network
tar xf output.tar
rm output.tar
echo '' >> /vmfs/volumes/ISO/tmp-network/etc/vmware/default.map.d/nmlx4_core.map
echo 'regtype=native,bus=pci,id=15b36750..............,driver=nmlx4_core' >> /vmfs/volumes/ISO/tmp-network/etc/vmware/default.map.d/nmlx4_core.map
cat /vmfs/volumes/ISO/tmp-network/etc/vmware/default.map.d/nmlx4_core.map
echo '        6750  Mellanox ConnectX-2 Dual Port 10GbE '                 >> /vmfs/volumes/ISO/tmp-network/usr/share/hwdata/default.pciids.d/nmlx4_core.ids 
cat /vmfs/volumes/ISO/tmp-network/usr/share/hwdata/default.pciids.d/nmlx4_core.ids
tar -cf /vmfs/volumes/ISO/FILE.tar *
cd /vmfs/volumes/ISO/
vmtar -c FILE.tar -o output.vtar
gzip output.vtar
mv output.vtar.gz nmlx4_co.v00
rm FILE.tar
cp /vmfs/volumes/ISO/nmlx4_co.v00 /bootbank/nmlx4_co.v00

Scripts add HW ID support in file nmlx4_core.map:

*********************************************************************
/vmfs/volumes/ISO/tmp-network/etc/vmware/default.map.d/nmlx4_core.map
*********************************************************************
regtype=native,bus=pci,id=15b301f6..............,driver=nmlx4_core
regtype=native,bus=pci,id=15b301f8..............,driver=nmlx4_core
regtype=native,bus=pci,id=15b31003..............,driver=nmlx4_core
regtype=native,bus=pci,id=15b31004..............,driver=nmlx4_core
regtype=native,bus=pci,id=15b31007..............,driver=nmlx4_core
regtype=native,bus=pci,id=15b3100715b30003......,driver=nmlx4_core
regtype=native,bus=pci,id=15b3100715b30006......,driver=nmlx4_core
regtype=native,bus=pci,id=15b3100715b30007......,driver=nmlx4_core
regtype=native,bus=pci,id=15b3100715b30008......,driver=nmlx4_core
regtype=native,bus=pci,id=15b3100715b3000c......,driver=nmlx4_core
regtype=native,bus=pci,id=15b3100715b3000d......,driver=nmlx4_core
regtype=native,bus=pci,id=15b36750..............,driver=nmlx4_core
------------------------->Last Line is FIX

And add HW ID support in file nmlx4_core.ids:

**************************************************************************************
/vmfs/volumes/FreeNAS/ISO/tmp-network/usr/share/hwdata/default.pciids.d/nmlx4_core.ids 
**************************************************************************************
#
# This file is mechanically generated.  Any changes you make
# manually will be lost at the next build.
#
# Please edit <driver>_devices.py file for permanent changes.
#
# Vendors, devices and subsystems.
#
# Syntax (initial indentation must be done with TAB characters):
#
# vendor  vendor_name
#       device  device_name                            <-- single TAB
#               subvendor subdevice  subsystem_name    <-- two TABs

15b3  Mellanox Technologies
        01f6  MT27500 [ConnectX-3 Flash Recovery]
        01f8  MT27520 [ConnectX-3 Pro Flash Recovery]
        1003  MT27500 Family [ConnectX-3]
        1004  MT27500/MT27520 Family [ConnectX-3/ConnectX-3 Pro Virtual Function]
        1007  MT27520 Family [ConnectX-3 Pro]
                15b3 0003  ConnectX-3 Pro VPI adapter card; dual-port QSFP; FDR IB (56Gb/s) and 40GigE (MCX354A-FCC)
                15b3 0006  ConnectX-3 Pro EN network interface card 40/56GbE dual-port QSFP(MCX314A-BCCT )
                15b3 0007  ConnectX-3 Pro EN NIC; 40GigE; dual-port QSFP (MCX314A-BCC)
                15b3 0008  ConnectX-3 Pro VPI adapter card; single-port QSFP; FDR IB (56Gb/s) and 40GigE (MCX353A-FCC)
                15b3 000c  ConnectX-3 Pro EN NIC; 10GigE; dual-port SFP+ (MCX312B-XCC)
                15b3 000d  ConnectX-3 Pro EN network interface card; 10GigE; single-port SFP+ (MCX311A-XCC)
        6750  Mellanox ConnectX-2 Dual Port 10GbE
-------->Last Line is FIX

After reboot I could see support for MT26448 [ConnectX EN 10GigE , PCIe 2.0 5GT/s].

Only ALERT: Failed to verify signatures of the following vib(s): [nmlx4-core].

2020-XX-XXTXX:XX:44.473Z cpu0:2097509)ALERT: Failed to verify signatures of the following vib(s): [nmlx4-core]. All tardisks validated
2020-XX-XXTXX:XX:47.909Z cpu1:2097754)Loading module nmlx4_core ...
2020-XX-XXTXX:XX:47.912Z cpu1:2097754)Elf: 2052: module nmlx4_core has license BSD
2020-XX-XXTXX:XX:47.921Z cpu1:2097754)<NMLX_INF> nmlx4_core: init_module called
2020-XX-XXTXX:XX:47.921Z cpu1:2097754)Device: 194: Registered driver 'nmlx4_core' from 42
2020-XX-XXTXX:XX:47.921Z cpu1:2097754)Mod: 4845: Initialization of nmlx4_core succeeded with module ID 42.
2020-XX-XXTXX:XX:47.921Z cpu1:2097754)nmlx4_core loaded successfully.
2020-XX-XXTXX:XX:47.951Z cpu1:2097754)<NMLX_INF> nmlx4_core: 0000:05:00.0: nmlx4_core_Attach - (nmlx4_core_main.c:2476) running
2020-XX-XXTXX:XX:47.951Z cpu1:2097754)DMA: 688: DMA Engine 'nmlx4_core' created using mapper 'DMANull'.
2020-XX-XXTXX:XX:49.724Z cpu1:2097754)<NMLX_INF> nmlx4_core: 0000:05:00.0: nmlx4_ChooseRoceMode - (nmlx4_core_main.c:382) Requested RoCE mode RoCEv1
2020-XX-XXTXX:XX:49.724Z cpu1:2097754)<NMLX_INF> nmlx4_core: 0000:05:00.0: nmlx4_ChooseRoceMode - (nmlx4_core_main.c:422) Requested RoCE mode is supported - choosing RoCEv1
2020-XX-XXTXX:XX:49.934Z cpu1:2097754)<NMLX_INF> nmlx4_core: 0000:05:00.0: nmlx4_CmdInitHca - (nmlx4_core_fw.c:1408) Initializing device with B0 steering support
2020-XX-XXTXX:XX:50.561Z cpu1:2097754)<NMLX_INF> nmlx4_core: 0000:05:00.0: nmlx4_InterruptsAlloc - (nmlx4_core_main.c:1744) Granted 38 MSIX vectors
2020-XX-XXTXX:XX:50.561Z cpu1:2097754)<NMLX_INF> nmlx4_core: 0000:05:00.0: nmlx4_InterruptsAlloc - (nmlx4_core_main.c:1766) Using MSIX
2020-XX-XXTXX:XX:50.781Z cpu1:2097754)Device: 330: Found driver nmlx4_core for device 0xxxxxxxxxxxxxxxxxxxxxxx

Some 10 Gbps tuning testing looks great, between 2x ESXi 7.0 with 2x MT2644:

[ ID] Interval           Transfer     Bandwidth       Retr
[  4]   0.00-120.00 sec   131 GBytes  9380 Mbits/sec    0             sender
[  4]   0.00-120.00 sec   131 GBytes  9380 Mbits/sec                  receiver
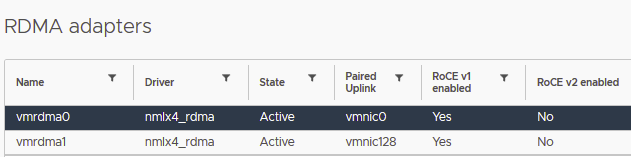
RDMA support for RoCEv1

RoCEv1 is only supported, because:

  • Support for RoCEv2 is above card – Mellanox ConnectX-3 Pro
  • We can see RoCEv2 options in nmlx2_core driver, but when I enabled enable_rocev2 It is NOT working
[root@esxi~] esxcli system module parameters list -m nmlx4_core
Name                    Type  Value  Description
----------------------  ----  -----  -----------
enable_64b_cqe_eqe      int          Enable 64 byte CQEs/EQEs when the the FW supports this
enable_dmfs             int          Enable Device Managed Flow Steering
enable_qos              int          Enable Quality of Service support in the HCA
enable_rocev2           int          Enable RoCEv2 mode for all devices
enable_vxlan_offloads   int          Enable VXLAN offloads when supported by NIC
log_mtts_per_seg        int          Log2 number of MTT entries per segment
log_num_mgm_entry_size  int          Log2 MGM entry size, that defines the number of QPs per MCG, for example: value 10 results in 248 QP per MGM entry
msi_x                   int          Enable MSI-X
mst_recovery            int          Enable recovery mode(only NMST module is loaded)
rocev2_udp_port         int          Destination port for RoCEv2

It is officialy NOT supported. Use it only in your HomeLAB. But We could save some money for new 10Gbps network cards.

Cisco UCS Manager Plugin for VMware vSphere HTML Client (Version 3.0(4))

What’s in version 3.0(4) of the Cisco UCS Manager plugin for the vSphere HTML client: view, manage and monitor Cisco UCS hardware from vCenter.

Cisco has released the 3.0(4) version of the Cisco UCS Manager VMware vSphere HTML client plugin. The UCS Manager vSphere HTML client plugin enables a virtualization administrator to view, manage, and monitor the Cisco UCS physical infrastructure. The plugin provides a physical view of the UCS hardware inventory on the HTML client.

Here are the new features in Release 3.0(4):

  • Support for VMware vSphere HTML Client 7.0
  • Included defect fix

Resolved Bugs

Defect IDSymptomFirst Affected in ReleaseResolved in Release
CSCvv01618UCSM domain not visible in HTML plug-in 3.0(2).3.0(2)3.0(4)
More info here.