ESXi iSCSI Port Binding with esxcli: networkportal add, remove and –force

iSCSI port binding with esxcli: list, add and remove network portals, what –force does, and how to clear active iSCSI sessions safely.

Short answer: software iSCSI port binding is managed with esxcli iscsi networkportal. Use list to see the bound VMkernel ports, add -A vmhbaNN -n vmkN to bind one, and remove -A vmhbaNN -n vmkN to unbind it. When ESX refuses because an iSCSI session is still active on the vmknic, remove --force unbinds it anyway, which logs those sessions out. Log them out deliberately first with esxcli iscsi session remove. Syntax below is from Broadcom’s ESXCLI reference for ESX 9.1.0 and is unchanged from ESXi 8.0 U3.

iSCSI port binding in one minute

Port binding ties the software iSCSI initiator to specific VMkernel adapters, so iSCSI traffic leaves only through those vmknics and each one becomes a separate path for multipathing. The usual rules: one vmknic per bound port, each vmknic with exactly one active physical uplink and no standby uplinks, all bound vmknics in the same subnet as the target portals, and unbound vmknics are never used for iSCSI. If your targets sit in a different subnet than the vmknics, read Broadcom’s routed port binding guidance before you bind anything.

esxcli iscsi networkportal options (ESX 9.1)

CommandOptionsWhat the option does
esxcli iscsi networkportal list--adapter | -ALimit the list to one iSCSI adapter
esxcli iscsi networkportal add--adapter | -A (required)The iSCSI adapter, e.g. vmhba64
--nic | -n (required)The vmknic to bind
--force | -fBind the vmknic even if it is not compatible with iSCSI multipathing
esxcli iscsi networkportal remove--adapter | -A (required)The iSCSI adapter
--nic | -n (required)The bound vmknic to remove
--force | -fRemove the vmknic even when sessions are active on it

The reference writes the flag as --force. The ESX error message suggests it as --force=true, so both spellings mean the same flag.

Find the software iSCSI adapter and the vmknics

esxcli iscsi adapter list
esxcli network ip interface ipv4 get
esxcli iscsi networkportal list

adapter list gives you the adapter name (the software initiator is usually vmhba6x). networkportal list shows each bound vmknic with its adapter, IP, uplink, compliance status and path status. A non-compliant vmknic is the first thing to fix.

Add a network portal (bind a vmknic)

esxcli iscsi networkportal add -A vmhba64 -n vmk2
esxcli iscsi networkportal add -A vmhba64 -n vmk3
esxcli storage core adapter rescan -A vmhba64
esxcli storage core path list

Replace vmhba64 and the vmknic names with your own. Rescan after binding so the new paths appear. Avoid add --force. It binds a vmknic that fails the multipathing checks (typically a port group with more than one active uplink), which leaves you with paths that do not fail over the way you expect. Fix the teaming instead: one active uplink, the rest unused.

Remove a network portal (unbind a vmknic)

esxcli iscsi networkportal remove -A vmhba64 -n vmk3
esxcli storage core adapter rescan -A vmhba64

With no active sessions on the vmknic, this is all you need.

“iSCSI session is active on the vmknic … use –force=true”

This is the message most people search for. ESX refuses to unbind because an iSCSI session still uses the vmknic, and suggests forcing it. Broadcom documents the same message when removing a static target (KB 370577). remove --force logs out every session on that vmknic. If a LUN has no other working path, that is an all-paths-down event for every VM on the datastore.

The safe order:

  1. Check that every LUN still has an active path through another vmknic: esxcli storage core path list -d naa.xxxx.
  2. List the sessions on the adapter and note the ISID of the session that uses this vmknic: esxcli iscsi session list -A vmhba64 and esxcli iscsi session connection list -A vmhba64.
  3. Log out only that session: esxcli iscsi session remove -A vmhba64 -s <isid>. Without -s or -n, session remove logs out every session on the adapter.
  4. Unbind: esxcli iscsi networkportal remove -A vmhba64 -n vmk3.
  5. Rescan the adapter and confirm the remaining paths.

Use --force only when the vmknic is already unusable (for example, a dead uplink during a NIC replacement) and you have confirmed the paths through the other vmknics.

iSCSI vmknics and netstacks

Searches for “netstack instance: iscsi” come from the output of esxcli network ip interface list, which prints the netstack every vmknic belongs to. To check:

esxcli network ip netstack list
esxcli network ip interface list

A vmknic gets its netstack when it is created. The reference documents esxcli network ip netstack add -N <name> and esxcli network ip interface add -i vmkN -p <portgroup> -N <netstack> (or -s <dvs-name> -P <dvport-id> on a distributed switch). An existing vmknic cannot be moved to another netstack; it has to be removed and created again. The main reason to give iSCSI its own netstack is a separate routing table. If your iSCSI traffic is not routed, the default netstack is the simpler choice. Before you port-bind vmknics on a custom netstack in production, confirm support with Broadcom’s vSphere Storage documentation and your array vendor, because the public documentation does not state it either way.

Verify paths after any change

esxcli iscsi networkportal list -A vmhba64
esxcli iscsi session list -A vmhba64
esxcli storage core path list
esxcli storage nmp device list

You want one active path per bound vmknic and target portal, and the path selection policy your array vendor recommends (usually Round Robin).

Common errors

  • “iSCSI session is active on the vmknic”: see the safe order above.
  • vmknic not compliant for binding: the port group has more than one active uplink, or a standby uplink. Set exactly one active uplink and move the others to unused. Don’t paper over it with add --force.
  • No new paths after add: no rescan, a target in a different subnet than the vmknic, or the array’s host access list does not include the initiator IQN.

Reference

NSX Host Agents on ESX: Troubleshooting nsx-proxy, nsx-opsagent, nsx-cfgagent and nsx-nestdb

Host Down or Host Disconnected in NSX? Which NSX host agent is behind it (nsx-proxy, nsx-opsagent, nsx-cfgagent, nsx-nestdb), how to check and restart it on ESX, and which logs to read.

Short answer: When a transport node shows Down in the NSX UI, one of the local agents that apply and report configuration (nsx-cfgagent, nsx-opsagent or nsx-nestdb) has usually stopped or crashed. When it shows Host Disconnected, look first at nsx-proxy, the agent that holds the connection to NSX Manager. Check the agent with /etc/init.d/<agent> status, start or restart it, then confirm the manager and controller connections and read /var/run/log/nsx-syslog.log.

The NSX agents on an ESX host

When you prepare a host for NSX, several user-space agents are installed next to the NSX kernel modules. Four of them matter most when a host goes red in the UI:

AgentWhat it doesIf it stops
nsx-proxyHolds the TLS connections from the host to NSX Manager (TCP 1234) and to the central control plane (TCP 1235) and passes messages to the other agents.The host loses its connection to the managers: Host Disconnected.
nsx-cfgagentReceives the desired configuration (segments, routing, firewall) and programs it into the kernel datapath.New or changed configuration is not applied; host status goes Down.
nsx-opsagentReports operational state and status of the transport node back to NSX Manager and handles VM port attachments.The manager gets no status from the host; host status goes Down.
nsx-nestdbLocal database on the host where the agents keep the configuration they received.The other agents cannot read or store configuration; host status goes Down.

The agents are management and control plane. Traffic that is already programmed into the kernel keeps flowing while an agent is down, but nothing new reaches the host: no new segments, no firewall rule changes, no vMotion of VMs onto NSX ports that the host does not know yet.

Symptom 1: host is Down in the NSX UI

In System > Fabric > Hosts the transport node shows Down, while the host itself is up in vCenter. The usual cause is that nsx-cfgagent, nsx-opsagent or nsx-nestdb stopped or crashed. Check all agents in one go from the ESX shell:

for a in nsx-proxy nsx-cfgagent nsx-opsagent nsx-nestdb; do
  echo "== $a"; /etc/init.d/$a status
done

Start the agent that is not running, or restart it if it is running but the node stays Down:

/etc/init.d/nsx-opsagent start
/etc/init.d/nsx-cfgagent restart
/etc/init.d/nsx-nestdb status

Restart one agent at a time and wait a minute before you look at the UI again; the node status is refreshed by the next report from the host. On ESX the NSX CLI has no restart service command (that is for Manager and Edge), so /etc/init.d is the way.

Symptom 2: Host Disconnected

The NSX configuration of the host shows Host Disconnected. Here the host cannot talk to NSX Manager at all, which points to nsx-proxy or to the network path between the host and the managers.

/etc/init.d/nsx-proxy status
/etc/init.d/nsx-proxy restart

# Which managers and controllers does the host use, and is it connected?
nsxcli -c get managers
nsxcli -c get controllers

# TCP sessions to NSX Manager (1234) and the central control plane (1235)
esxcli network ip connection list | grep -E ':1234|:1235'

If nsx-proxy runs but there is no ESTABLISHED session on 1234 and 1235, the problem is not the agent: check routing and firewalls between the ESX management network and the NSX Manager nodes (or the cluster VIP), DNS, and the manager certificates. For the full list of host-side NSX CLI commands see the NSX CLI interactive mindmap with the ESXi node filter.

Logs: nsx-syslog.log

All four agents write to /var/run/log/nsx-syslog.log on the host (/var/log is a link to /var/run/log). Filter by agent name to see why it stopped:

grep -i "nestdb"    /var/run/log/nsx-syslog.log | tail -50
grep -i "cfgagent"  /var/run/log/nsx-syslog.log | tail -50
grep -i "opsagent"  /var/run/log/nsx-syslog.log | tail -50

# nsx-proxy: the connection to the managers, filtered by a manager IP
grep -i "<nsx-manager-ip>" /var/run/log/nsx-syslog.log | tail -20

A healthy nsx-proxy logs a heartbeat about once a minute, with subcomp="nsx-proxy" and a line like MessagingClientService: Heartbeat message received … from endpoint: ssl://<manager-ip>:1234. If the heartbeats stop at a certain time, that is when the host lost the manager; look at the lines just before it for TLS, certificate or connection errors.

For more detail while you reproduce the problem, raise the nsx-proxy log level and set it back afterwards:

nsxcli -c get service nsx-proxy logging-level
nsxcli -c set service nsx-proxy logging-level debug
# ... reproduce ...
nsxcli -c set service nsx-proxy logging-level info

If the agent keeps stopping

  • Check for core dumps in /var/core: a crashing agent leaves one there each time.
  • Check that the host is not short of memory or that its scratch/OSDATA partition is not full; agents fail to start when they cannot write their state.
  • Compare the NSX VIB version on the host (esxcli software vib list | grep -i nsx) with the NSX Manager version; a half-finished upgrade often shows up as agents that crash after start.
  • Collect a support bundle for the host from NSX Manager before you reboot it, so the logs and cores are kept for Broadcom support.

Further reading

VMware Hypervisor Recovery at Boot: Causes and Fixes for ESXi 7, 8 and 9

Why an ESXi host stops at VMware Hypervisor Recovery or No hypervisor found, and how to fix it: KB 324877, Shift+R rollback, repair install.

Short answer: if an ESXi host stops at “VMware Hypervisor Recovery” or reports “No hypervisor found”, the host could not load a valid image from its boot device. First check the firmware boot mode and the boot device itself. If the hang started right after a 7.0 Update 2 upgrade on a UEFI host, apply the boot loader workaround from KB 324877. If the image is damaged, roll back with Shift+R (only if the altbootbank still holds the previous build), or reinstall with “Install ESXi, preserve VMFS datastore” and restore the configuration backup.

What the “VMware Hypervisor Recovery” screen means

ESXi 7.0 and later keep the hypervisor in two boot banks on the boot device. According to the ESXi 7.0 system storage documentation, the layout is a System Boot partition (boot loader and EFI modules), Boot-bank 0 and Boot-bank 1 (ESXi boot modules, mounted as /bootbank and /altbootbank) and ESX-OSData (scratch, VMware Tools locker, core dumps, logs). The active bank holds the running build. The other bank holds the build from before the last update.

Broadcom documents the “VMware Hypervisor Recovery” message in one specific case, KB 324877: a UEFI host hangs at the boot loader showing this message after an ESXi install or upgrade. Broadcom does not publish a general definition of the screen. Treat it, and the related “No hypervisor found” error, as a sign that the host could not boot a working image. Look at the boot loader, the boot bank contents, the boot device and the firmware settings, in that order.

VMware Hypervisor Recovery: cause and fix table

SymptomLikely causeFixSource
UEFI host hangs at “VMware Hypervisor Recovery” right after upgrading to 7.0 Update 27.0 U2 boot loader loads EFI files in a way some firmware does not supportBoot the 7.0 U1 installer and copy its boot loader files to the boot partitionKB 324877
“No hypervisor found”Missing or corrupted ESXi files, failed SD card or disk, boot LUN lost, boot order or boot mode changedCheck boot mode (UEFI vs BIOS) and boot order, check hardware and storage, then reinstallKB 404825
Host fails or misbehaves after a patch or upgradeProblem with the new image in the active bankShift+R rollback to the build in the altbootbankKB 316592
Host silently reverts to the old build after an upgradeFaulty dual SD card RAID mirror, or not enough contiguous space to repartition for the 7.0 layoutMove to supported boot media, or clean install without a datastore on the boot deviceKB 418807, KB 426659
Upgrade precheck reports a vFAT bootbank problem, or PSOD while backing up vFAT partitionsCorrupted vFAT boot bank partitionsRepair the partitions with dosfsckKB 91136 (345227)
“Out of resources” when booting a newer release in legacy BIOS modeImage too large for legacy BIOS bootSwitch to UEFI on the old release first, then upgradeKB 84233 (313152)

UEFI boot hang after ESXi 7.0 Update 2 (KB 324877)

KB 324877 covers ESXi 7.0.x. Broadcom states that the way ESXi 7.0 U2 loads EFI files is not supported by some system firmware. The workaround replaces the boot loader on the system boot partition with the one from the 7.0 U1 installer. In outline:

  1. Boot the host from the ESXi 7.0 U1 installer ISO and open the shell with Alt+F1 (log in as root, no password).
  2. Identify the boot disk with ls /dev/disks and partedUtil getptbl. Partition 1 (systemPartition) is the boot partition.
  3. Back up the existing BOOTx64.EFI, mboot64.efi and safeboot64.efi, then copy the versions from /usr/lib/vmware/bootloader-installer onto the boot partition with mcopy.
  4. Reboot from the disk.

Follow the exact commands in the KB, because the device name differs on every host. This only applies to this 7.0 U2 case. It does not fix a damaged boot bank or a failed boot device.

Shift+R: roll back to the previous bootbank

KB 316592 describes the rollback for ESXi 6.x, 7.x, 8.x and ESX 9.x. Reboot the host and press Shift+R while the hypervisor progress bar is loading, not after it finishes. The KB suggests pressing it repeatedly once the “system is preparing to boot” message appears. ESXi then warns that the current hypervisor will be permanently replaced with the older build. Press Y to confirm and Enter to boot.

Rollback only works if the altbootbank still holds a different, working build. Before you rely on it, check the build= line of both banks from the ESXi Shell:

grep build= /bootbank/boot.cfg /altbootbank/boot.cfg
esxcli software profile get

Limits documented in KB 316592, KB 376175 and KB 386377:

  • Only one previous state (n-1) is kept. Each upgrade or VIB install or removal discards the older copy.
  • After the first reboot following an upgrade, any change that needs another reboot commits the new build to both banks. After that, rollback is gone.
  • In an HA cluster, exiting maintenance mode installs the FDM VIB. After an upgrade to 8.0 this discards the previous build (KB 386377). The workaround is to disable vSphere HA before the upgrade.
  • You cannot roll back from 7.0 to 6.x because the partition layout changed. Rollback between 7.0, 8.0 and 9.0 is possible.
  • Rollback does not revert the tools-light VIB, and it will not help if the boot device itself is failing.

VMware Hypervisor Recovery: “No hypervisor found”

KB 404825 lists the causes: missing or corrupted ESXi files, a failing SD card or disk, a power outage, a boot LUN lost through network or storage problems, a changed boot order, or a changed boot mode. Work through it in this order:

  1. Confirm the firmware is still in UEFI mode and the ESXi device is first in the boot order.
  2. Check the hardware logs (iDRAC, iLO, CIMC and similar) for a failed SD module, M.2 device or disk. For boot from SAN, have the storage team check the LUN and its paths.
  3. Try Shift+R if the other bank has a valid build.
  4. If nothing else works, reinstall ESXi (next section).

ESXi repair install: reinstall without losing VMs

Broadcom does not document a separate “repair” mode. The documented path is to boot the installer and run it over the existing installation. When the installer finds ESXi and a VMFS datastore on the selected disk, KB 392956 lists three options:

  • Upgrade ESXi, preserve VMFS datastore: upgrades the installation and keeps both the settings and the datastore.
  • Install ESXi, preserve VMFS datastore: fresh ESXi install that keeps the datastore. The host configuration is lost.
  • Install ESXi, overwrite VMFS datastore: wipes the installation and the datastore on that disk.

The TechDocs page for ESX 9.0 interactive upgrade adds that if the datastore cannot be preserved, you can only overwrite it or cancel. In that case, back up the datastore first.

A configuration backup can only be restored to the same build, so reinstall from the same build you backed up (KB 313510, KB 413897). If you need a specific ISO, see the download tip linked below.

Boot device causes

SD card and USB boot media

KB 85685 (now 317631) explains why SD/USB boot devices wear out on 7.0 and later: ESX-OSData takes constant writes and the wear cannot be monitored. SD/USB boot is still supported through VCF 9.0 on previously certified servers. Broadcom recommends a persistent device for OSData, or better, an SSD/NVMe boot device (8.x: 32 GB minimum, 128 GB recommended; 9.x: 128 GB minimum). KB 317891 lists the warnings 7.0 U3 and later raise without one. KB 413897 covers the migration: back up, reinstall the same build on the new disk, fix the boot order, restore.

Corrupted vFAT boot banks

If an upgrade precheck reports a vFAT bootbank problem, see the KB 91136 walkthrough linked below. It covers identifying the boot bank partitions with esxcli storage filesystem list and vmkfstools -P, then checking and repairing them with dosfsck in maintenance mode.

Legacy BIOS vs UEFI

KB 84233 (313152) warns that newer releases may fail to boot in legacy BIOS mode, for example with “Out of resources”. Switch to UEFI while still on the old release, reboot, fix any device naming issues, and only then upgrade. An unexpected BIOS/UEFI mode change is also listed as a cause in KB 404825.

Restore the configuration afterwards

After a clean install, restore the configuration bundle as described in KB 313510. The build must match the backup, and the host UUID should match. From 7.0 U2, a TPM-encrypted configuration cannot be force-restored to different hardware. The ESXi Shell workflow is:

# before the failure (or on a healthy host, regularly)
vim-cmd hostsvc/firmware/sync_config
vim-cmd hostsvc/firmware/backup_config

# on the reinstalled host, same build (check with: vmware -vl)
vim-cmd hostsvc/maintenance_mode_enter
# reboot, copy the bundle to /tmp/configBundle.tgz, then:
vim-cmd hostsvc/firmware/restore_config 0

The restore reboots the host automatically. KB 413897 notes that the bundle does not include SSH keys, custom scripts or third-party agents.

Preventing ESXi boot recovery problems

  • Boot from an endurance-rated SSD, NVMe or M.2 RAID device, not SD/USB. At minimum, give OSData a persistent device.
  • Run hosts in UEFI mode and switch before a major upgrade, not during it.
  • Schedule regular configuration backups with vim-cmd hostsvc/firmware/backup_config and keep the matching ISO for each build.
  • Check both boot bank builds before and after an upgrade. If you need a rollback option, validate the new build before any further reboot-requiring change, and consider disabling HA during the upgrade (KB 386377).
  • Do not create extra VMFS datastores on the boot device (KB 426659).

Sources

Related on vdan.cz

Intel Skylake and ESX 9: Skylake-SP Supported in Deprecated Mode for VCF 9.x, Not Beyond

Is Intel Skylake supported in ESX 9? Skylake-SP runs in Deprecated mode for all VCF 9.x (KB 428874), not beyond. Skylake-W stays discontinued.

Illustration of an Intel Skylake server CPU reaching end of support in vSphere

Short answer: Yes, with limits. Broadcom KB 428874 was updated on 18 September 2026. Intel Skylake-SP (Xeon Scalable 1st generation: Platinum 8100, Gold 6100/5100, Silver 4100, Bronze 3100) is now supported in Deprecated mode for all of VCF 9.x, including 9.0 GA. Support depends on BCG listing and OEM hardware support. It will not be extended beyond 9.x. Skylake-W (Xeon W-2100) remains discontinued.

This post covers Skylake specifically. For the general installer warning (“may not be supported in future ESXi releases”) and the full CPU tables, see KB 82794 explained.

Intel Skylake ESXi 9 support at a glance

Skylake variantBCG CPU seriesCPU Info / CPUIDKB 318697 status for 9.x
Skylake-SPXeon Platinum 8100, Gold 6100/5100, Silver 4100, Bronze 31006.55.4 / 0x00050654See KB 428874: Deprecated mode for VCF 9.x
Skylake-DXeon D-21006.55.4 / 0x00050654See KB 428874
Skylake-SXeon E3-1200-v5, E3-1500-v56.5E.3 / 0x000506E3See KB 428874
Skylake-WXeon W-21006.55.4 / 0x00050654Discontinued

Note: the text of KB 428874 names only Skylake-SP explicitly. KB 318697 points the Skylake-D and Skylake-S rows to it as well. If you run Xeon D-2100 or E3 v5 systems, check the BCG listing for your exact server model. The other VCF 9 hardware checks (I/O devices, deprecated drivers, vSAN ESA) are in How to check VCF 9 hardware compatibility.

How Skylake support changed from vSphere 8 to VCF 9.x

  • vSphere 8.x: Skylake was on the deprecation list. The ESXi 8 installer warned that the CPU may not be supported in future releases, and installation continued. The original version of this post (October 2024) covered that stage.
  • VCF 9.0 GA: Skylake-SP was discontinued and not listed in the BCG for 9.0. In February 2026, Broadcom’s VCF blog still said Skylake needed an RPQ, with “VCF Software Only” support on approval.
  • KB 428874, 4 July 2026: the KB added Skylake-SP support for VCF 9.1.x.
  • KB 428874, 18 September 2026: support was expanded to VCF 9.x, including 9.0 GA. No TQ/RPQ is required for certain OEM server models marked “VCF Supported. Confirm w/ Vendor”.

Advice from older posts and forums, such as “Skylake does not install on ESX 9” or “file an RPQ”, may be out of date. Check the KB’s update date before you decide.

What Deprecated mode means for an Intel Skylake server

  • Deprecated means still supported. Per KB 318697, the CPU series is supported through the life of the VCF release, its updates and patches, or until End of General Support.
  • The OEM must list the server model in the Broadcom Compatibility Guide. KB 428874 links a BCG search for Skylake systems marked “VCF Supported. Confirm w/Vendor” on ESXi 9.0 and 9.1.
  • “VCF Supported. Confirm w/Vendor” means no further system-level driver enhancements and best-effort fixes or workarounds for the VCF software only.
  • Hardware, BIOS, firmware and microcode support comes from the server OEM and Intel under your contract with them. If you have no such support, you carry the risk.
  • vSAN OSA and ESA ReadyNodes with Skylake-SP are also in Deprecated mode and still supported.

Installing or upgrading ESX 9 on Skylake-SP

KB 428874 says the specific install and upgrade paths for VCF 9.x are described in its attached document, ESX_9.x_Install_Upgrade_using_OVERRIDE_on_Skylake_CPU_based_Servers-v1.3-09182026.pdf. Download it from the KB page and follow it for your path (fresh install, ESX upgrade, or a VCF-managed upgrade). I have not reproduced its steps here because they are versioned and still changing. This is Broadcom’s supported procedure. Don’t confuse it with the unsupported homelab boot option allowLegacyCPU=true.

Is it Skylake or Cascade Lake? Check the stepping

Skylake-SP and Cascade Lake-SP use the same family and model (hex 6.55, decimal model 85). Only the stepping tells them apart: 4 is Skylake-SP, and 6 or 7 is Cascade Lake. Cascade Lake is Deprecated in 9.x and listed as Discontinued for the next major release.

esxcli hardware cpu list
# look at: Brand, Family, Model, Stepping (decimal values)
# Family 6, Model 85, Stepping 4    -> Skylake-SP (6.55.4)
# Family 6, Model 85, Stepping 6/7  -> Cascade Lake (6.55.6 / 6.55.7)

What happens after 9.x

KB 428874 is explicit: Skylake-SP support will not be extended to VCF releases beyond 9.x. In KB 318697’s definitions, a “future major release” is the release after the 9.x series. The same table lists Cascade Lake, AMD EPYC 7001 (Naples) and 7002 (Rome), Coffee Lake Xeon E-2100/E-2200 and Atom C3000 as discontinued in that release. For planning:

  1. Inventory hosts by CPU stepping, not only by server model.
  2. Treat Skylake-SP hosts as “last stop: VCF 9.x” and track the 9.x End of General Support date in the Broadcom Product Lifecycle Matrix.
  3. Confirm OEM hardware and firmware support for the remaining lifetime. KB 428874 puts this responsibility on the OEM and Intel.
  4. Plan the refresh so the cluster does not block the next major upgrade. Avoid mixing in new Cascade Lake purchases, which hit the same wall.

Sources

Related on vdan.cz

Cisco UCS VMware-v2 Adapter Policy (UCSM 4.3(4a)): Values, VIC Support and When to Use It

What the UCSM 4.3(4a) VMware-v2 adapter policy sets on Cisco VIC (1 TX, 8 RX, 4096 rings, RSS) and when to use it vs VMWare or VMWarePassThru.

Short answer: The VMware-v2 adapter policy is a system-provided Ethernet adapter policy that Cisco added in UCS Manager 4.3(4a). It builds Cisco’s recommended ESXi settings into a default: 1 TX queue, 8 RX queues, 4096-entry TX and RX rings, 9 completion queues, 11 interrupts and RSS enabled. The release notes cover VIC 1400, 14000 and 15000 adapters. Use it for ordinary ESXi vNICs instead of the old “VMWare” policy. VMWarePassThru is only for VM-FEX.

I wrote this post in October 2024, when 4.3(4a) shipped. We had been running almost the same values in our own custom policy for years; the one difference was 12 interrupts instead of 11. This September 2026 update checks the values against Cisco’s current documentation and adds the upgrade caveats.

Cisco UCS Manager 4.3(4a) Ethernet adapter policy settings for the VMware-v2 policy on a Cisco VIC

What the VMware-v2 adapter policy is

The UCS Manager 4.3 release notes say that from 4.3(4a), “new optimized adapter policies are available for Windows, Linux, and VMware operating systems, for the Cisco UCS VIC 1400, 14000 and 15000 series adapter”. Cisco’s VIC 15000 best-practices white paper explains what that means: the recommended adapter parameters “have now been built into new system provided adapter policies, suffixed with ‘-v2′”. Intersight Managed Mode gained the same policies at the same release level.

The main point is that you no longer need a hand-built custom policy for the standard ESXi RSS configuration. Select VMWare-v2 on the vNIC or vNIC template and you get Cisco’s baseline.

VMware-v2 adapter policy values

These are the ESXi values in Cisco’s “Recommended adapter policy for the best performance with RSS” (VIC 15000 white paper, Table 3). The v2 policies are built from this table.

ParameterVMware-v2 / Cisco ESXi recommendation
Transmit queues1
TX ring size4096
Receive queues8
RX ring size4096
Completion queues9 (TX + RX)
Interrupts11 (CQ + 2)
Receive Side Scaling (RSS)Enabled

A note on interrupts: the UCS Manager 4.3 Network Management Guide gives the formula as “(Completion Queues + 2) rounded up to nearest power of 2”, which would be 16. The white paper uses 11 for ESXi and gives 16 as its own worked example. Both are Cisco documents. VMware-v2 uses 11. Our custom policy used 12 for years without problems.

Ring size and RX queue limits

  • VIC 1400 and 14000 series support a ring size of up to 4096 (4K). This is the maximum, and VMware-v2 already uses it.
  • VIC 15000 series and later support ring sizes up to 16384 (16K). If you want more than 4096, you need a custom policy.
  • RSS spreads receive processing across CPU cores and is set per vNIC through the adapter policy. Cisco states that most ESXi versions support up to 16 RX queues (ESXi 6.0 supports 8). The Intersight best-practices guide recommends 16 RX queues for ESXi 8.0. Again, going above the v2 default of 8 requires a custom policy.

Which Cisco VIC adapters use it

The release notes and the Network Management Guide name the VIC 1400, 14000 and 15000 series for the 4.3(4a) optimized policies. The VIC 15000 white paper words the v2 policies as being for operating systems “that use VIC 15000 adapters”. Older VIC 1200 and 1300 adapters are not named.

VMware-v2 vs VMWare vs VMWarePassThru

PolicyUse it for
VMWare-v2Standard ESXi vNICs (management, vMotion, VM traffic, NFS/iSCSI) on VIC 1400/14000/15000 with UCSM 4.3(4a) or later. RSS with 8 RX queues.
VMWareThe older system policy. Keep it only if you deliberately want the old values. Compare both policies under Servers > Policies > root > Adapter Policies before switching.
VMWarePassThruCisco’s system policy for VM-FEX in high-performance mode (dynamic vNICs). Not for normal static vNICs.
Custom policyNeeded for GENEVE offload (disabled by default in every adapter policy), 16 RX queues, or VIC 15000 rings above 4096.

For NSX host transport nodes, Cisco’s recommended GENEVE policy is different from VMware-v2: 1 TX queue, 8 RX queues, 4096 rings, 16 completion queues, 32 interrupts, RSS on and GENEVE offload enabled.

How to apply the VMware-v2 adapter policy

  1. Upgrade the UCS domain to 4.3(4e) or later (see the upgrade note below).
  2. In UCS Manager, open Servers > Policies > root > Adapter Policies and check the values of VMWare-v2.
  3. In the vNIC template, or in the vNIC of the LAN connectivity policy or service profile, set Adapter Policy to VMWare-v2.
  4. UCS Manager shows whether the change needs a server reboot. If it does, the reboot follows the service profile’s maintenance policy, so put the ESXi host into maintenance mode first.
  5. Verify on the ESXi host with the commands in Cisco’s vNIC tuning guide:
vsish -e get /net/pNics/vmnic0/txqueues/info
vsish -e get /net/pNics/vmnic0/rxqueues/info
esxcli network nic ring current get -n vmnic0

Upgrade note: 4.3(4a) to 4.3(4d) are deprecated

Cisco has deprecated UCS Manager 4.3(4a), 4.3(4b), 4.3(4c) and 4.3(4d), and their firmware files are no longer available. Cisco recommends 4.3(4e) or later. Two field notices are behind this. FN74201: UCS Manager can become inaccessible after an upgrade with integrated S3260 servers. FN74209: virtual Fibre Channel interfaces may flap. At the time of writing the newest 4.3 maintenance release is 4.3(6j), and Cisco also publishes UCS Manager 6.0.

Sources

Related on vdan.cz

Add nConnect Support to NFS v4.1

vSphere 8.0 Update 3 adds nConnect for NFS v4.1 datastores: multiple connections per session on one IP, extending session trunking.

Starting with vSphere 8.0 Update 3, nConnect support has been added for NFS v4.1 datastores. This feature enables multiple connections using a single IP address within a session, thereby extending session trunking functionality to that IP. With nConnect, multipathing and nConnect coexist, allowing for more flexible and efficient network configurations.

Benefits of nConnect

Traditionally, vSphere NFSv4.1 implementations create a single TCP/IP connection from each host to each datastore. This setup can become a bottleneck in scenarios requiring high performance. By enabling multiple connections per IP, nConnect significantly enhances data throughput and performance. Here’s a quick overview of the benefits:

  • Increased Performance: Multiple connections can be established per session, reducing congestion and improving data transfer speeds.
  • Flexibility: Customers can configure datastores with multiple IPs to the same server and also multiple connections with the same IP.
  • Scalability: Supports up to 8 connections per IP, enhancing scalability for demanding workloads.

Configuring nConnect

Adding a New NFSv4.1 Datastore

When adding a new NFSv4.1 datastore, you can specify the number of connections at the time of the mount using the following command:

esxcli storage nfs41 add -H <host> -v <volume-label> -s <remote_share> -c <number_of_connections>

By default, the maximum number of connections per session is set to 4. However, this can be increased to 8 using advanced NFS options. Here’s how you can configure it:

  1. Set the maximum number of connections to 8: esxcfg-advcfg -s 8 /NFS41/MaxNConnectConns
  2. Verify the configuration: esxcfg-advcfg -g /NFS41/MaxNConnectConns

The total number of connections used across all mounted NFSv4.1 datastores is limited to 256.

Modifying Connections for an Existing NFSv4.1 Datastore

For an existing NFSv4.1 datastore, the number of connections can be increased or decreased at runtime using the following command:

esxcli storage nfs41 param set -v <volume-label> -c <number_of_connections>

Multipathing and nConnect Coexistence

There is no impact on multipathing when using nConnect. Both NFSv4.1 nConnect and multipaths can coexist seamlessly. Connections are created for each of the multipathing IPs, allowing for enhanced redundancy and performance.

Example Configuration with Multiple IPs

To add a datastore with multiple IPs and specify the number of connections, use:

esxcli storage nfs41 add -H <IP1,IP2> -v <volume-label> -s <remote_share> -c <number_of_connections>

This command ensures that multiple connections are created for each of the specified IPs, leveraging the full potential of nConnect.

Summary

The introduction of nConnect support in vSphere 8.0 U3 for NFS v4.1 datastores marks a significant enhancement in network performance and flexibility. By allowing multiple connections per IP, nConnect addresses the limitations of single connection setups, providing a robust solution for high-performance environments. Whether you’re configuring a new datastore or updating an existing one, nConnect offers a scalable and efficient way to manage your NFS workloads.

https://core.vmware.com/resource/whats-new-vsphere-8-core-storage

vmss2core: Where to Download It and How to Convert VM Snapshots (.vmsn/.vmss + .vmem) into Windows and Linux Memory Dumps

vmss2core in 2026: where to download it, which .vmsn/.vmss/.vmem files it needs, -W/-W8/-N commands, WinDbg analysis and common errors.

Short answer: vmss2core converts a VM checkpoint (a snapshot with memory, .vmsn + .vmem, or a suspend file, .vmss + .vmem) into a memory dump for WinDbg or the Linux crash utility. Get the current build from VMware Workstation Pro or Fusion; the standalone Fling in Broadcom’s Free Downloads is older (build 8456865) and does not support Windows 11, Server 2019 or Server 2025. Run vmss2core.exe -W8 vm.vmsn vm.vmem for modern Windows, -N for Linux.

vmss2core converting a VMware VM snapshot (.vmsn and .vmem) into a memory dump

What the vmss2core tool does and which files it needs

vmss2core reads VMware checkpoint state and writes a core or memory dump that standard debuggers understand: memory.dmp for Windows (WinDbg) or vmss.core for Linux (crash, GDB). It is useful when a guest hangs and you cannot force a crash dump from inside the OS.

MethodFiles to copyNotes
Snapshot with memory<name>-SnapshotN.vmsn + <name>-SnapshotN.vmemVM keeps running. Pick the newest pair by timestamp.
Suspend<name>.vmss + <name>.vmemHardware version 11 or newer, or VMs on vVols, write a separate .vmem. Hardware version 10 or lower keeps everything in the .vmss.

The .vmem file is the guest memory image. The .vmsn/.vmss file holds the device and CPU state. You always pass the state file first and the .vmem second.

vmss2core download: where to get it now

The old Flings site and vmwa.re/flings links are gone. Flings now live in the Free Downloads section of the Broadcom Support Portal, which needs a free Broadcom account (personal email addresses are accepted).

SourceVersionUse it for
Broadcom Support Portal > Free Downloads > Flings > VMSS2CoreLegacy standalone build 8456865 (Windows and Linux binaries)Older guests only. Not for Windows 11, Server 2019 or Server 2025.
VMware Workstation Pro (Free Downloads)Current, bundledAny supported guest, including Windows 11 and Server 2025
VMware Fusion Pro (Free Downloads)Current, bundledSame, on macOS

Once Workstation or Fusion is installed, the binary is here:

  • Windows 64-bit: C:\Program Files (x86)\VMware\VMware Workstation\vmss2core.exe
  • Windows 32-bit: C:\Program Files\VMware\VMware Workstation\
  • Linux: /usr/bin/ (Broadcom’s KB calls the Linux binary vmss2core-Linux64; same syntax)
  • macOS (Fusion): /Library/Application Support/VMware Fusion/

Get the latest vmss2core.exe without installing Workstation

  1. Download the VMware Workstation Pro installer from Free Downloads (Broadcom’s example: VMware-Workstation-Full-25H2u1-25219725.exe).
  2. Open the installer with 7-Zip, then open Workstation.cab inside it.
  3. Copy vmss2core.exe and _zlib1.dll to one folder, for example C:\Temp\vmss2core.
  4. Rename _zlib1.dll to zlib1.dll. Without this you get “The code execution cannot proceed because zlib1.dll was not found.”

Get the snapshot or suspend files from ESXi

vSphere Client datastore browser showing the .vmsn and .vmem snapshot files to download for vmss2core
  1. Reproduce the problem so the guest is in the state you want to capture. The guest kernel must be loaded; a VM stuck in BIOS/POST or before the OS boots gives no usable data.
  2. In the vSphere Client, right-click the VM and take a snapshot with the VM’s memory included, or suspend it (Power > Suspend). From the ESXi Shell you can suspend with vim-cmd vmsvc/getallvms and vim-cmd vmsvc/power.suspend <VMID>.
  3. Browse the datastore to the VM folder (/vmfs/volumes/<datastore>/<vm_name>/) and download the .vmsn or .vmss file and the matching .vmem.
  4. Copy them to the folder that contains vmss2core.

On vSAN the .vmem is an object; Broadcom KB 326327 describes reading its object ID and exposing it with objtool before copying. For Horizon desktops, put full clones in maintenance mode before suspending; for instant clones, use a memory snapshot instead. The Broadcom KBs are written for ESXi 8.x; memory snapshots and suspend work the same way in vSphere 9.

vmss2core for Windows: -W or -W8

OptionGuest OS (Broadcom KB 323788)
-WWindows 7, Windows 10, Windows Server 2008, 2008 R2
-W8Windows 8, 8.1, Windows 11, Windows Server 2012, 2016, 2019, 2025
-NLinux
vmss2core.exe -W8 test-vm.vmsn test-vm.vmem
vmss2core.exe -W8 test-vm.vmss test-vm.vmem
vmss2core.exe -W  old-vm.vmsn old-vm.vmem

KB 181598 phrases it slightly differently: -W8 for Windows 8 / Server 2012 and later, -W for older Windows. The two KBs disagree on Windows 10. Success produces memory.dmp in the current folder.

vmss2core for Linux guests: -N

./vmss2core-Linux64 -N vm-Snapshot1.vmsn vm-Snapshot1.vmem
vmss2core.exe -N vm-Snapshot1.vmsn vm-Snapshot1.vmem

The result is vmss.core, a Red Hat crash-format core. The tool’s help says -N uses kernel structure offsets passed with -l, generated by getlinuxoffsets. Here is my own -N run from the original version of this post (vmss2core build 20800274, about 2,000 MB written, progress lines shortened):

vmss2core.exe -N VM-Snapshot1.vmsn VM-Snapshot1.vmem
vmss2core version 20800274 Copyright (C) 1998-2022 VMware, Inc. All rights reserved.
Started core writing.
Writing note section header.
Writing 1 memory section headers.
Writing notes.
... 100 MBs written.
... 200 MBs written.
...
... 1900 MBs written.
... 2000 MBs written.
Finished writing core.

Analyze the VMware memory dump

  • Windows, WinDbg: windbg -y <SymbolPath> -z memory.dmp, or File > Open Crash Dump (Ctrl+D). Start with !analyze -v, then .bugcheck, lm and !process 0 0.
  • Linux, crash: crash vmlinux vmss.core. crash needs two arguments for a dump file: the uncompressed kernel (vmlinux with debug info matching the guest kernel) and the dump.

vmss2core errors and fixes

SymptomCause and fix
Unrecognized .vmss file (magic 4f434e45), 0 KB memory.dmpVM files are encrypted (Windows 11 / Server 2025 with vTPM). Suspend the VM, decrypt on ESXi with crypto-util (below), convert the decrypted files with the current vmss2core.
Error parsing Windows data. Cannot create memory.dmpWindows kernel was not loaded yet (stuck in POST, no boot device, boot failure). Capture again after the OS is up.
0 KB dump, or a .core file instead of memory.dmpVBS or Hyper-V is enabled in the guest. Check vhv.enable = "TRUE" in the .vmx; the KB says to set it to "FALSE". Also update old Windows builds.
Access is DeniedUse the latest vmss2core from Workstation Pro.
EFI VM freezes on a black screen, Cannot translate linear addressEFI SMM deadlock on hardware version below 14 (ESXi 7.0). Fixed in ESXi 8.0; workaround is hardware version 14 or later (KB 318382).
crypto-util encobj decrypt --related vm-###.vmx vm-###.vmem vm-###-decrypted.vmem
crypto-util encobj decrypt --related vm-###.vmx vm-###.vmss vm-###-decrypted.vmss
vmss2core.exe -W8 vm-###-decrypted.vmss vm-###-decrypted.vmem

Do not remove the vTPM to get around encryption: Broadcom warns that this makes encrypted data unrecoverable and stops Windows 11 from booting.

vmss2core options reference

Output of vmss2core.exe without arguments on my machine (build 20800274, abridged):

Usage:
GENERAL:  vmss2core [[options] | [-l linuxoffsets options]] \
          <vmss file> [<vmem file>]

Without options one vmss.core<N> per vCPU with linear view of
memory is generated.
-q      Quiet(er) operation.
-M      Create core file with physical memory view (vmss.core).
-l str  Offset stringset expressed as 0xHEXNUM,0xHEXNUM,... .
-N      Red Hat crash core file for arbitrary Linux version
        described by the "-l" option (vmss.core).
-N4     Red Hat crash core file for Linux 2.4 (vmss.core).
-N6     Red Hat crash core file for Linux 2.6 (vmss.core).
-O <x>  Use <x> as the offset of the entrypoint.
-U <i>  Create linear core file for vCPU <i> only.
-P      Print list of processes in Linux VM.
-P<pid> Create core file for Linux process <pid> (core.<pid>).
-S      Create core for 64-bit Solaris (vmcore.0, unix.0).
-S32    Create core for 32-bit Solaris (vmcore.0, unix.0).
-W      Create WinDbg file (memory.dmp) with commonly used
        build numbers ("2195" for Win32, "6000" for Win64).
-W<num> Create WinDbg file (memory.dmp), with <num> as the
        build number (for example: "-W2600").
-WK     Create a Windows kernel memory only dump file (memory.dmp).
-WDDB<num> or -W8DDB<num>
        Create WinDbg file (memory.dmp), with <num> as the
        debugger data block address in hex.
-WSCAN  Scan all of memory for Windows debugger data blocks
        (instead of just low 256 MB).
-W8     Generate a memory dump file from a suspended Windows 8 VM.
-X32    <mach_kernel> Create core for 32-bit Mac OS.
-X64    <mach_kernel> Create core for 64-bit Mac OS.
-F      Create core for an EFI firmware exception.

Sources

Related on vdan.cz

How to Rebuild a VMX File from vmware.log on an ESXi 8 Host via SSH

Lost or corrupted .vmx? Rebuild it from vmware.log on ESXi 8 with a short shell script over SSH (KB 1023880), including the #!/bin/ash fix for ESXi 8.

Introduction

Short answer: if a VM’s .vmx file is lost or corrupted, you can rebuild it from the configuration that ESXi writes into the VM’s vmware.log. SSH to the host, change to the VM’s folder, and run the small shell script below. On ESXi 8 the script needs #!/bin/ash as its first line, otherwise it fails with Operation not permitted. Back up the VM folder first.

Rebuilding a VMX file from vmware.log in VMware ESXi can be crucial for restoring a virtual machine’s configuration. This guide will walk you through the process using SSH according KB 1023880, but with update for ESXi 8.0. It was necessary add #!/bin/ash because of error “Operation not permitted”.

Step 1: SSH into Your ESXi Host

First, ensure SSH is enabled on your ESXi host. Then, use an SSH client to connect to the host.

Step 2: Navigate to the Virtual Machine’s Directory

Change to the directory where your VM resides. This is usually under /vmfs/volumes/.

cd /vmfs/volumes/name-volume/name-vm

Step 3: Create and Prepare the Script File

Create a new file named vmxrebuild.sh and make it executable:

touch vmxrebuild.sh && chmod +x vmxrebuild.sh

Step 4: Edit the Script File for ESXi 8

Edit the vmxrebuild.sh file using the vi editor:

  1. Run vi vmxrebuild.sh.
  2. Press i to enter insert mode.
  3. Copy and paste the following script (adjust for your ESXi host version).
  4. Press ESC, then type :wq! to save and exit.

Script Content for ESXi 8.0:

#!/bin/ash
VMXFILENAME=$(sed -n 's/^.*Config file: .*\/\(.\+\)$/\1/p' vmware.log)
echo -e "#\041/usr/bin/vmware" > ${VMXFILENAME}
echo '.encoding = "UTF-8"' >> ${VMXFILENAME}
sed -n '/DICT --- CONFIGURATION/,/DICT ---/ s/^.*DICT \+\(.\+\) = \(.\+\)$/\1 = \2/p' vmware.log >> ${VMXFILENAME}

Step 5: Run the Script

Execute the script to rebuild the VMX file:

./vmxrebuild.sh

Conclusion

This process extracts the necessary configuration details from the vmware.log file and recreates the VMX file, which is vital for VM configuration. Always back up your VM files before performing such operations.

vCenter Server 8.0 U2 Issue with Edit Settings Virtual Machine Hardware 9 or older

vCenter 8.0 U2 can’t edit settings of powered-on VMs with virtual hardware 9 or older in the vSphere Client. Symptoms, workarounds and resolution.

Introduction

I was unable to manage Virtual Machines with virtual Hardware Version 9 or older via the vSphere Client while they are in a powered on state.

Symptoms

  1. vCenter Server Version: The problem is specific to vCenter Server version 8.0 U2 – 22385739.
  2. Virtual Machine Hardware Version: Affected VMs are those with hardware version 9 or below.
  3. VM State: The issue occurs when the Virtual Machine is in a powered-on state.
  4. UI Glitches: In the vSphere Client, when attempting to open the ‘Edit Settings’ for the affected VMs, users notice red exclamation marks next to the Virtual Hardware and VM Options tabs. Additionally, the rest of the window appears empty, hindering any further action.

Impact and Risks:

The primary impact of this issue is a significant management challenge:

  • Users are unable to manage Virtual Machines with Virtual Hardware Version 9 or older through the vSphere Client while they remain powered on. This limitation can affect routine operations, maintenance, and potentially urgent modifications needed for these VMs.

Workarounds:

In the meantime, users can employ either of the following workarounds to manage their older VMs effectively:

  1. Power Off the VM: By powering off the VM, the ‘Edit Settings’ window should function correctly. While this is not ideal for VMs that need to remain operational, it can be a temporary solution for making necessary changes.
  2. Use ESXi Host Client: Alternatively, users can connect directly to the ESXi Host Client to perform the ‘Edit Settings’ operations. This method allows the VM to remain powered on, which is beneficial for critical systems that cannot afford downtime.

Resolution:

Keep an eye on updates from VMware for a permanent resolution to this issue Edit settings window fails to load on Virtual Machines with virtual hardware version 9 or older on vCenter Server 8.0U2 (94979).

NVIDIA Tesla P40 for Private AI in the Homelab: Specs, ESXi Passthrough and Benchmarks

Tesla P40 specs (24 GB GDDR5, 250 W, 10.5-inch dual slot, compute 6.1), cooling and ESXi passthrough setup, llama.cpp benchmarks, and CUDA 13 limits.

Short answer: the NVIDIA Tesla P40 is a 2016 Pascal data-center GPU with 24 GB GDDR5, a 250 W power limit and a dual-slot, 10.5-inch PCIe Gen3 card with no fan of its own. It’s one of the cheapest ways to get 24 GB of VRAM for local LLMs in a homelab. It runs fine with ESXi PCIe passthrough and in my tests was 16–26× faster than the CPU in llama.cpp. The catch in 2026: CUDA 13 no longer targets Pascal, so you stay on CUDA 12.x.

Tesla P40 specifications

Architecture / GPUPascal, GP102
CUDA cores3,840
Compute capability6.1
Memory24 GB GDDR5, 384-bit
Max power250 W
Form factorDual-slot, 10.5-inch, full height, PCI Express Gen3 x16
CoolingNo fan: designed for server airflow
INT8 inference47 TOPS

Source: NVIDIA Tesla P40 datasheet; compute capability as reported by CUDA in the benchmark output below.

Why I picked the P40

For Private AI in HomeLAB, I was searching for budget-friendly GPUs with a minimum of 24GB RAM. Recently, I came across the refurbished NVIDIA Tesla P40 on eBay, which boasts some intriguing specifications:

  • GPU Chip: GP102
  • Cores: 3840
  • TMUs: 240
  • ROPs: 96
  • Memory Size: 24 GB
  • Memory Type: GDDR5
  • Bus Width: 384 bit

Fitting and cooling the P40 in a homelab

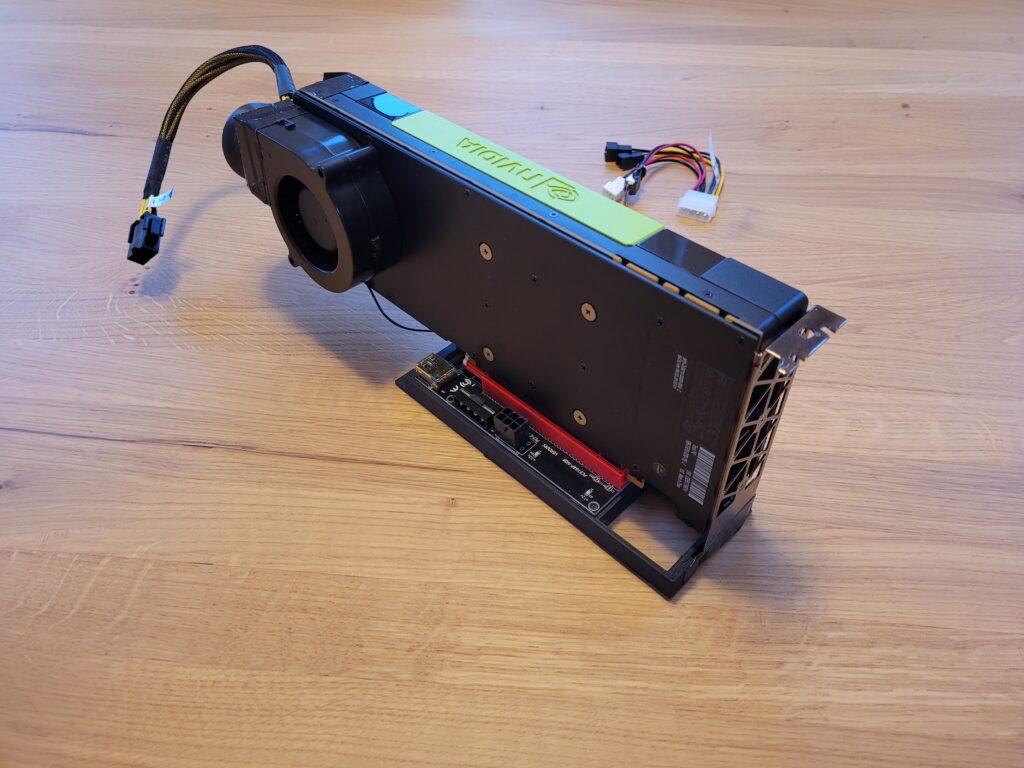
Since the NVIDIA Tesla P40 comes in a full-profile form factor, we needed to acquire a PCIe riser card.

A PCIe riser card, commonly known as a “riser card,” is a hardware component essential in computer systems for facilitating the connection of expansion cards to the motherboard. Its primary role comes into play when space limitations or specific orientation requirements prevent the direct installation of expansion cards into the PCIe slots on the motherboard.

Furthermore, I needed to ensure adequate cooling, but this posed no issue. I utilized a 3D model created by MiHu_Works for a Tesla P100 blower fan adapter, which you can find at this link: Tesla P100 Blower Fan Adapter.

As for the fan, the Titan TFD-B7530M12C served the purpose effectively. You can find it on Amazon: Titan TFD-B7530M12C.

ESXi PCIe passthrough settings

Currently, I am using a single VM with PCIe pass-through. However, it was necessary to implement specific Advanced VM parameters:

  • pciPassthru.use64bitMMIO = true
  • pciPassthru.64bitMMIOSizeGB = 64

If the P40 later disappears from the VM and nvidia-smi can no longer reach the driver, see Tesla P40 passthrough GPU disappears: “PCIe link to the device is down”. A VM reboot doesn’t help there; only a host reboot brings the card back.

llama.cpp benchmark: P40 vs CPU

Now, you might wonder about the performance. It’s outstanding, delivering speeds up to 16x-26x times faster than the CPU. To provide you with an idea of the performance, I conducted a llama-bench test:

pp 512CPU t/sGPU t/sAcceleration
llama 7B mostly Q4_09.50155.3716x
llama 13B mostly Q4_05.18134.7426x
./llama-bench -t 8
| model                          |       size |     params | 
| ------------------------------ | ---------: | ---------: | 
| llama 7B mostly Q4_0           |   3.56 GiB |     6.74 B | 
| llama 7B mostly Q4_0           |   3.56 GiB |     6.74 B | 
| backend    |    threads | test       |              t/s |
| ---------- | ---------: | ---------- | ---------------: |
| CPU        |          8 | pp 512     |      9.50 ± 0.07 |
| CPU        |          8 | tg 128     |      8.74 ± 0.12 |
./llama-bench -ngl 3800
ggml_init_cublas: GGML_CUDA_FORCE_MMQ:   no
ggml_init_cublas: CUDA_USE_TENSOR_CORES: yes
ggml_init_cublas: found 1 CUDA devices:
  Device 0: Tesla P40, compute capability 6.1
| model                          |       size |     params |
| ------------------------------ | ---------: | ---------: |
| llama 7B mostly Q4_0           |   3.56 GiB |     6.74 B |
| llama 7B mostly Q4_0           |   3.56 GiB |     6.74 B |
| backend    | ngl | test       |              t/s | 
| ---------- | --: | ---------- | ---------------: | 
| CUDA       | 3800 | pp 512     |    155.37 ± 1.26 |
| CUDA       | 3800 | tg 128     |      9.31 ± 0.19 |
 ./llama-bench -t 8 -m ./models/13B/ggml-model-q4_0.gguf
| model                          |       size |     params |
| ------------------------------ | ---------: | ---------: |
| llama 13B mostly Q4_0          |   6.86 GiB |    13.02 B |
| llama 13B mostly Q4_0          |   6.86 GiB |    13.02 B |
| backend    |    threads | test       |              t/s |
| ---------- | ---------: | ---------- | ---------------: |
| CPU        |          8 | pp 512     |      5.18 ± 0.00 |
| CPU        |          8 | tg 128     |      4.63 ± 0.14 |
./llama-bench -ngl 3800 -m ./models/13B/ggml-model-q4_0.gguf
ggml_init_cublas: GGML_CUDA_FORCE_MMQ:   no
ggml_init_cublas: CUDA_USE_TENSOR_CORES: yes
ggml_init_cublas: found 1 CUDA devices:
  Device 0: Tesla P40, compute capability 6.1
| model                          |       size |     params |
| ------------------------------ | ---------: | ---------: |
| llama 13B mostly Q4_0          |   6.86 GiB |    13.02 B |
| llama 13B mostly Q4_0          |   6.86 GiB |    13.02 B |
| backend    | ngl | test       |              t/s | 
| ---------- | --: | ---------- | ---------------: | 
| CUDA       | 3800 | pp 512     |    134.74 ± 1.29 |
| CUDA       | 3800 | tg 128     |      8.42 ± 0.10 |

Feel free to explore this setup for your Private AI in HomeLAB.

Is the Tesla P40 still worth it in 2026?

  • CUDA: CUDA Toolkit 13.0 removed offline compilation and library support for Maxwell, Pascal and Volta. You can keep building for the P40 with CUDA 12.x, but newer toolkits can’t target it (CUDA 13.1 release notes).
  • Still good for: running quantized models that need a lot of VRAM on a budget, where 24 GB matters more than raw speed.
  • Plan for: power (250 W) and your own airflow, because the card has no fan.

Related: vGPU management in VMware environments.