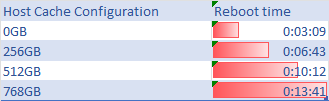
Host Cache can significantly extend reboot times

Exploring the vSphere environment, I’ve found that configuring a large Host Cache with VMFS Datastore can significantly extend reboot times.

It’s a delicate balance of performance gains versus system availability. For an in-depth look at my findings and the impact on your VMware setup, stay tuned.

Host Cache can significantly extend reboot times

CVE-2022-40982 (Downfall) and VMware ESXi: No ESXi Patch – Fix Is CPU Microcode in Cisco UCS M5/M6 Firmware

CVE-2022-40982 on VMware: no VMSA or ESXi patch. The fix is Intel microcode in the server BIOS, on Cisco UCS M5/M6 in 4.3(2b) or 4.2(3h).

Downfall (CVE-2022-40982, Intel Gather Data Sampling) vulnerability logo

Short answer: VMware never published a VMSA or an ESXi patch for CVE-2022-40982 (Downfall / Gather Data Sampling). The VMware Security Response Center said hypervisor patches are not required. The fix is Intel CPU microcode, which you get with a server BIOS/firmware update. On Cisco UCS, the M5 fix is defect CSCwf30468 and the M6 fix is CSCwf30460, both in UCS Manager 4.3(2b) and 4.2(3h). Intel says some workloads may lose up to 50% performance.

CVE-2022-40982 and VMware: is there a VMSA or ESXi patch?

No. On 8 August 2023, the day Intel published INTEL-SA-00828, the VMware Security Response Center posted its response. It rated the issue Moderate (CVSSv3.1 6.5) and said VMware hypervisors may be impacted when they run on an affected Intel processor, but that hypervisor patches are not required. VMware told customers to check INTEL-SA-00828 to see whether their CPU family is affected, and to ask their hardware vendor for a firmware update. No VMSA and no ESXi build is tied to this CVE. So when a scanner flags ESXi for CVE-2022-40982, the fix belongs to the server BIOS, not to an ESXi patch baseline or image.

LayerWhat fixes DownfallAction
CPUIntel microcode (INTEL-SA-00828, 2023.3 IPU)Comes with the server BIOS
Server firmwareBIOS that contains the new microcodeCisco UCS: 4.3(2b) / 4.2(3h) or later (see below)
ESXiNo patch required (VMware statement)None for this CVE
Guest OSKernel reports status, can opt out, or can disable AVX if microcode is missingLeave the mitigation on (the default)

What Downfall (Gather Data Sampling) is

According to the Linux kernel documentation, when a transiently executed gather instruction hits a fault, it can forward stale data from vector registers. An attacker can then infer that data with cache-timing side channels. The victim does not need to use gather instructions, only vector registers. The buffers are shared between Hyper-Threads, so cross-thread attacks are possible. The kernel documentation lists guest-to-host and guest-to-guest among the boundaries GDS can cross. That is why it matters on a virtualisation host even though the CVE requires local access.

Cisco UCS M5 and M6 firmware for CVE-2022-40982

Cisco documents the fix in the UCS release notes under “Security Fixes”. I did not find a separate Cisco PSIRT advisory for this CVE. The defects and first fixed releases are:

PlatformDefectCVEs in the fixUCS Manager (B-Series and FI-attached C-Series)Standalone C-Series (IMC)
UCS M5CSCwf30468CVE-2022-40982, CVE-2022-435054.3(2b) (16 Aug 2023), 4.2(3h)4.3(2.230207), 4.2(3h)
UCS M6CSCwf30460CVE-2022-40982, CVE-2022-41804, CVE-2023-23908, CVE-2022-373434.3(2b), 4.2(3h)4.3(2.230207), 4.2(3h)

In practice, stay on your release train. Environments on 4.2(3) go to 4.2(3h) or later. Environments on 4.3 go to 4.3(2b) or later, and ideally to the current recommended 4.3 release, which also carries later security fixes. Upgrade the server firmware bundle (host firmware package), not only UCS Manager infrastructure, because the microcode ships in the BIOS. After the reboot, you can confirm the new microcode revision from ESXi (see the related post below).

Downfall mitigation performance impact

With the mitigation on, the results of a gather load are held back for extra time before software can use them. Intel says the impact on most workloads is minimal, but “specific workloads may show performance impacts of up to 50%”. Intel lets users opt out through OS vendor options. On Linux, that is gather_data_sampling=off or mitigations=off. Opt out only if your threat model allows it, for example on a single-tenant host with no untrusted code.

Intel SGX exception: when the microcode is loaded through the FIT (that is, from an updated BIOS), SGX is enabled and Hyper-Threading is disabled, the mitigation is locked on. Otherwise system software can enable or disable it.

Checking a Linux guest (and why EVC is not a fix)

Inside a Linux VM, the kernel reports GDS status in sysfs:

cat /sys/devices/system/cpu/vulnerabilities/gather_data_sampling

Possible values include Not affected, Vulnerable: No microcode, Mitigation: Microcode, Mitigation: Microcode (locked), Mitigation: AVX disabled, no microcode and, in a VM, Unknown: Dependent on hypervisor status. The last one means the guest cannot tell whether the host CPU is mitigated.

In my 2023 lab I also ran the open-source spectre-meltdown-checker in a VM on an affected host before its microcode was updated, with two different EVC modes on the cluster:

wget https://raw.githubusercontent.com/speed47/spectre-meltdown-checker/master/spectre-meltdown-checker.sh
sh spectre-meltdown-checker.sh --variant downfall --explain

EVC Intel “Skylake” Generation:

CVE-2022-40982 aka 'Downfall, gather data sampling (GDS)'
> STATUS:  VULNERABLE  (Your microcode doesn't mitigate the vulnerability, and your kernel doesn't support mitigation)
> SUMMARY: CVE-2022-40982:KO

EVC Intel “Broadwell” Generation:

CVE-2022-40982 aka 'Downfall, gather data sampling (GDS)'
> STATUS:  NOT VULNERABLE  (your CPU vendor reported your CPU model as not affected)
> SUMMARY: CVE-2022-40982:OK

The Broadwell result is a reporting difference, not a mitigation. The checker decides from the CPU model the guest sees (“your CPU vendor reported your CPU model”). The VM still runs on the same physical, unpatched CPU. Treat EVC as a compatibility feature, not a workaround for Downfall. The real fix is the BIOS update on the host.

For bare-metal Linux or guests where microcode is not yet available, the kernel offers gather_data_sampling=force. It uses the microcode mitigation when present and otherwise disables AVX by turning off XSAVE YMM support. clearcpuid=avx does the same. Applications that check AVX incorrectly can break, so this is a stopgap only.

Checklist

  1. Check your CPUs in INTEL-SA-00828 (Intel’s affected processor table, Gather Data Sampling column).
  2. Cisco UCS M5/M6: upgrade the server firmware to 4.3(2b)+ or 4.2(3h)+ (standalone C-Series: 4.3(2.230207)+ or 4.2(3h)+). Other vendors: install the BIOS that contains the 2023.3 IPU microcode.
  3. Do not wait for an ESXi patch for this CVE. Record the VMware statement as the justification in your scanner exception.
  4. Keep the guest mitigation enabled. Benchmark AVX-heavy workloads (HPC, analytics, crypto) before and after.

Sources

Related on vdan.cz

ESXi Check Secure Boot Status: secureBoot.py, Enabling Secure Boot (Cisco UCS) and the “Host secure boot was disabled” Alarm

Check ESXi Secure Boot status and readiness with secureBoot.py -s/-c, enable it in firmware or a Cisco UCS boot policy, and fix unsigned-VIB failures.

Short answer: SSH to the host and run /usr/lib/vmware/secureboot/bin/secureBoot.py -s. It prints Enabled or Disabled. Before you switch Secure Boot on in the firmware, run the same script with -c; it reports either “Secure boot can be enabled” or “Secure boot CANNOT be enabled” and lists the VIBs that block it. On hosts with a TPM, esxcli system settings encryption get also shows whether Secure Boot is enforced.

ESXi check Secure Boot status with secureBoot.py

ESXi (and ESX 9) ships with a validation script. It has three modes. This is the help output from one of my hosts:

/usr/lib/vmware/secureboot/bin/secureBoot.py -h
usage: secureBoot.py [-h] [-a | -c | -s]

optional arguments:
  -h, --help            show this help message and exit
  -a, --acceptance-level-check
                        Validate acceptance levels for installed vibs
  -c, --check-capability
                        Check if the host is ready to enable secure boot
  -s, --check-status    Check if UEFI secure boot is enabled
OptionWhat it answersTypical output
-sIs UEFI Secure Boot enabled right now?Enabled / Disabled
-cCan Secure Boot be enabled on this install?Secure boot can be enabled: ... or Secure boot CANNOT be enabled: ...
-aDo the installed VIBs meet the required acceptance levels?Acceptance level validation result

Status on a host that still boots with Secure Boot off:

/usr/lib/vmware/secureboot/bin/secureBoot.py -s
Disabled

Check whether the host is ready for Secure Boot (-c)

Run the capability check before you change anything in the firmware. This matters most on hosts that were upgraded from older releases. Here is a host that passes:

/usr/lib/vmware/secureboot/bin/secureBoot.py -c
Secure boot can be enabled: All vib signatures verified. All tardisks validated. All acceptance levels validated

According to the Broadcom upgrade documentation, the result depends on how the host was upgraded:

  • Every installed VIB needs an acceptance level of at least PartnerSupported. A single CommunitySupported VIB blocks Secure Boot.
  • The signature of every installed VIB must be stored on the system. Older ESXi versions did not save the signatures, and an upgrade done with ESXCLI commands doesn’t save them either. An ISO-based upgrade, including a vSphere Lifecycle Manager upgrade that uses the ISO, does save them.
  • An old third-party driver VIB that the upgrade did not replace stays on the host without a stored signature, so it blocks Secure Boot.
  • The script does not check whether the bootloader is up to date, and Secure Boot needs a current one.

ESXi Secure Boot enable: firmware and Cisco UCS boot policy

ESXi doesn’t turn Secure Boot on by itself. You enable it in the server firmware, and the host must boot in UEFI mode. On most servers you do this in the BIOS/UEFI setup, usually under Boot or Security. Shut the host down gracefully first.

On Cisco UCS Manager-managed servers the setting lives in the boot policy. Set Boot Mode to UEFI and check Boot Security (UEFI Secure Boot), then associate the policy through the service profile. Cisco lists these points in its boot configuration guide:

  • UEFI boot mode must be enabled in the boot policy before you can use UEFI Secure Boot.
  • Cisco UCS Manager and the BIOS firmware must be Release 2.2 or later. User-generated encryption keys are not supported.
  • On UCSM-managed servers, only Cisco UCS Manager can control UEFI Secure Boot.
  • You cannot mix UEFI and legacy boot mode on the same server. Moving an existing legacy-BIOS ESXi install to UEFI is a separate task (see the related post below).
Cisco UCS Manager boot policy with Boot Mode set to UEFI and Boot Security (UEFI Secure Boot) enabled for an ESXi host
Cisco UCS Manager boot policy: UEFI boot mode with Boot Security (UEFI Secure Boot) enabled

After the host reboots with the new policy, check the status again:

/usr/lib/vmware/secureboot/bin/secureBoot.py -s
Enabled

Secure Boot enforcement on hosts with a TPM

On vSphere 7.0 Update 2 and later, a host with an active TPM can enforce Secure Boot on every boot. This setting is separate from the firmware toggle and you manage it with ESXCLI:

esxcli system settings encryption get
   Mode: TPM
   Require Executables Only From Installed VIBs: false
   Require Secure Boot: true

If Mode shows NONE, activate the TPM in the firmware and run esxcli system settings encryption set --mode=TPM. Broadcom warns that you cannot undo this once it is set. To enforce Secure Boot, first enable it in the firmware and restart. Then run the following:

esxcli system settings encryption set --require-secure-boot=T
esxcli system settings encryption get
/bin/backup.sh 0

To turn enforcement off, use --require-secure-boot=F and run /bin/backup.sh 0 again.

“Host secure boot was disabled”: the vCenter alarm

Broadcom KB 369525 documents this condition as the Host TPM attestation alarm in the vSphere Client (vCenter 8.x, ESXi 7.x/8.x). The main cause is that vCenter sees Secure Boot disabled on a host that has a TPM. Secure Boot is a requirement for successful attestation. The alarm can also fire when host and vCenter data get out of sync after a network glitch, a restart or a new host being added. The KB resolution:

  1. Check the current state with secureBoot.py -s.
  2. If it’s disabled, run secureBoot.py -c. If the host is compatible, enable Secure Boot in the firmware and boot ESXi.
  3. If Secure Boot is already enabled and the alarm stays, disconnect and reconnect the host. Then go to Monitor > Issues and Alarms and use Reset to Green on the alarm.
  4. If Secure Boot can’t be enabled on that hardware, the KB says you can use Reset to Green to suppress the alarm.

Fixing “Secure boot CANNOT be enabled” and unsigned VIB failures

  • Find the blocking VIB. The -c output names the VIBs whose signatures it could not verify. Compare them with esxcli software vib list, which includes an AcceptanceLevel column.
  • Replace or remove it. Install the vendor’s current signed driver or add-on, or remove a VIB you no longer need. Then run -c again.
  • Reboot after patching. KB 319600 describes a false failure on esx-base with “Failed to verify checksum for payload btldr”. It appears when you run the check after a live VIB install but before the reboot. Reboot and check again.
  • Purple screen “UEFI Secure Boot failed: Failed to verify signatures of the following vibs”. TechDocs says to reboot with Secure Boot disabled, run the validation script, and check /var/log/esxupdate.log.
  • VIB install fails on a host that already has TPM and Secure Boot. KB 384314 covers the error “Could not find a trusted signer”. The VIB must be signed through the VMware partner program. Disabling Secure Boot is not the recommended fix.
vSphere Secure Boot

Sources

Related on vdan.cz

How to Maxtang’s NX 6412 NUC add to vDS? Fix script /etc/rc.local.d/local.sh

The Maxtang NX6412 loses its vDS uplink after an ESXi reboot with USB NICs. The /etc/rc.local.d/local.sh script that fixes it.

How to fix network after adding to vDS. When you add NX6412 to vDS and reboot ESXi. I don’t have uplink for vDS. You could check it with:

# esxcfg-vswitch -l
DVS Name         Num Ports   Used Ports  Configured Ports  MTU     Uplinks
vDS              2560        6           512               9000    vusb0
--cut
  DVPort ID                               In Use      Client
  468                                     0           
  469                                     0
  470                                     0
  471                                     0

We will have to note DVPort ID 468 – example. vDS is name of your vDS switch.

esxcfg-vswitch -P vusb0 -V 468 vDS

It is necessary add it to /etc/rc.local.d/local.sh before exit 0. You could have similar script from source Persisting USB NIC Bindings

vusb0_status=$(esxcli network nic get -n vusb0 | grep 'Link Status' | awk '{print $NF}')
count=0
while [[ $count -lt 20 && "${vusb0_status}" != "Up" ]]
do
    sleep 10
    count=$(( $count + 1 ))
    vusb0_status=$(esxcli network nic get -n vusb0 | grep 'Link Status' | awk '{print $NF}')
done

esxcfg-vswitch -R
esxcfg-vswitch -P vusb0 -V 468 vDS

exit 0

Maxtang’s NX 6412 NUC – update ESXi 8.0a

Update a Maxtang NX6412 NUC to ESXi 8.0a (CVE-2022-31705 fix): build a custom ESXi 8.0a ISO with the USB Network Native Driver.

VMware ESXi 8.0a release was announced:

How to prepare ESXi Custom ISO image 8U0a for NX6412 NUC?

Download these files:

Run those script to prepare Custom ISO image you should use PowerCLI version 13.0. Problem with upgrade to PowerCLI you could fix with blog PowerCLI 13 update and installation hurdles on Windows:

Add-EsxSoftwareDepot .\VMware-ESXi-8.0a-20842819-depot.zip
Add-EsxSoftwareDepot .\ESXi800-VMKUSB-NIC-FLING-61054763-component-20826251.zip
New-EsxImageProfile -CloneProfile "ESXi-8.0a-20842819-standard" -name "ESXi-8.0.0-20842819-USBNIC" -Vendor "vdan.cz"
Add-EsxSoftwarePackage -ImageProfile "ESXi-8.0.0-20842819-USBNIC" -SoftwarePackage "vmkusb-nic-fling"
Export-ESXImageProfile -ImageProfile "ESXi-8.0.0-20842819-USBNIC" -ExportToBundle -filepath ESXi-8.0.0-20842819-USBNIC.zip

Upgrade to ESXi 8.0

TPM_VERSION WARNING: Support for TPM version 1.2 is discontinued. With Apply –no-hardware-warning option to ignore the warnings and proceed with the transaction.

esxcli software profile update -d  /vmfs/volumes/datastore1/_ISO/ESXi-8.0.1-20842819-USBNIC.zip -p ESXi-8.0.1-20842819-USBNIC --no-hardware-warning
Update Result
   Message: The update completed successfully, but the system needs to be rebooted for the changes to be effective.
   Reboot Required: true

vSphere 8 Lab with Cohesity and VMware vExpert gift – Maxtang’s NX 6412 NUC

Building a vSphere 8 lab on the Maxtang NX6412 NUC (vExpert gift): custom ESXi ISO with the USB Network Native Driver because there are no onboard NICs.

During VMware Explore 2022 Barcelona, I’ve been given a gift as a vExpert. You could read it in my previous article. NX6412 doesn’t support onboard NICs. We will need Custom ISO with USB Network Native Driver for ESXi. Because of problem using latest PowerCLI 13 release Nov 25, 2022 with export ISO. I decided to install Custom ISO ESXi 7u2e and than upgrade to ESXi 8.0 with depot zip.

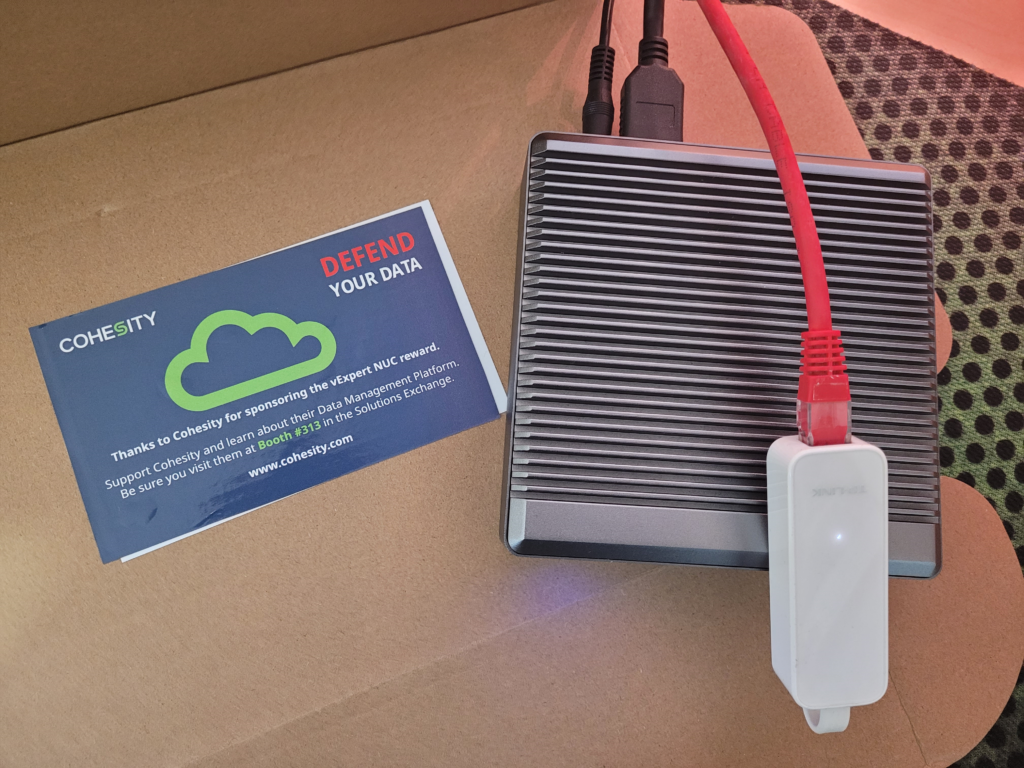
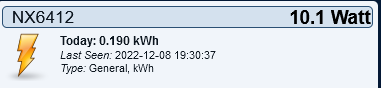
Thank You Cohesity. Power consumpion is only 10 Watts …

How to prepare ESXi Custom ISO image 7U2e for NX6412 NUC?

Download these files:

Run those script to prepare Custom ISO image you could use PowerCLI 12.7 or 13.0: You could use create_custom_esxi_iso.ps1 as well.

Add-EsxSoftwareDepot .\VMware-ESXi-7.0U2e-19290878-depot.zip
Add-EsxSoftwareDepot .\ESXi702-VMKUSB-NIC-FLING-47140841-component-18150468.zip
New-EsxImageProfile -CloneProfile "ESXi-7.0U2e-19290878-standard" -name "ESXi-7.0U2e-19290878-USBNIC" -Vendor "vdan.cz"
Add-EsxSoftwarePackage -ImageProfile "ESXi-7.0U2e-19290878-USBNIC" -SoftwarePackage "vmkusb-nic-fling"
Export-ESXImageProfile -ImageProfile "ESXi-7.0U2e-19290878-USBNIC" -ExportToIso -filepath ESXi-7.0U2e-19290878-USBNIC.iso

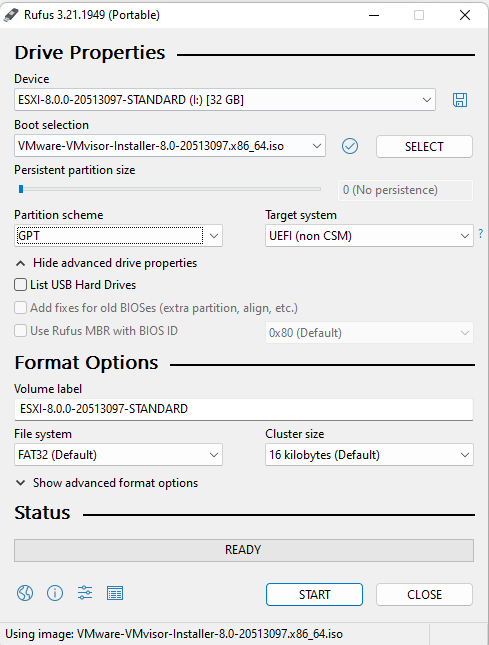
Create bootable ESXi USB Flash Drive from ESXi-7.0U2e-19290878-USBNIC.iso. More info How to create a bootable ESXi Installer USB Flash Drive

  • For Custom ISO image is necessary select Write in ISO -> ESP mode
Dialog only for Custom ISO image

Install ESXi 7U2e and fix Persisting USB NIC Bindings

Currently there is a limitation in ESXi where USB NIC bindings are picked up much later in the boot process and to ensure settings are preserved upon a reboot, the following needs to be added to /etc/rc.local.d/local.sh based on your configurations.

vusb0_status=$(esxcli network nic get -n vusb0 | grep 'Link Status' | awk '{print $NF}')
count=0
while [[ $count -lt 20 && "${vusb0_status}" != "Up" ]]
do
    sleep 10
    count=$(( $count + 1 ))
    vusb0_status=$(esxcli network nic get -n vusb0 | grep 'Link Status' | awk '{print $NF}')
done

esxcfg-vswitch -R

Prepare ESXi Custom zip depot 8.0 for NX6412 NUC

Download these files:

Run those script to prepare Custom ISO image you could use 13.0. Problem with upgrade to PowerCLI you could fix with blog PowerCLI 13 update and installation hurdles on Windows:

Add-EsxSoftwareDepot .\VMware-ESXi-8.0-20513097-depot.zip
Add-EsxSoftwareDepot .\ESXi800-VMKUSB-NIC-FLING-61054763-component-20826251.zip
New-EsxImageProfile -CloneProfile "ESXi-8.0.0-20513097-standard" -name "ESXi-8.0.0-20513097-USBNIC" -Vendor "vdan.cz"
Add-EsxSoftwarePackage -ImageProfile "ESXi-8.0.0-20513097-USBNIC" -SoftwarePackage "vmkusb-nic-fling"
Export-ESXImageProfile -ImageProfile "ESXi-8.0.0-20513097-USBNIC" -ExportToBundle -filepath ESXi-8.0.0-20513097-USBNIC.zip

Upgrade to ESXi 8.0

esxcli software profile update -d  /vmfs/volumes/datastore1/_ISO/ESXi-8.0.0-20513097-USBNIC.zip -p ESXi-8.0.0-20513097-USBNIC

Hardware precheck of profile ESXi-8.0.0-20513097-USBNIC failed with warnings: <TPM_VERSION WARNING: TPM 1.2 device detected. Support for TPM version 1.2 is discontinued. Installation may proceed, but may cause the system to behave unexpectedly.>

You could fix TPM_VERSION WARNING: Support for TPM version 1.2 is discontinued. With Apply –no-hardware-warning option to ignore the warnings and proceed with the transaction.

esxcli software profile update -d  /vmfs/volumes/datastore1/_ISO/ESXi-8.0.0-20513097-USBNIC.zip -p ESXi-8.0.0-20513097-USBNIC --no-hardware-warning
Update Result
   Message: The update completed successfully, but the system needs to be rebooted for the changes to be effective.
   Reboot Required: true
   VIBs Installed: VMW_bootbank_atlantic_1.0.3.0-10vmw.800.1.0.20513097, VMW_bootbank_bcm-mpi3_8.1.1.0.0.0-1vmw.800.1.0.20513097, VMW_bootbank_bfedac-esxio_0.1-1vmw.800.1.0.20513097, VMW_bootbank_bnxtnet_216.0.50.0-66vmw.800.1.0.20513097, VMW_bootbank_bnxtroce_216.0.58.0-27vmw.800.1.0.20513097, VMW_bootbank_brcmfcoe_12.0.1500.3-4vmw.800.1.0.20513097, VMW_bootbank_cndi-igc_1.2.9.0-1vmw.800.1.0.20513097, VMW_bootbank_dwi2c-esxio_0.1-2vmw.800.1.0.20513097, VMW_bootbank_dwi2c_0.1-2vmw.800.1.0.20513097, VMW_bootbank_elxiscsi_12.0.1200.0-10vmw.800.1.0.20513097, VMW_bootbank_elxnet_12.0.1250.0-8vmw.800.1.0.20513097, VMW_bootbank_i40en_1.11.2.5-1vmw.800.1.0.20513097, VMW_bootbank_iavmd_3.0.0.1010-5vmw.800.1.0.20513097, VMW_bootbank_icen_1.5.1.16-1vmw.800.1.0.20513097, VMW_bootbank_igbn_1.4.11.6-1vmw.800.1.0.20513097, VMW_bootbank_ionic-en-esxio_20.0.0-29vmw.800.1.0.20513097, VMW_bootbank_ionic-en_20.0.0-29vmw.800.1.0.20513097, VMW_bootbank_irdman_1.3.1.22-1vmw.800.1.0.20513097, VMW_bootbank_iser_1.1.0.2-1vmw.800.1.0.20513097, VMW_bootbank_ixgben_1.7.1.39-1vmw.800.1.0.20513097, VMW_bootbank_lpfc_14.0.635.3-14vmw.800.1.0.20513097, VMW_bootbank_lpnic_11.4.62.0-1vmw.800.1.0.20513097, VMW_bootbank_lsi-mr3_7.722.02.00-1vmw.800.1.0.20513097, VMW_bootbank_lsi-msgpt2_20.00.06.00-4vmw.800.1.0.20513097, VMW_bootbank_lsi-msgpt35_23.00.00.00-1vmw.800.1.0.20513097, VMW_bootbank_lsi-msgpt3_17.00.13.00-2vmw.800.1.0.20513097, VMW_bootbank_mlnx-bfbootctl-esxio_0.1-1vmw.800.1.0.20513097, VMW_bootbank_mnet-esxio_0.1-1vmw.800.1.0.20513097, VMW_bootbank_mtip32xx-native_3.9.8-1vmw.800.1.0.20513097, VMW_bootbank_ne1000_0.9.0-2vmw.800.1.0.20513097, VMW_bootbank_nenic_1.0.35.0-3vmw.800.1.0.20513097, VMW_bootbank_nfnic_5.0.0.35-3vmw.800.1.0.20513097, VMW_bootbank_nhpsa_70.0051.0.100-4vmw.800.1.0.20513097, VMW_bootbank_nmlx5-core-esxio_4.23.0.36-8vmw.800.1.0.20513097, VMW_bootbank_nmlx5-core_4.23.0.36-8vmw.800.1.0.20513097, VMW_bootbank_nmlx5-rdma-esxio_4.23.0.36-8vmw.800.1.0.20513097, VMW_bootbank_nmlx5-rdma_4.23.0.36-8vmw.800.1.0.20513097, VMW_bootbank_nmlxbf-gige-esxio_2.1-1vmw.800.1.0.20513097, VMW_bootbank_ntg3_4.1.8.0-4vmw.800.1.0.20513097, VMW_bootbank_nvme-pcie-esxio_1.2.4.1-1vmw.800.1.0.20513097, VMW_bootbank_nvme-pcie_1.2.4.1-1vmw.800.1.0.20513097, VMW_bootbank_nvmerdma_1.0.3.9-1vmw.800.1.0.20513097, VMW_bootbank_nvmetcp_1.0.1.2-1vmw.800.1.0.20513097, VMW_bootbank_nvmxnet3-ens-esxio_2.0.0.23-1vmw.800.1.0.20513097, VMW_bootbank_nvmxnet3-ens_2.0.0.23-1vmw.800.1.0.20513097, VMW_bootbank_nvmxnet3-esxio_2.0.0.31-1vmw.800.1.0.20513097, VMW_bootbank_nvmxnet3_2.0.0.31-1vmw.800.1.0.20513097, VMW_bootbank_penedac-esxio_0.1-1vmw.800.1.0.20513097, VMW_bootbank_pengpio-esxio_0.1-1vmw.800.1.0.20513097, VMW_bootbank_pensandoatlas_1.46.0.E.24.1.256-2vmw.800.1.0.20293628, VMW_bootbank_penspi-esxio_0.1-1vmw.800.1.0.20513097, VMW_bootbank_pvscsi-esxio_0.1-5vmw.800.1.0.20513097, VMW_bootbank_pvscsi_0.1-5vmw.800.1.0.20513097, VMW_bootbank_qcnic_1.0.15.0-22vmw.800.1.0.20513097, VMW_bootbank_qedentv_3.40.5.70-4vmw.800.1.0.20513097, VMW_bootbank_qedrntv_3.40.5.70-1vmw.800.1.0.20513097, VMW_bootbank_qfle3_1.0.67.0-30vmw.800.1.0.20513097, VMW_bootbank_qfle3f_1.0.51.0-28vmw.800.1.0.20513097, VMW_bootbank_qfle3i_1.0.15.0-20vmw.800.1.0.20513097, VMW_bootbank_qflge_1.1.0.11-1vmw.800.1.0.20513097, VMW_bootbank_rd1173-esxio_0.1-1vmw.800.1.0.20513097, VMW_bootbank_rdmahl_1.0.0-1vmw.800.1.0.20513097, VMW_bootbank_rste_2.0.2.0088-7vmw.800.1.0.20513097, VMW_bootbank_sfvmk_2.4.0.2010-13vmw.800.1.0.20513097, VMW_bootbank_smartpqi_80.4253.0.5000-2vmw.800.1.0.20513097, VMW_bootbank_spidev-esxio_0.1-1vmw.800.1.0.20513097, VMW_bootbank_vmkata_0.1-1vmw.800.1.0.20513097, VMW_bootbank_vmksdhci-esxio_1.0.2-2vmw.800.1.0.20513097, VMW_bootbank_vmksdhci_1.0.2-2vmw.800.1.0.20513097, VMW_bootbank_vmkusb-esxio_0.1-14vmw.800.1.0.20513097, VMW_bootbank_vmkusb-nic-fling_1.11-1vmw.800.1.20.61054763, VMW_bootbank_vmkusb_0.1-14vmw.800.1.0.20513097, VMW_bootbank_vmw-ahci_2.0.14-1vmw.800.1.0.20513097, VMware_bootbank_bmcal-esxio_8.0.0-1.0.20513097, VMware_bootbank_bmcal_8.0.0-1.0.20513097, VMware_bootbank_clusterstore_8.0.0-1.0.20513097, VMware_bootbank_cpu-microcode_8.0.0-1.0.20513097, VMware_bootbank_crx_8.0.0-1.0.20513097, VMware_bootbank_drivervm-gpu_8.0.0-1.0.20513097, VMware_bootbank_elx-esx-libelxima.so_12.0.1200.0-6vmw.800.1.0.20513097, VMware_bootbank_esx-base_8.0.0-1.0.20513097, VMware_bootbank_esx-dvfilter-generic-fastpath_8.0.0-1.0.20513097, VMware_bootbank_esx-ui_2.5.1-20374953, VMware_bootbank_esx-update_8.0.0-1.0.20513097, VMware_bootbank_esx-xserver_8.0.0-1.0.20513097, VMware_bootbank_esxio-base_8.0.0-1.0.20513097, VMware_bootbank_esxio-combiner-esxio_8.0.0-1.0.20513097, VMware_bootbank_esxio-combiner_8.0.0-1.0.20513097, VMware_bootbank_esxio-dvfilter-generic-fastpath_8.0.0-1.0.20513097, VMware_bootbank_esxio-update_8.0.0-1.0.20513097, VMware_bootbank_esxio_8.0.0-1.0.20513097, VMware_bootbank_gc-esxio_8.0.0-1.0.20513097, VMware_bootbank_gc_8.0.0-1.0.20513097, VMware_bootbank_loadesx_8.0.0-1.0.20513097, VMware_bootbank_loadesxio_8.0.0-1.0.20513097, VMware_bootbank_lsuv2-hpv2-hpsa-plugin_1.0.0-3vmw.800.1.0.20513097, VMware_bootbank_lsuv2-intelv2-nvme-vmd-plugin_2.7.2173-2vmw.800.1.0.20513097, VMware_bootbank_lsuv2-lsiv2-drivers-plugin_1.0.0-12vmw.800.1.0.20513097, VMware_bootbank_lsuv2-nvme-pcie-plugin_1.0.0-1vmw.800.1.0.20513097, VMware_bootbank_lsuv2-oem-dell-plugin_1.0.0-2vmw.800.1.0.20513097, VMware_bootbank_lsuv2-oem-lenovo-plugin_1.0.0-2vmw.800.1.0.20513097, VMware_bootbank_lsuv2-smartpqiv2-plugin_1.0.0-8vmw.800.1.0.20513097, VMware_bootbank_native-misc-drivers-esxio_8.0.0-1.0.20513097, VMware_bootbank_native-misc-drivers_8.0.0-1.0.20513097, VMware_bootbank_qlnativefc_5.2.46.0-3vmw.800.1.0.20513097, VMware_bootbank_trx_8.0.0-1.0.20513097, VMware_bootbank_vdfs_8.0.0-1.0.20513097, VMware_bootbank_vmware-esx-esxcli-nvme-plugin-esxio_1.2.0.52-1vmw.800.1.0.20513097, VMware_bootbank_vmware-esx-esxcli-nvme-plugin_1.2.0.52-1vmw.800.1.0.20513097, VMware_bootbank_vsan_8.0.0-1.0.20513097, VMware_bootbank_vsanhealth_8.0.0-1.0.20513097, VMware_locker_tools-light_12.0.6.20104755-20513097
   VIBs Removed: VMW_bootbank_atlantic_1.0.3.0-8vmw.702.0.0.17867351, VMW_bootbank_bnxtnet_216.0.50.0-34vmw.702.0.20.18426014, VMW_bootbank_bnxtroce_216.0.58.0-20vmw.702.0.20.18426014, VMW_bootbank_brcmfcoe_12.0.1500.1-2vmw.702.0.0.17867351, VMW_bootbank_brcmnvmefc_12.8.298.1-1vmw.702.0.0.17867351, VMW_bootbank_elxiscsi_12.0.1200.0-8vmw.702.0.0.17867351, VMW_bootbank_elxnet_12.0.1250.0-5vmw.702.0.0.17867351, VMW_bootbank_i40enu_1.8.1.137-1vmw.702.0.20.18426014, VMW_bootbank_iavmd_2.0.0.1152-1vmw.702.0.0.17867351, VMW_bootbank_icen_1.0.0.10-1vmw.702.0.0.17867351, VMW_bootbank_igbn_1.4.11.2-1vmw.702.0.0.17867351, VMW_bootbank_irdman_1.3.1.19-1vmw.702.0.0.17867351, VMW_bootbank_iser_1.1.0.1-1vmw.702.0.0.17867351, VMW_bootbank_ixgben_1.7.1.35-1vmw.702.0.0.17867351, VMW_bootbank_lpfc_12.8.298.3-2vmw.702.0.20.18426014, VMW_bootbank_lpnic_11.4.62.0-1vmw.702.0.0.17867351, VMW_bootbank_lsi-mr3_7.716.03.00-1vmw.702.0.0.17867351, VMW_bootbank_lsi-msgpt2_20.00.06.00-3vmw.702.0.0.17867351, VMW_bootbank_lsi-msgpt35_17.00.02.00-1vmw.702.0.0.17867351, VMW_bootbank_lsi-msgpt3_17.00.10.00-2vmw.702.0.0.17867351, VMW_bootbank_mtip32xx-native_3.9.8-1vmw.702.0.0.17867351, VMW_bootbank_ne1000_0.8.4-11vmw.702.0.0.17867351, VMW_bootbank_nenic_1.0.33.0-1vmw.702.0.0.17867351, VMW_bootbank_nfnic_4.0.0.63-1vmw.702.0.0.17867351, VMW_bootbank_nhpsa_70.0051.0.100-2vmw.702.0.0.17867351, VMW_bootbank_nmlx4-core_3.19.16.8-2vmw.702.0.0.17867351, VMW_bootbank_nmlx4-en_3.19.16.8-2vmw.702.0.0.17867351, VMW_bootbank_nmlx4-rdma_3.19.16.8-2vmw.702.0.0.17867351, VMW_bootbank_nmlx5-core_4.19.16.10-1vmw.702.0.0.17867351, VMW_bootbank_nmlx5-rdma_4.19.16.10-1vmw.702.0.0.17867351, VMW_bootbank_ntg3_4.1.5.0-0vmw.702.0.0.17867351, VMW_bootbank_nvme-pcie_1.2.3.11-1vmw.702.0.0.17867351, VMW_bootbank_nvmerdma_1.0.2.1-1vmw.702.0.0.17867351, VMW_bootbank_nvmxnet3-ens_2.0.0.22-1vmw.702.0.0.17867351, VMW_bootbank_nvmxnet3_2.0.0.30-1vmw.702.0.0.17867351, VMW_bootbank_pvscsi_0.1-2vmw.702.0.0.17867351, VMW_bootbank_qcnic_1.0.15.0-11vmw.702.0.0.17867351, VMW_bootbank_qedentv_3.40.5.53-20vmw.702.0.20.18426014, VMW_bootbank_qedrntv_3.40.5.53-17vmw.702.0.20.18426014, VMW_bootbank_qfle3_1.0.67.0-14vmw.702.0.0.17867351, VMW_bootbank_qfle3f_1.0.51.0-19vmw.702.0.0.17867351, VMW_bootbank_qfle3i_1.0.15.0-12vmw.702.0.0.17867351, VMW_bootbank_qflge_1.1.0.11-1vmw.702.0.0.17867351, VMW_bootbank_rste_2.0.2.0088-7vmw.702.0.0.17867351, VMW_bootbank_sfvmk_2.4.0.2010-4vmw.702.0.0.17867351, VMW_bootbank_smartpqi_70.4000.0.100-6vmw.702.0.0.17867351, VMW_bootbank_vmkata_0.1-1vmw.702.0.0.17867351, VMW_bootbank_vmkfcoe_1.0.0.2-1vmw.702.0.0.17867351, VMW_bootbank_vmkusb-nic-fling_1.8-3vmw.702.0.20.47140841, VMW_bootbank_vmkusb_0.1-4vmw.702.0.20.18426014, VMW_bootbank_vmw-ahci_2.0.9-1vmw.702.0.0.17867351, VMware_bootbank_clusterstore_7.0.2-0.30.19290878, VMware_bootbank_cpu-microcode_7.0.2-0.30.19290878, VMware_bootbank_crx_7.0.2-0.30.19290878, VMware_bootbank_elx-esx-libelxima.so_12.0.1200.0-4vmw.702.0.0.17867351, VMware_bootbank_esx-base_7.0.2-0.30.19290878, VMware_bootbank_esx-dvfilter-generic-fastpath_7.0.2-0.30.19290878, VMware_bootbank_esx-ui_1.34.8-17417756, VMware_bootbank_esx-update_7.0.2-0.30.19290878, VMware_bootbank_esx-xserver_7.0.2-0.30.19290878, VMware_bootbank_gc_7.0.2-0.30.19290878, VMware_bootbank_loadesx_7.0.2-0.30.19290878, VMware_bootbank_lsuv2-hpv2-hpsa-plugin_1.0.0-3vmw.702.0.0.17867351, VMware_bootbank_lsuv2-intelv2-nvme-vmd-plugin_2.0.0-2vmw.702.0.0.17867351, VMware_bootbank_lsuv2-lsiv2-drivers-plugin_1.0.0-5vmw.702.0.0.17867351, VMware_bootbank_lsuv2-nvme-pcie-plugin_1.0.0-1vmw.702.0.0.17867351, VMware_bootbank_lsuv2-oem-dell-plugin_1.0.0-1vmw.702.0.0.17867351, VMware_bootbank_lsuv2-oem-hp-plugin_1.0.0-1vmw.702.0.0.17867351, VMware_bootbank_lsuv2-oem-lenovo-plugin_1.0.0-1vmw.702.0.0.17867351, VMware_bootbank_lsuv2-smartpqiv2-plugin_1.0.0-6vmw.702.0.0.17867351, VMware_bootbank_native-misc-drivers_7.0.2-0.30.19290878, VMware_bootbank_qlnativefc_4.1.14.0-5vmw.702.0.0.17867351, VMware_bootbank_vdfs_7.0.2-0.30.19290878, VMware_bootbank_vmware-esx-esxcli-nvme-plugin_1.2.0.42-1vmw.702.0.0.17867351, VMware_bootbank_vsan_7.0.2-0.30.19290878, VMware_bootbank_vsanhealth_7.0.2-0.30.19290878, VMware_locker_tools-light_11.2.6.17901274-18295176
   VIBs Skipped:

And reboot ESXi after upgrade with cmd reboot. Good luck

How to create a bootable ESXi Installer USB Flash Drive

Make a bootable ESXi installer USB drive on Windows with Rufus: GPT + UEFI settings, ESP mode for custom OEM ISOs, and where to download ESXi ISOs today.

Short answer: to create a bootable ESX 9 or ESXi 8 installer USB drive on Windows, download the ISO from the Broadcom Support Portal, open it in Rufus, select the USB drive, choose partition scheme GPT and target system UEFI, and press START. For a custom (OEM) ISO, choose Write in ISO → ESP mode when Rufus asks. Install in UEFI mode, because legacy BIOS boot is deprecated (see “Legacy boot detected” (KB 84233)).

Download the ESX / ESXi ISO

ESX and ESXi ISO images are downloaded from the Broadcom Support Portal. The old VMware Customer Connect links no longer work. Release notes are on Broadcom TechDocs. Where to find the ISO for 7.0, 8.0 and 9.x, and which build is which, is in ESXi download: ISO for every build. For server hardware, use the vendor’s custom ISO (Cisco, Dell, HPE, Lenovo) so the drivers for your NICs and storage controllers are included.

Create the ESXi installer USB with Rufus (Windows)

  1. Download Rufus (installer or portable) and start it.
  2. Under Device, select the USB flash drive. Everything on it will be erased.
  3. Press SELECT and open the ESX / ESXi ISO.
  4. Check Partition scheme: GPT and Target system: UEFI (non CSM).
  5. Press START.
Rufus main window before selecting the ESXi ISO image
Rufus with an ESXi ISO selected, partition scheme GPT and target system UEFI

With a vendor custom ISO, Rufus asks how to write the image. Choose Write in ISO → ESP mode:

Rufus dialog for a custom ESXi ISO with Write in ISO to ESP mode selected
This dialog appears only for custom ISO images.

Several ISOs on one stick: Ventoy or rEFInd

Ventoy lists VMware ESXi among its tested images. You prepare the stick once, then copy ISO files onto it and pick one from a menu at boot. This is handy if you carry ESXi 8 and ESX 9 installers together. Test it with your exact ISO and server before you rely on it in a data center. For several ESX 9 installers with different kickstart files on one UEFI stick, see ESXi boot menu with rEFInd.

Installer USB vs USB as the ESX boot device

Using a USB stick as installer media is fine. Using USB or SD as the boot device of the installed host is a different question. Broadcom KB 317631 keeps USB/SD boot supported through VCF 9.0 and its update releases, but only with a separate persistent local device for the OSData partition (32 GB minimum, 128 GB recommended). For new servers, install ESX on an SSD or a boot-optimized M.2 RAID device instead, for example the Cisco UCS M.2 HWRAID controller.

Before you reinstall an existing host

New ESXCLI Commands Details in vSphere 8.0

New ESXCLI namespaces in ESXi 8.0 vs 7.0 U3 with –help output: daemon entitlement, storage osdata, nvme config, vsan storagepool, plus 7.0 U2/U3 additions.

Looking for ESX 9? See ESXCLI changes in ESX 9.0 and 9.1 and the full ESX 9.0 command list.

Short answer: compared with ESXi 7.0 U3, ESXi 8.0 GA added these ESXCLI namespaces: daemon entitlement, hardware devicecomponent, nvme device config and nvme device log get, the storage core nvme and storage core scsi device and path lists, storage osdata, storage vvol vmstats and vsan storagepool (vSAN ESA). If you upgrade from 7.0 GA or U1, you also get namespaces that first appeared in 7.0 U2 and U3, such as network ip hosts, system health report, system settings encryption and vsan hardware vcg. Below is the --help output of each, captured on an ESXi 8.0 host. For the complete list see ESXCLI commands for ESXi 8.0.

Where each namespace first appeared (per Broadcom’s 7.0.3 and 8.0.0 ESXCLI references): new in 8.0 GA: daemon entitlement, hardware devicecomponent, nvme device config, nvme device log get, storage core nvme/scsi device and path, storage osdata, storage vvol vmstats, vsan storagepool. Already in 7.0 U2: storage vvol stats, system health report, system security keypersistence, system settings encryption (and recovery), system settings gueststore repository, system syslog config logfilter. Already in 7.0 U3: network ip hosts, nvme device log persistentevent and telemetry, system ntp stats, vsan hardware vcg. For 7.0, see new ESXCLI commands in vSphere 7.0; for 9.x, see ESXCLI changes in ESX 9.0 and 9.1.

esxcli daemon entitlement

[root@ESXI-8:~] esxcli daemon entitlement add --help
Usage: esxcli daemon entitlement add [cmd options]

Description:
  add                   Add Partner REST entitlements to the partner user.

Cmd options:
  -p|--partner-user-name=<str>
                        Specifies the partner's user name. (required)
  -r|--read-acccess     Grant read access to the partner.
  -w|--write-acccess    Grant write access to the partner.
[root@ESXI-8:~] esxcli daemon entitlement list --help
Usage: esxcli daemon entitlement list [cmd options]

Description:
  list                  List the installed DSDK built daemons.

Cmd options:
  -p|--partner-user-name=<str>
                        Specifies the partner's user name. (required)
[root@ESXI-8:~] esxcli daemon entitlement remove --help
Usage: esxcli daemon entitlement remove [cmd options]

Description:
  remove                Remove Partner REST entitlments from the partner user.

Cmd options:
  -p|--partner-user-name=<str>
                        Specifies the partner's user name. (required)
  -r|--read-acccess     Remove read access from the partner.
  -w|--write-acccess    Remove write access from the partner.
[root@ESXI-8:~] esxcli hardware devicecomponent list --help
Usage: esxcli hardware devicecomponent list [cmd options]

Description:
  list                  List all device components on this host.

Cmd options:

esxcli network ip hosts

[root@ESXI-8:~] esxcli network ip hosts add --help
Usage: esxcli network ip hosts add [cmd options]

Description:
  add                   Add association of IP addresses with host names.

Cmd options:
  -A|--alias=[ <str> ... ]
                        The list of aliases of the host.
  -C|--comment=<str>    Comment line of this item
  -H|--hostname=<str>   The name of the host. (required)
  -I|--ip=<str>         The IP address (v4 or v6) of the host. (required)
[root@ESXI-8:~] esxcli network ip hosts list --help
Usage: esxcli network ip hosts list [cmd options]

Description:
  list                  List the user specified associations of IP addresses with host names.

Cmd options:
[root@ESXI-8:~] esxcli network ip hosts remove --help
Usage: esxcli network ip hosts remove [cmd options]

Description:
  remove                Remove association of IP addresses with host names.

Cmd options:
  -H|--hostname=<str>   The name of the host. (required)
  -I|--ip=<str>         The IP address (v4 or v6) of the host. (required)

esxcli nvme

[root@ESXI-8:~] esxcli nvme device config list
ol stats list
Name          Default   Current   Description
------------  --------  --------  -----------
logLevel      0         0         Log level of this plugin.
adminTimeout  60000000  60000000  Timeout in microseconds of the admin commands issued by this plugin.

[root@ESXI-8:~] esxcli nvme device config set --help
Usage: esxcli nvme device config set [cmd options]

Description:
  set                   Set the plugin's parameter

Cmd options:
  -p|--parameter=<str>  Parameter name (required)
  -v|--value=<str>      Parameter value (required)
[root@ESXI-8:~] esxcli nvme device log get --help
Usage: esxcli nvme device log get [cmd options]

Description:
  get                   Get NVMe log page

Cmd options:
  -A|--adapter=<str>    Adapter to operate on (required)
  -l|--length=<long>    Log page length. (required)
  -i|--lid=<str>        Log page ID. Both decimal number and hexadecimal number are accepted. Hexadecimal number should start with '0x' or '0X'. (required)
  -I|--lsi=<long>       Log specific ID. The default value is 0.
  -s|--lsp=<long>       Log specific field. The default value is 0.
  -n|--namespace=<long> Namespace ID. The default value is 0xFFFFFFFF.
  -o|--offset=<long>    Log page offset. The default value is 0.
  -p|--path=<str>       Log path. If set, the raw log data will be wrote to the specified file. If not set, the log data will be printed in hex format.
  -r|--rae=<long>       Retain asynchronous event. The default value is 0.
  -u|--uuid=<long>      UUID index. The default value is 0.
[root@ESXI-8:~] esxcli nvme device log persistentevent get
Error: Missing required parameter -a|--action
       Missing required parameter -A|--adapter

Usage: esxcli nvme device log persistentevent get [cmd options]

Description:
  get                   Get NVMe persistent event log

Cmd options:
  -a|--action=<long>    Action the controller shall take during processing this command. 0: Read log data. 1: Establish context and read log data. 2: Release context. (required)
  -A|--adapter=<str>    Adapter to operate on (required)
  -p|--path=<str>       Persistent event log path. This parameter is required if the --action parameter is 0 or 1.
[root@ESXI-8:~] esxcli nvme device log telemetry controller get --help
Usage: esxcli nvme device log telemetry controller get [cmd options]

Description:
  get                   Get NVMe telemetry controller-initiated data

Cmd options:
  -A|--adapter=<str>    Adapter to operate on (required)
  -d|--data=<long>      Data area to get telemetry data, 3 is selected if not set
  -p|--path=<str>       Telemetry log path (required)
[root@ESXI-8:~] esxcli nvme device log telemetry host get --help
Usage: esxcli nvme device log telemetry host get [cmd options]

Description:
  get                   Get NVMe telemetry host-initiated data

Cmd options:
  -A|--adapter=<str>    Adapter to operate on (required)
  -d|--data=<long>      Data area to get telemetry data, 3 is selected if not set
  -p|--path=<str>       Telemetry log path (required)

esxcli storage core

[root@ESXI-8:~] esxcli storage core nvme device list --help
Usage: esxcli storage core nvme device list [cmd options]

Description:
  list                  List the NVMe devices currently registered with the PSA.

Cmd options:
  -d|--device=<str>     Filter the output of this command to only show a single device.
  -o|--exclude-offline  If set this flag will exclude the offline devices.
  -p|--pe-only          If set this flag will list the mount points of PE type.
  --skip-slow-fields    Do not show the value of some fields that need more time to fetch. The output will show the value <skipped> for such fields.
[root@ESXI-8:~] esxcli storage core nvme path list --help
Usage: esxcli storage core nvme path list [cmd options]

Description:
  list                  List all the NVMe paths on the system.

Cmd options:
  -d|--device=<str>     Limit the output to paths to a specific device. This name can be any of the UIDs for a specific device.
  -p|--path=<str>       Limit the output to a specific path. This name can be either the UID or the runtime name of the path.
[root@ESXI-8:~] esxcli storage core scsi device list
t10.ATA_____Samsung_SSD_850_EVO_M.2_500GB___________S33DNX0J600488T_____
   Display Name: Local ATA Disk (t10.ATA_____Samsung_SSD_850_EVO_M.2_500GB___________S33DNX0J600488T_____)
   Has Settable Display Name: true
   Size: 476940
   Device Type: Direct-Access
   Multipath Plugin: HPP
   Devfs Path: /vmfs/devices/disks/t10.ATA_____Samsung_SSD_850_EVO_M.2_500GB___________S33DNX0J600488T_____
   Vendor: ATA
   Model: Samsung SSD 850
   Revision: 1B6Q
   SCSI Level: 5
   Is Pseudo: false
   Status: on
   Is RDM Capable: false
   Is Local: true
   Is Removable: false
   Is SSD: true
   Is VVOL PE: false
   Is Offline: false
   Is Perennially Reserved: false
   Queue Full Sample Size: 0
   Queue Full Threshold: 0
   Thin Provisioning Status: yes
   Attached Filters:
   VAAI Status: unsupported
   Other UIDs: vml.0100000000533333444e58304a36303034383854202020202053616d73756e
   Is Shared Clusterwide: false
   Is SAS: false
   Is USB: false
   Is Boot Device: true
   Device Max Queue Depth: 31
   IOs with competing worlds: 31
   Drive Type: unknown
   RAID Level: unknown
   Number of Physical Drives: unknown
   Protection Enabled: false
   PI Activated: false
   PI Type: 0
   PI Protection Mask: NO PROTECTION
   Supported Guard Types: NO GUARD SUPPORT
   DIX Enabled: false
   DIX Guard Type: NO GUARD SUPPORT
   Emulated DIX/DIF Enabled: false
[root@ESXI-8:~] esxcli storage core scsi path list
sata.vmhba0-sata.0:0-t10.ATA_____Samsung_SSD_850_EVO_M.2_500GB___________S33DNX0J600488T_____
   UID: sata.vmhba0-sata.0:0-t10.ATA_____Samsung_SSD_850_EVO_M.2_500GB___________S33DNX0J600488T_____
   Runtime Name: vmhba0:C0:T0:L0
   Device: t10.ATA_____Samsung_SSD_850_EVO_M.2_500GB___________S33DNX0J600488T_____
   Device Display Name: Local ATA Disk (t10.ATA_____Samsung_SSD_850_EVO_M.2_500GB___________S33DNX0J600488T_____)
   Adapter: vmhba0
   Controller: Not Applicable
   Channel: 0
   Target: 0
   LUN: 0
   Plugin: HPP
   State: active
   Transport: sata
   Adapter Identifier: sata.vmhba0
   Target Identifier: sata.0:0
   Adapter Transport Details: Unavailable or path is unclaimed
   Target Transport Details: Unavailable or path is unclaimed
   Maximum IO Size: 33554432

esxcli storage osdata

[root@ESXI-8:~] esxcli storage osdata create --help
Usage: esxcli storage osdata create [cmd options]

Description:
  create                Create an OSData partition on a disk.

Cmd options:
  --clearpartitions     Erase existing partitions and force the operation.
  -d|--diskname=<str>   Target disk device on which to create the OSData partition. (required)
  -m|--mediasize=<str>  The size of the created partition.
                            default: 128 GB
                            max: Use whole device
                            min: 32 GB
                            small: 64 GB
                          (required)

esxcli storage vvol stats

[root@ESXI-8:~] esxcli storage vvol stats add --help
Usage: esxcli storage vvol stats add [cmd options]

Description:
  add                   Add entity for stats tracking

Cmd options:
  -e|--entity=<str>     entity Id (required)
  -n|--namespace=<str>  entity namespace (required)
[root@ESXI-8:~] esxcli storage vvol stats disable --help
Usage: esxcli storage vvol stats disable [cmd options]

Description:
  disable               Disable stats for complete namespace
[root@ESXI-8:~] esxcli storage vvol stats enable --help
Usage: esxcli storage vvol stats enable [cmd options]

Description:
  enable                Enable stats for complete namespace
[root@ESXI-8:~] esxcli storage vvol stats get --help
Usage: esxcli storage vvol stats get [cmd options]

Description:
  get                   Get stats for given stats namespace

Cmd options:
  -d|--dump=<str>       Dump the stats in log file with given custom message
  -e|--entity=<str>     entity Id
  -n|--namespace=<str>  node namespace expression
  -r|--raw              Enable raw format output
[root@ESXI-8:~] esxcli storage vvol stats list --help
Usage: esxcli storage vvol stats list [cmd options]

Description:
  list                  List all supported stats

Cmd options:
  -n|--namespace=<str>  node namespace expression
[root@ESXI-8:~] esxcli storage vvol stats remove --help
Usage: esxcli storage vvol stats remove [cmd options]

Description:
  remove                Remove tracked entity

Cmd options:
  -e|--entity=<str>     entity Id (required)
  -n|--namespace=<str>  entity namespace (required)
[root@ESXI-8:~] esxcli storage vvol stats reset --help
Usage: esxcli storage vvol stats reset [cmd options]

Description:
  reset                 Reset stats for given namespace

Cmd options:
  -e|--entity=<str>     entity Id
  -n|--namespace=<str>  node namespace (required)
[root@ESXI-8:~] esxcli storage vvol vmstats get --help
Usage: esxcli storage vvol vmstats get [cmd options]

Description:
  get                   Get the VVol information and statistics for a specific virtual machine.

Cmd options:
  -c|--get-config-vvol  Get config VVol stats along with data VVols.
  -v|--vm-name=<str>    Display name of the virtual machine. (required)

esxcli system health report

[root@ESXI-8:~] esxcli system health report get --help
Usage: esxcli system health report get [cmd options]

Description:
  get                   Displays one or more health reports

Cmd options:
  --all-reports         Retrieve all the health reports. The default behavior is to retrieve only the latest health report.
  -f|--filename=<str>   The absolute path on the ESXi host where the health report(s) should be copied. If multiple reports are specified, they will be concatenated to this file.
  -r|--report-names=[ <str> ... ]
                        Specifies one or more health reports to display. The name(s) of the report can be obtained from the 'esxcli system health report list' command. (required)
[root@ESXI-8:~] esxcli system health report list
Name                    Time
----------------------  ----
vmw.memoryHealth        2022-12-08T01:53:01+00:00
vmw.ssdStorageHealth    2022-12-08T01:53:31+00:00
vmw.coreServicesStatus  2022-12-08T01:54:01+00:00
hostd-health            2022-12-08T01:55:01+00:00
vmw.vpxaStatus          2022-12-08T01:54:31+00:00
vmw.PSODCount           2022-12-08T01:20:01+00:00
vmw.autoscaler          2022-12-08T01:55:01+00:00

esxcli system ntp stats get

[root@ESXI-8:~] esxcli system ntp stats get --help
Usage: esxcli system ntp stats get [cmd options]

Description:
  get                   Report operational state of Network Time Protocol Daemon

esxcli system security

[root@ESXI-8:~] esxcli system security keypersistence disable --help
Usage: esxcli system security keypersistence disable [cmd options]

Description:
  disable               Disable key persistence daemon.

Cmd options:
  --remove-all-stored-keys
                        Confirm deletion of all stored keys. This confirmation is required.
[root@ESXI-8:~] esxcli system security keypersistence enable --help
Usage: esxcli system security keypersistence enable [cmd options]

Description:
  enable                Enable key persistence daemon.
[root@ESXI-8:~] esxcli system settings encryption get --help
Usage: esxcli system settings encryption get [cmd options]

Description:
  get                   Get the encryption mode and policy.
[root@ESXI-8:~] esxcli system settings encryption recovery list --help
Usage: esxcli system settings encryption recovery list [cmd options]

Description:
  list                  List recovery keys.
[root@ESXI-8:~] esxcli system settings encryption recovery rotate --help
Usage: esxcli system settings encryption recovery rotate [cmd options]

Description:
  rotate                Rotate the recover key.

Cmd options:
  -k|--keyid=<str>      The ID of the new recovery key. If no value is specified, the system will generate a new key.
  -u|--uuid=<str>       The UUID of the recovery key to be rotated. (required)
[root@ESXI-8:~] esxcli system settings encryption set --help
Usage: esxcli system settings encryption set [cmd options]

Description:
  set                   Set the encryption mode and policy.

Cmd options:
  -m|--mode=<str>       Set the encryption mode.
  -e|--require-exec-installed-only=<bool>
                        Require executables to be loaded only from installed VIBs.
  -s|--require-secure-boot=<bool>
                        Require secure boot.
[root@ESXI-8:~] esxcli system settings gueststore repository get --help
Usage: esxcli system settings gueststore repository get [cmd options]

Description:
  get                   Get GuestStore repository.
[root@ESXI-8:~] esxcli system settings gueststore repository set --help
Usage: esxcli system settings gueststore repository set [cmd options]

Description:
  set                   Set or clear GuestStore repository.

Cmd options:
  --url=<str>           URL of a repository to set; to clear GuestStore repository, set --url "" (required)

esxcli system syslog config logfilter

[root@ESXI-8:~] esxcli system syslog config logfilter add --help
Usage: esxcli system syslog config logfilter add [cmd options]

Description:
  add                   Add a log filter.

Cmd options:
  -f|--filter=<str>     The filter to be added. Format is: numLogs | ident | logRegexp. 'numLogs' sets the maximum number of log entries for the specified log messages. After reaching this number, the specified log messages are filtered and ignored. 'ident' specifies one or more
                        system components to apply the filter to the log messages that these components generate. 'logRegexp' specifies a case-sensitive phrase with Python regular expression syntax to filter the log messages by their content. (required)
[root@ESXI-8:~] esxcli system syslog config logfilter get --help
Usage: esxcli system syslog config logfilter get [cmd options]

Description:
  get                   Show the current log filter configuration values.
[root@ESXI-8:~] esxcli system syslog config logfilter list --help
Usage: esxcli system syslog config logfilter list [cmd options]

Description:
  list                  Show the added log filters.
[root@ESXI-8:~] esxcli system syslog config logfilter remove --help
Usage: esxcli system syslog config logfilter remove [cmd options]

Description:
  remove                Remove a log filter.

Cmd options:
  -f|--filter=<str>     The filter to be removed. (required)
[root@ESXI-8:~] esxcli system syslog config logfilter set --help
Usage: esxcli system syslog config logfilter set [cmd options]

Description:
  set                   Set log filtering configuration options.

Cmd options:
  --log-filtering-enabled=<bool>
                        Enable or disable log filtering. (required)

esxcli vsan hardware vcg

[[root@ESXI-8:~] esxcli vsan hardware vcg add --help
Usage: esxcli vsan hardware vcg add [cmd options]

Description:
  add                   Map unidentified vSAN hardware device with VCG ID.

Cmd options:
  -d|--device-id=<str>  Unidentified Device ID. It can be seen with command "esxcli storage core device list" (e.g. nqn.2014-08.org.nvmexpress_8086_Dell_Express_Flash_NVMe_P4610_1.6TB_SFF_BTLN9443030C1P6AGN). (required)
  -v|--vcg-id=<long>    VCG ID. (required)
[root@ESXI-8:~] esxcli vsan hardware vcg get
Usage: esxcli vsan hardware vcg get [cmd options]

Description:
  get                   Get the vSAN VCG ID for a vSAN hardware device. Output is VCG ID while "N/A" means device ID is not mapped.

Cmd options:
  -d|--device-id=<str>  Unidentified Device ID. It can be seen command "esxcli storage core device list" (e.g. nqn.2014-08.org.nvmexpress_8086_Dell_Express_Flash_NVMe_P4610_1.6TB_SFF_BTLN9443030C1P6AGN). (required)

esxcli vsan storagepool

[root@ESXI-8:~] esxcli vsan storagepool list --help
Usage: esxcli vsan storagepool list [cmd options]

Description:
  list                  List vSAN storage pool configuration.

Cmd options:
  -d|--device=<str>     Filter the output of this command to only show a single device with specified device name.
  -u|--uuid=<str>       Filter the output of this command to only show a single device with specified UUID.
[root@ESXI-8:~] esxcli vsan storagepool mount --help
Usage: esxcli vsan storagepool mount [cmd options]

Description:
  mount                 Mount vSAN disk from storage pool.

Cmd options:
  -d|--disk=[ <str> ... ]
                        Name of disk to mount from storage pool. e.g.: mpx.vmhba2:C0:T1:L0. Multiple devices can be provided using format -d device1 -d device2 -d device3.
  -u|--uuid=[ <str> ... ]
                        The vSAN UUID of disk to mount from storage pool. e.g.: 52afa1de-4240-d5d6-17f9-8af1ec8509e5. Multiple UUIDs can be provided using format -u uuid1 -u uuid2 -u uuid3.
[root@ESXI-8:~] esxcli vsan storagepool rebuild --help
Usage: esxcli vsan storagepool rebuild [cmd options]

Description:
  rebuild               Rebuild vSAN storage pool disks.

Cmd options:
  -d|--disk=<str>       Name of disk to rebuild for use by vSAN storage pool. E.g.: mpx.vmhba2:C0:T1:L0.
  -m|--evacuation-mode=<str>
                        Action to take upon removing storage pool from vSAN (default noAction). Available modes are
                            EnsureObjectAccessibility: Evacuate data from the disk to ensure object accessibility in the vSAN cluster, before removing the disk.
                            EvacuateAllData: Evacuate all data from the disk before removing it.
                            NoAction: Do not move vSAN data out of the disk before removing it.
  -u|--uuid=<str>       The vSAN UUID of the disk to rebuild for use by vSAN storage pool. E.g.: 5291022a-ad03-df90-dd0f-b9f980cc005e.
[root@ESXI-8:~] esxcli vsan storagepool remove --help
Usage: esxcli vsan storagepool remove [cmd options]

Description:
  remove                Remove physical disk from storage pool usage. Exactly one of --disk or --uuid param is required.

Cmd options:
  -d|--disk=<str>       Specify individual vSAN disk to remove from storage pool. e.g.: mpx.vmhba2:C0:T1:L0.
  -m|--evacuation-mode=<str>
                        Action the vSAN service must take before the disk can be removed (default noAction). Allowed values are:
                        ensureObjectAccessibility: Evacuate data from the disk to ensure object accessibility in the vSAN cluster, before removing the disk.
                        evacuateAllData: Evacuate all data from the disk before removing it.
                        noAction: Do not move vSAN data out of the disk before removing it.
  -f|--force            Forcefully remove unhealthy disk that has run into permanent metadata read/write errors.
                        Use -f|--force option only if remove disk operation failed repeatedly without force option.
                        Only 'noAction' evacuation mode is supported with -f|--force option.
  -u|--uuid=<str>       Specify UUID of vSAN disk to remove from storage pool. e.g.: 52afa1de-4240-d5d6-17f9-8af1ec8509e5.
[root@ESXI-8:~] esxcli vsan storagepool unmount --help
Usage: esxcli vsan storagepool unmount [cmd options]

Description:
  unmount               Unmount vSAN disk from storage pool.

Cmd options:
  -d|--disk=<str>       Name of disk to unmount from storage pool. e.g.: mpx.vmhba2:C0:T1:L0.
  -m|--evacuation-mode=<str>
                        Action to take upon unmounting storage pool from vSAN (default noAction). Available modes are
                            EnsureObjectAccessibility: Evacuate data from the disk to ensure object accessibility in the vSAN cluster, before unmounting the disk.
                            EvacuateAllData: Evacuate all data from the disk before unmounting it.
                            NoAction: Do not move vSAN data out of the disk before unmounting it.
  -f|--force            Forcefully unmount unhealthy disk that has run into permanent metadata read/write errors.
                        Use -f|--force option only if unmount disk operation failed repeatedly without force option.
                        Only 'noAction' evacuation mode is supported with -f|--force option.
  -u|--uuid=<str>       The vSAN UUID of disk to unmount from storage pool. e.g.: 52afa1de-4240-d5d6-17f9-8af1ec8509e5.

For reference ESXCLI full commands list for ESXi 8.0.

For reference ESXCLI full commands list for ESXi 7.0.

For reference ESXCLI full commands list for ESXi 6.x.
New ESXCLI Commands in vSphere 8.0 (Moved to the Detailed Guide)

This list moved to New ESXCLI Commands Details in vSphere 8.0, which covers every new ESXi 8.0 namespace with its –help output.

This page has moved. The list of new ESXCLI namespaces in ESXi 8.0 is now maintained in New ESXCLI Commands Details in vSphere 8.0, together with the --help output of each command.

According to Broadcom’s ESXCLI reference, the commands that are new in 8.0.0 compared with 7.0.3 include daemon entitlement, hardware devicecomponent, nvme device config/feature, storage osdata, storage vvol vmstats and vsan storagepool. network ip hosts, system health report and system syslog config logfilter already existed in 7.0 Update 2/3.

VMware Cohesity vExpert Gift VMware EXPLORE 2022 Barcelona

The Maxtang NX6412 NUC I received as a vExpert gift from Cohesity at VMware Explore 2022 Barcelona, and my plans for it as a homelab host.

During VMware Explore 2022 Barcelona, I’ve been given a gift as a vExpert.

We could start start popcorn party with NX6412 …

A huge shout out to the vExpert program and to Cohesity for supporting with such an amazing gift – a small but powerful quad-CPU Intel NUC. It’s fanless so it will be quiet too. Thank You

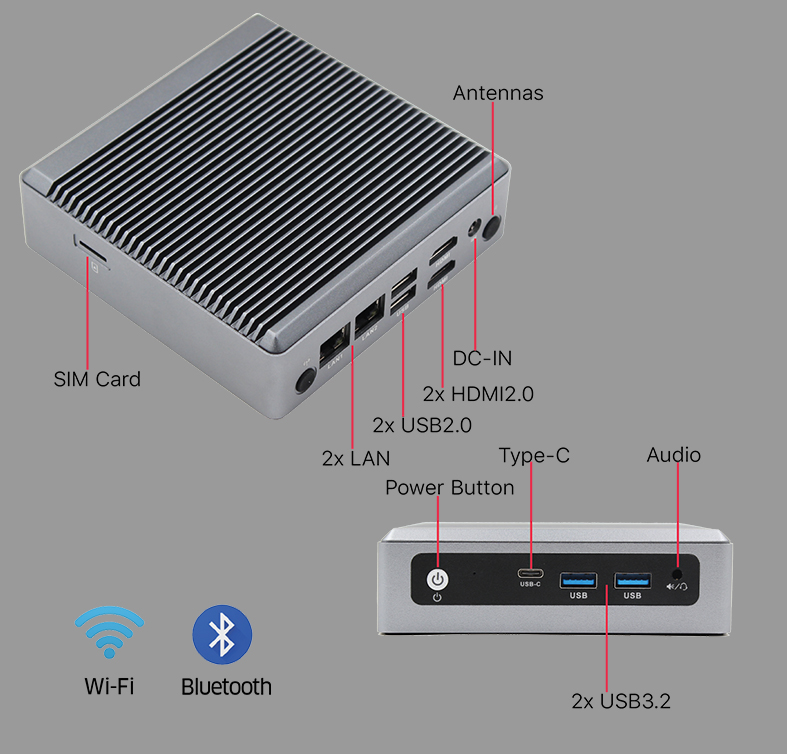
NX6412 Specification:

  • CPU: Intel Elkhart Lake J6412 Processor
  • Memory: Dual Channel SO-DIMM DDR4 up to 32GB – 64GB could run – I will have to confirm it lately ….
  • Display via: Intel Integrated Graphics display via 2xHDMI2.0
  • I/O Ports: 2xLAN, 2xUSB3.2, 2xUSB2.0, Type-C, SIM
  • Ethernet: 10/100/1000Mbps
  • Storage: 1x M.2 2242/2280 SSD, SATA optional
  • Power: 12V DC-in
​Hardware: MaxTang N6412,  32gig memory, 512gig SSD, Quad Core Dual Gigabit Ethernet, Dual HDMI2

Based on small form factors, the compact design at 127mm x 127mm x 37mm makes it great for space-saving.

Intel Elkhart Lake J6412 Processor

Powered by Intel Elkhart Lake Celeron J6412 processor, the NX6412 provides you excellent performance with long life expectancies. The processor has 4cores 4threads, 1.5MB L2 Cache, up to 2.60GHz with a 10W TDP rate. It has a 1.7x improvement in single-thread performance and 1.5x improvement in multi-thread performance generation over generation, 2x performance improvement in graphics over the previous generation

CODE2769US Intel NUC Home Lab with Smart Sensors & Tanzu

Links & information