Microsoft KEK and UEFI CA 2011 expired in June 2026. What it means for vSphere VMs with Secure Boot, and how SilentPK (8.0 U3j) and Capsule PK (9.1.1) fix it.
The Microsoft KEK CA 2011 and UEFI CA 2011 certificates expired in June 2026, and Windows Production PCA 2011 expires in October 2026. vSphere VMs with UEFI Secure Boot keep booting, but VMs without the Microsoft 2023 certificates can’t take future Secure Boot database updates. The fix is two steps: update the VM’s Platform Key (PK) first, using SilentPK on ESXi 8.0 U3j (P09) and later or Capsule PK on ESX 9.1.1.0 for Windows VMs with vTPM, then update KEK and DB through the guest OS vendor. Broadcom KB 423893 is the source of truth and was last updated on 2 September 2026.
Which Microsoft certificates expire, and when
Certificate
Expires
Microsoft Corporation KEK CA 2011
June 2026
Microsoft Corporation UEFI CA 2011
June 2026
Microsoft Windows Production PCA 2011
October 2026
What happens to VMs after the certificates expire
The VMs continue to boot. The impact is that a VM whose KEK and DB don’t contain the Microsoft 2023 certificates can’t apply future Secure Boot database updates, which can block Secure Boot-related security updates in the guest. Guest OS updates that don’t depend on these databases keep working.
Which VMs are affected
VM hardware version 13 or newer (Secure Boot starts at version 13)
UEFI Secure Boot enabled
KEK and DB without the Microsoft 2023 certificates: typically VMs on hardware version 13, VMs created on ESXi hosts earlier than 8.0 U2, or VMs deployed from templates that carry an old NVRAM
VMs on hardware version 13 need an upgrade to version 14 or later before their PK can be updated.
How to find affected VMs
Fleet-wide: KB 423893 attaches PowerCLI scripts (SecureBootExportVMList.ps1, SecureBootExportVMListv2.ps1) that export Secure Boot and vTPM status for all VMs.
Inside a Windows guest:Get-SecureBootUEFI -Name PK
Inside a Linux guest:mokutil --pk
vCenter and ESX 9.1.1.0: the alarm “Virtual Machine UEFI Secure Boot Platform Key is out of date. Refer KB 423893” flags affected VMs.
Remediation by ESXi version: 8.0 U3j (P09), 9.0 and 9.1.1
Secure Boot
vTPM
ESX 7.x, ESXi 8.0 U3i (P08) and earlier
ESXi 8.0 U3j (P09)
ESX 9.0.x / 9.1.0
ESX 9.1.1.0 and later
Disabled
Disabled
No action
SilentPK update (optional)
SilentPK update (optional)
SilentPK update (optional)
Enabled
Disabled
Manual update from the vUEFI interface
SilentPK update
SilentPK update
SilentPK update
Enabled
Enabled
Manual update from the vUEFI interface
Manual update from VMX configuration (preferred for non-Windows VMs)
Manual update from VMX configuration (non-Windows VMs)
Source: KB 423893, as of its 2 September 2026 update. ESX 7.x gets only the manual vUEFI method; no automated fix is planned for it.
SilentPK vs Capsule PK
SilentPK update (ESXi 8.0 U3j and later): the hypervisor adds the missing Windows OEM Devices PK certificate automatically during a guest reboot or VM power cycle. No guest OS action is needed. It is used for VMs without vTPM.
Capsule PK update (ESX 9.1.1.0 and later, Windows): an OS-coordinated firmware update that changes the PK during a guest reboot while preserving vTPM measurements, so BitLocker and other vTPM-dependent features don’t lock you out. It requires VMware Tools 13.1.5 or later and the July 2026 Windows cumulative update (earlier for Windows Server 2025 and Windows 11 24H2/25H2).
The order that matters
Patch hosts to ESXi 8.0 U3j (P09), or to ESX 9.1.1.0 if you have Windows VMs with vTPM.
Update the Platform Key first, with SilentPK, Capsule PK or the manual method from the table.
Then update KEK and DB following the guest OS vendor’s guidance.
NVMe Memory Tiering across vSphere 8.0 U3, ESX 9.0 and 9.1: versions, requirements, DRAM:NVMe ratio, tierdevice and memtier ESXCLI commands.
Short answer: NVMe Memory Tiering lets ESX use a local, dedicated NVMe device as a second memory tier (Tier 1) behind DRAM (Tier 0). Only VM memory is tiered. It was a tech preview in vSphere 8.0 U3 (default DRAM:NVMe 4:1), became GA in ESX/VCF 9.0 (default 1:1, DRS aware, hardware RAID, encryption), and ESX 9.1 adds the esxcli memtier namespace, automatic partitioning, activation without a reboot and software mirroring. It works well when active memory stays under 50% of DRAM.
What memory tiering does
The host presents DRAM plus the NVMe tier to VMs as one contiguous memory pool. The ESX memory manager tracks how recently and how often each VM page is accessed. Frequently used pages stay in DRAM and cold pages go to NVMe. Kernel memory is never tiered. Tiering is off by default.
The 9.1 best-practices page describes the placement behaviour. Cold pages start moving to NVMe when host memory consumption reaches roughly 80% of DRAM. After that, the algorithm keeps scanning VM memory in batches and moves pages between tiers at the end of each cycle. How fast it scans depends on memory pressure. So a host whose VMs fit in DRAM will show little or no Tier 1 usage.
This is not swap. Tiering picks pages by age and activity and uses a dedicated local device, while host swap picks pages crudely and often sits on shared storage. The 9.1 guidance also says not to combine tiering with memory overcommit.
Version status: 8.0 U3 vs 9.0 vs 9.1
vSphere 8.0 U3
ESX / VCF 9.0
ESX / VCF 9.1
Status
Tech preview (KB 311934)
GA, production supported
GA
Default DRAM:NVMe
4:1 (Mem.TierNvmePct = 25)
1:1
1:1 (tier-size-pct 100)
Ratio range
1–400%
docs recommend 100% or lower
1–400%
Tier partition
Manual, esxcli system tierdevice create
Manual, esxcli system tierdevice create
Created automatically
Enable
Kernel boot option + reboot
VMkernel.Boot.memoryTiering + reboot
esxcli memtier enable or Configuration Manager, maintenance mode, no reboot
Redundancy
No RAID recommended, one device per host
Hardware RAID (VROC, tri-mode)
Software mirroring (2 devices) or hardware RAID
Encryption
Not supported
Host or VM level
Host or VM level
DRS
Not recommended
Tiering-aware placement
Tiering-aware placement
Mixed clusters
Not supported
Supported
Supported
The 8.0 U3 tech preview guide attached to KB 311934 also recommended VDI-type workloads only, no vSAN in the same cluster, and disabled large pages by default. Treat 8.0 U3 as a lab feature and plan production on 9.x.
Requirements and limits
Item
Requirement (9.0 / 9.1 TechDocs)
Versions
vCenter and ESX 9.0+ (9.1 features need 9.1 on both)
Device class
vSAN-cache-class NVMe from the Broadcom Compatibility Guide, vSAN SSD: Endurance Class D (≥ 7300 TBW), Performance Class F or G. The 9.1 docs add Mixed Use, 3 DWPD or higher
Attachment
Local only. No NVMe-oF or Ethernet-attached devices
Partition
Dedicated device, all other partitions deleted. Tier partition max 4 TB
Sharing
Not usable if it is already a vSAN cache/data disk or VMFS datastore (9.1: remove from the disk group first)
Host
No Intel Optane PMem, no NVDIMM-N. Maintenance mode for any change
Unsupported operations
Suspend to memory. NVMe hot-plug / prepare-to-remove. Quick Boot (9.1)
Sizing
NVMe used = the smaller of (DRAM × ratio) and the partition size. Keep active memory ≤ 50% of DRAM
VM types that are excluded
ESX 9.0: these VMs cannot power on on a tiered host: latency sensitivity high, SEV / SGX / TDX, Fault Tolerance, VMs with more than 1 TB and 128 vCPUs, and nested virtualization (vhv.enable). These are kept in DRAM automatically: 1 GB pages, preallocated memory, PCI passthrough / UPT, and vQAT.
ESX 9.1: low-latency, confidential, FT, large and nested VMs can now power on, but they are still left out of tiering and stay in DRAM. VBS guests are the exception because they can opt in with sched.mem.enableNestedTiering = TRUE. The 9.1 VCF blog says nested VMs participate in tiering, which is broader than TechDocs, so go by the documentation. For VMs above 512 GB and 64 vCPUs, the 9.1 docs recommend turning tiering off and using a full reservation.
Configure on vSphere 8.0 U3 (tech preview)
esxcli system maintenanceMode set --enable true
esxcli storage core adapter device list
# delete any existing partitions first (partedUtil, KB 1036609)
esxcli system tierdevice create -d /vmfs/devices/disks/<nvme_device>
esxcli system tierdevice list
esxcli system settings kernel set -s MemoryTiering -v TRUE
# optional ratio, default 25 (= 4:1)
esxcfg-advcfg -s 50 /Mem/TierNvmePct
reboot
The only option tierdevice create takes is -d / --nvmedevice, and tierdevice delete takes the same one. An older version of this article showed extra vendor/ID arguments, which were wrong.
Configure on ESX 9.0
Put the host in maintenance mode, delete all partitions on the NVMe device (KB 323144 / KB 1036609), then run esxcli system tierdevice create -d /vmfs/devices/disks/<nvme_device> and check it with esxcli system tierdevice list. Device preparation can’t be done from the vSphere Client in 9.0.
Enable tiering. Cluster: Configure → Desired State → Configuration → Draft → esx → vmkernel → options, set memory_tiering to True. Host: Advanced System Settings, set VMKernel.Boot.memoryTiering to true. Both need a cluster managed by a single image with vSphere Configuration Profiles. Broadcom’s 9.1 memtier blog confirms that 9.0 still uses the esxcli system settings kernel namespace from the CLI.
Optionally set Mem.TierNvmePct for the ratio (25 = 4:1), Mem.EncryptTierNVMe = 1 for host-level encryption, or sched.mem.EncryptTierNVMe = TRUE for one VM. Reboot.
To exclude a single VM, power it off and set sched.mem.enableTiering = FALSE.
Configure on ESX 9.1: the esxcli memtier namespace
In 9.1, every tiering operation is in one namespace. The partition is created automatically, and enabling needs maintenance mode but no reboot. Commands and options below are from the ESXCLI 9.1.0 reference:
esxcli memtier device list --available        # -a; --configured / -c
esxcli memtier enable -d <device_1>
esxcli memtier enable -d <device_1>,<device_2>   # software mirror
esxcli memtier enable -d <device_1> -c t -r 50    # encryption, 2:1 ratio
esxcli memtier config get                     # -d / -e / -c / -r for single values
esxcli memtier config set --tier-size-pct 25  # 1-400, % of DRAM
esxcli memtier config set --encryption true
esxcli memtier config set -d <new_device>,<mirror_device>
esxcli memtier status get
esxcli memtier disable                        # keeps tier partition
esxcli memtier disable -d                     # --delete-devices
esxcli memtier config delete                  # removes config and partition
For a cluster, go to Configure → Desired State → Configuration → Draft → esx → memtier → nvme. Set enable and pick a device for each host (by BIOS UUID). You can also set a mirror_device, encryption and tier_size_pct. Configuration Manager puts the host into maintenance mode by itself. The mirror device has to be at least as large as the primary. If config get shows Enable true but status get reports Disabled, activation failed, so check the logs and alarms.
In 9.1, if you set sched.mem.enableTiering = FALSE on a VM, also give it a full memory reservation. Without one, its pages can end up in host swap, which is slower than the NVMe tier.
Monitor it
9.0: Host → Configure → Hardware → Overview shows Tier 0 (DRAM), Tier 1 (NVMe) and Total. The cluster Hosts tab has a Memory Tiering column, which reads “Software” for tiered hosts.
9.1: host and cluster Summary Memory cards show tier state and Tier 1 consumption, and there are tiering-specific performance charts. From the CLI, use esxcli memtier status get.
Capacity check: compare active memory with DRAM. A host whose active memory is under 50% of DRAM is a good candidate.
Operational notes
Expect vMotion to take roughly 1.5–2x longer for tiered VMs, because pages have to be read back from NVMe.
If a single-device tier fails (9.1 docs), VMs that touch a page on the failed device power off. With vSphere HA restart policies they can be restarted on another host. DRAM-only VMs keep running. This is the reason for mirroring or RAID.
If you turn tiering off on a host, the cluster loses that capacity, and in an overcommitted cluster some VMs may then fail to power on.
Recap of Explore 2025 session INVB1158LV: managing NVIDIA vGPU for AI/ML workloads in VMware, vGPU profiles, MIG and placement tips.
Explore 2025 Session Recap – INVB1158LV
Are you looking to maximize AI/ML performance in your virtualized environment? At VMware Explore 2025, I attended a compelling session — INVB1158LV: Accelerating AI Workloads: Mastering vGPU Management in VMware Environments — that unpacked how to effectively configure and scale GPUs for AI workloads in vSphere.
This blog post shares key takeaways from the session and outlines how to use vGPU, MIG, and Passthrough to achieve optimal performance for AI inference and training on VMware Cloud Foundation 9.0.
vGPU Configuration Options in VMware vSphere
🔹 1. DirectPath I/O (Passthrough)
A dedicated GPU is assigned to a single VM or containerized workload.
Ideal for maximum performance and full GPU access (e.g., LLM training).
No sharing or resource fragmentation.
🔹 2. NVIDIA vGPU – Time Slicing Mode
Shares one physical GPU across multiple VMs.
Each VM gets 100% of GPU cores for a slice of time, while memory is statically partitioned.
Supported on all NVIDIA GPUs.
Useful for efficient GPU sharing, especially for model inference and dev/test setups.
✅ Example profiles: grid_a100-8c, grid_a100-4-20c
🔹 3. Multi-Instance GPU (MIG)
Available on NVIDIA Ampere & Hopper (e.g., A100, H100).
Splits GPU into isolated hardware slices (compute + memory).
Offers deterministic performance and better isolation.
Best for multi-tenant AI inference, production-grade deployments.
✅ Example profiles: MIG 1g.5gb, MIG 2g.10gb, MIG 3g.20gb ✅ Assignable via vSphere UI with profiles like grid_a100-3-20c
Time Slicing vs. MIG – When to Use What?
Mode
Best For
Sharing Type
Time Slicing
LLM training, dev/test environments
Time-shared
MIG
Production inference, multitenancy
Spatial (hardware)
Passthrough
Maximum performance for single workload
Not shared
Smarter vMotion for AI Workloads in VCF 9.0
One of the standout improvements presented during session INVB1158LV was the vMotion optimization for VMs using vGPUs. With vSphere 8.0 U3 and VMware Cloud Foundation 9.0, the way vMotion handles GPU memory has been completely reengineered to minimize downtime (stun time) during live migration.
Instead of migrating all GPU memory during the VM stun phase, 70% of the vGPU cold data is now pre-copied in the pre-copy stage, and only the final 30% is checkpointed during stun. This greatly accelerates live migration even for massive LLM workloads running on multi-GPU systems.
📊 Example results with Llama 3.1 models:
Migrating a VM using 2×H100 GPUs (144 GB vGPU memory) saw stun time drop from 24.5s to just 6.3s.
Migrating a large model on 8×H100 (576 GB) now completes in 21s, compared to 325s for a power-off-and-reload approach — that’s a 15× improvement.
These enhancements make zero-downtime AI infrastructure upgrades and scaling possible, even for large language model deployments
Deploy a minimal VCF 9.0 lab on 2–3 hosts: single-host domain flag, NIC speed bypass, vSAN ESA HCL mock VIB, HTTP offline depot and a sample hardware BOM.
Short answer: a minimal VCF 9.0 lab needs only 2 ESXi hosts with NFS or 3 with vSAN/FC, a single 10GbE NIC, and singleton appliances. For nested labs you can even put the VCF Installer and SDDC Manager on one host. The tricks that make it work in a homelab are a single-host domain flag, a NIC-speed validation bypass, a vSAN ESA HCL mock VIB, and an HTTP offline depot, all shown below with the exact commands. Reference hardware: MINISFORUM MS-A2 with 128 GB RAM.
I had the pleasure of attending the excellent session “Deploying Minimal VMware Cloud Foundation 9.0 Lab” by Alan Renouf and William Lam at VMware Explore 2025. It was packed with practical advice, hardware insights, and field-tested tips on how to stand up a fully functional VCF environment—even on a tight budget.
Whether you’re a home lab enthusiast, enterprise architect, or just VCF-curious, here’s a recap of the key takeaways.
Key Changes: VCF 5.x vs VCF 9.x
VCF 5.x:
Required 4+ ESXi hosts
Monolithic installer
vSAN required
3-node NSX cluster
10GbE NICs mandatory
VCF 9.x:
More modular design
Only 2–3 ESXi hosts required
1 x 10GbE NIC sufficient
Support for singleton appliances
Flexible storage (vSAN ESA, FC, NFS)
VCF 9.0 Tips & Tricks (with real CLI guidance)
Here’s the juicy part—real-world deployment tips and overrides:
1. Minimum ESXi Host Requirements
For vSAN/FC: 3 ESXi hosts
For NFS: 2 ESXi hosts
⚠️ You can install VCF Installer + SDDC Manager even on a single ESXi host (great for nested labs!)
No in-place upgrade from Aria Operations for Logs 8.18 to VCF Operations for Logs 9.0: deploy fresh, run both, move integrations, then retire 8.18.
Short answer: there is no in-place upgrade from Aria Operations for Logs 8.18.x to VCF Operations for Logs 9.0. Deploy VCF Operations for Logs 9.0 fresh, keep 8.18.x running for historical logs, move integrations and log sources to the new instance, optionally transfer old logs, then decommission 8.18.x (KB 402314).
With the release of VMware Cloud Foundation (VCF) 9.0, Aria Operations for Logs has officially been rebranded as VCF Operations for Logs. However, if you were expecting a simple in-place upgrade, there’s an important caveat: no direct in-place upgrade is supported.
Instead, administrators must deploy VCF Ops for Logs 9.0 as a fresh installation and gradually migrate integrations and data sources from their existing Aria Ops for Logs 8.18.x environment.
Why No In-Place Upgrade?
VMware Aria Operations for Logs version 8.18.x does not support an in-place upgrade path to version 9.0. The architectural and platform changes introduced in VCF 9.0 require a clean deployment.
This means that if you are currently running Aria Ops for Logs 8.18.3, you cannot simply apply an upgrade package. Instead, both versions must temporarily coexist while you complete the transition.
Recommended Migration Approach
Broadcom’s official upgrade guidance outlines the following steps:
Deploy VCF Ops for Logs 9.0
Set up a fresh instance of VCF Ops for Logs in your environment.
Keep your Aria Ops for Logs 8.18.3 instance online, but start unconfiguring existing integrations.
This ensures that historical log data remains accessible, even though new logs will be directed elsewhere.
Reconfigure Integrations on 9.0
Point all your log sources, agents, and integrations to the new VCF Ops for Logs 9.0 instance.
Validate ingestion pipelines to confirm that logs are flowing properly.
Leverage Log Transfer if Needed
Broadcom provides guidance for log transfer, allowing you to move log data from the old environment to the new one.
Decommission the Old Instance
Once all integrations and data have been verified in the new platform, you can safely retire your 8.18.3 deployment.
Key Takeaways
Rebrand Only in Name? Not Quite. While the product name has changed from Aria Ops for Logs to VCF Ops for Logs, the lack of in-place upgrade means the transition is more than cosmetic.
Parallel Operations Are Required. You’ll need to run 8.18.3 and 9.0 side by side during the migration phase.
Fresh Deployment Is Mandatory. Treat this as a new installation rather than an upgrade.
Plan for Migration Effort. Reconfiguring all integrations and log sources can be time-intensive, so schedule accordingly.
Summary
If your organization relies heavily on VMware Aria Operations for Logs today, be prepared for a stepwise migration process rather than a straightforward upgrade. By planning the deployment of VCF Ops for Logs 9.0 carefully—and keeping the old instance online for historical data—you can ensure a smooth transition without losing valuable log visibility.
For more details, consult Broadcom’s official documentation:
What “vSphere Cluster Services are disabled by retreat mode” means, what breaks in 7.0/8.0 vs 9.0, and how to enter or exit vCLS Retreat Mode.
Retreat Mode removes the vSphere Cluster Services (vCLS) VMs from one cluster. In vSphere 7.0 and 8.0 that has a price: DRS stops working and HA placement becomes suboptimal, which is exactly what the banner “vSphere Cluster Services are disabled by retreat mode” warns you about. From vSphere 9.0, vCLS can be disabled without any impact on DRS or HA. On 7.0 U3o, 8.0 U2 and later you switch it in the vSphere Client in a few clicks.
What “vSphere Cluster Services are disabled by retreat mode” means
When a cluster is in Retreat Mode, vCenter shows one of these messages on the cluster:
vSphere Cluster Services are disabled by retreat mode. vSphere DRS is not functioning and vSphere HA will not perform optimally.

vSphere Cluster Services are disabled by retreat mode. vSphere HA will not perform optimally.
The exact wording depends on which cluster services are enabled. Both mean the same thing: someone (or a script) put the cluster into Retreat Mode, the vCLS VMs were removed, and the cluster is running without them. If that wasn’t intentional, exit Retreat Mode and the vCLS VMs are redeployed automatically.
What vCLS and Retreat Mode are
vCLS runs small agent VMs in every vSphere cluster to keep cluster services such as DRS running independently of vCenter. There are two implementations:
External vCLS (vSphere 7.0 U1 to 8.0 U2): agent VMs deployed and managed by the ESX Agent Manager (EAM), up to three per cluster.
Embedded vCLS (vSphere 8.0 Update 3 and later): vCLS VMs based on vSphere Pod technology, managed internally by vpxd instead of EAM, with a redundancy of two VMs per cluster and a minimum of one powered-on VM for DRS (TechDocs: Embedded vCLS).
Retreat Mode tells vCenter to stop running vCLS VMs on one cluster. Embedded vCLS keeps the same per-cluster activate/deactivate capability, so Retreat Mode works the same way on 8.0 U3.
What breaks in Retreat Mode, by version
vSphere version
DRS
HA
vSAN cluster health
7.0.x and 8.0.x
Does not function on the cluster
Restarts VMs, but placement is not optimal (HA relies on DRS for placement)
Cluster Service health shows Degraded
9.0 and later
No impact
No impact
–
Source: Broadcom KB 316514. On 7.0 and 8.0, use Retreat Mode only for a specific task, such as storage maintenance or troubleshooting, and exit it as soon as you’re done.
How to enable Retreat Mode
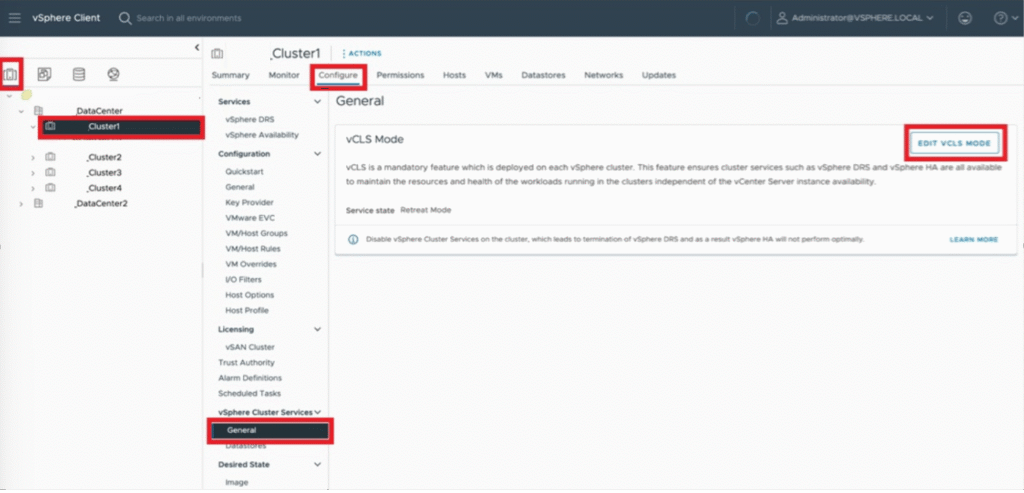
vSphere 7.0 U3o, 8.0 U2 and later (vSphere Client)
In the vSphere Client, go to Hosts and Clusters and select the cluster.
Open Configure → vSphere Cluster Services → General.
Click EDIT VCLS MODE (top right).
Select Retreat Mode (the second option) and click OK.
vCenter removes the vCLS VMs from the cluster automatically.
Select the cluster in the vSphere Client and copy its domain ID from the browser URL, for example domain-c1006. Use only the domain-c<number> part; a wrong ID can break vCenter.
Select the vCenter Server and open Configure → Advanced Settings → Edit Settings.
Add the setting below and click Save. vCenter removes the vCLS VMs automatically.
vSphere Client (7.0 U3o / 8.0 U2 and later): open EDIT VCLS MODE again and select the first (default) option instead of Retreat Mode.
Advanced setting: set config.vcls.clusters.domain-c<number>.enabled back to True.
Script: run retreatModeConfiguration.py with the opposite option.
vCenter redeploys the vCLS VMs, and on 7.0/8.0 DRS resumes once they are running. Check that the banner has disappeared from the cluster.
How to identify vCLS VMs
vCLS VMs are named vCLS-{UUID}, where the UUID is the UUID of the ESXi host, and sit in the vCLS folder in the VMs and Templates view.
Embedded vCLS VMs (8.0 U3 and later) carry the extra config option vCLSCRX.agent = true.
You can also check which extension manages a VM in the Managed Object Browser, for example https://<vCenter>/mob/?moid=vm-1004&doPath=config.managedBy. On vSphere 9 the MOB is disabled by default: see how to enable the MOB in vSphere 9.
Summary
vSphere 9.0 and later: you can disable vCLS without affecting DRS or HA.
vSphere 7.0 and 8.0: Retreat Mode also stops DRS and weakens HA placement. Use it for a specific task, then exit it.
vSphere Standard and Enterprise Plus stop at 8.0 U3; vSphere 9.1 ships only in VVF and VCF. See what each edition includes and which one fits you.
There is no vSphere 9 Standard or Enterprise Plus. Broadcom’s vSphere 9.1 Product Line Comparison states that the standalone vSphere Standard and vSphere Enterprise Plus editions are available only up to 8.0 Update 3, and that vSphere 9.1 features ship only in VMware vSphere Foundation (VVF) 9.1 and VMware Cloud Foundation (VCF) 9.1. So the real choice is between staying on 8.0 U3 or moving to VVF or VCF. The tables below show what separates them.
Which vSphere editions exist today
Edition
Latest vSphere version
What it is
vSphere Standard
8.0 Update 3
Standalone vSphere for basic consolidation: vCenter Standard, vMotion, HA, no DRS or Distributed Switch
vSphere Enterprise Plus
8.0 Update 3
Standalone vSphere with DRS, Distributed Switch and the advanced resource-management features
VMware vSphere Foundation (VVF)
9.1
vSphere 9.1 bundled with vSAN (0.25 TiB per core), Supervisor / Kubernetes services and VCF Operations for monitoring, logs and compliance
VMware Cloud Foundation (VCF)
9.1
The full private-cloud platform: vSphere, vSAN, NSX, vSphere Kubernetes Service, VCF Operations, VCF Automation, HCX and VCF Private AI services
No. Standard and Enterprise Plus end at 8.0 Update 3. If you need anything from vSphere 9.x, you need VVF 9.1 or VCF 9.1. Staying on Standard or Enterprise Plus means staying on the 8.0 line, so check its support dates in the Broadcom product lifecycle matrix before you commit to it.
Key differences between the editions
A selection of the features that most often decide the choice. For the complete matrix (storage protocols, vSAN data services, security features), use the official datasheet.
✔ included, – not included. The Standard, Enterprise Plus and VVF columns follow the Broadcom datasheet; the VCF column reflects that VCF includes vSphere and the components listed in the VCF 9.1 FAQ.
Which edition fits your environment
Your situation
Edition
Why
Small site, a few hosts, no need for DRS or a Distributed Switch, and 8.0 is fine
vSphere Standard
Covers vMotion and HA; no path to 9.x
You need DRS, a Distributed Switch or NIOC, and plan to stay on 8.0 for now
vSphere Enterprise Plus
Full resource management on 8.0 U3; no path to 9.x
You want vSphere 9.x, Kubernetes via Supervisor/VKS, or built-in operations and compliance monitoring
VVF 9.1
The smallest bundle that includes vSphere 9.1
You need software-defined networking and security (NSX), self-service automation, or migration with HCX
VCF 9.1
The full private-cloud stack
Licensing terms and core minimums change between Broadcom announcements, so confirm them with your Broadcom partner before you size a purchase. Included vSAN capacity, per KB 313548 at the time of writing: 0.25 TiB per core with VVF and 1 TiB per core with VCF.
What VCF 9.1 adds on top of VVF
According to the VCF 9.1 FAQ, VCF 9.1 includes vSphere, vSAN, NSX, vSphere Kubernetes Service, VCF Operations, VCF Automation, HCX and VCF Private AI services. In practice, the step from VVF to VCF is about the network (NSX), automation and multi-site operations rather than about vSphere features themselves. Note that vSAN is not VCF-only: VVF includes 0.25 TiB of vSAN entitlement per licensed core, and VCF includes 1 TiB per core (KB 313548).
What vSphere Supervisor is in VCF 9: VM Service, vSphere Pods, VKS, Zones, Namespaces and Supervisor Services, walked through in hands-on lab HOL-2633-01-VCF-L.
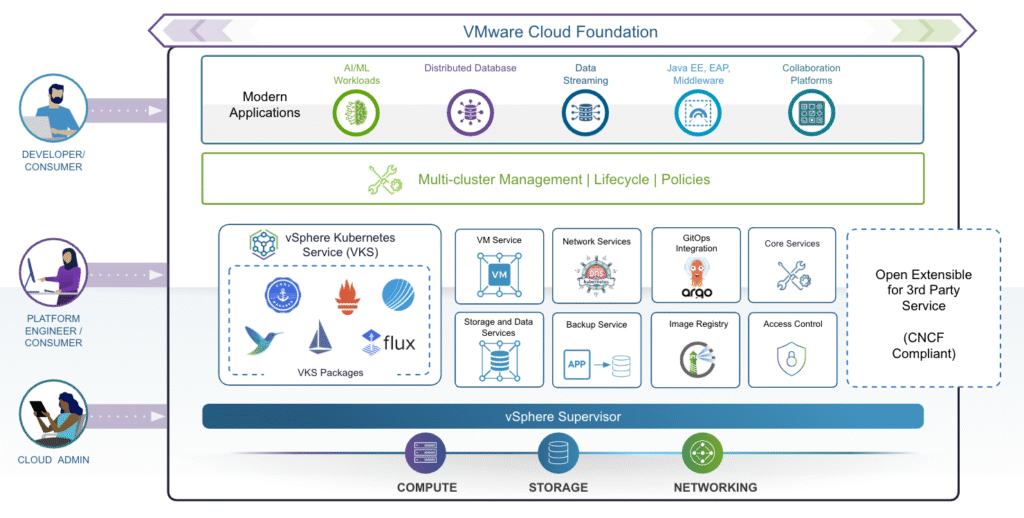
Short answer:vSphere Supervisor turns a vSphere cluster into a Kubernetes control plane, so the same cluster can run VMs through the VM Service, vSphere Pods directly on ESX hosts, and full Kubernetes clusters through vSphere Kubernetes Service (VKS). In VCF 9 it is organised with vSphere Zones and Namespaces and extended with Supervisor Services such as Harbor or Velero. Supervisor is part of VVF and VCF, not of standalone vSphere Standard or Enterprise Plus. Below is my walkthrough of Broadcom’s hands-on lab HOL-2633-01-VCF-L.
Modern IT teams are increasingly challenged to manage both traditional virtual machines (VMs) and modern Kubernetes workloads side-by-side. VMware Cloud Foundation 9.0 rises to this challenge by tightly integrating vSphere Supervisor, transforming your vSphere clusters into a robust hybrid platform for VMs and Kubernetes.
In this Hands-On Lab (HOL-2633-01-VCF-L), you’ll get guided, practical experience on how to unify VM and Kubernetes management using vSphere Supervisor, from foundational concepts to deploying real workloads.
📚 Lab Modules at a Glance
Module
Title
Duration
Level
1
What is the vSphere Supervisor?
15 min
Beginner
2
How does the vSphere Supervisor work?
30 min
Beginner
Let’s break down each module.
⚙️ Module 1: vSphere Supervisor Concepts and Components
✅ What is vSphere Supervisor?
vSphere Supervisor introduces a declarative Kubernetes control plane natively into your vSphere cluster. This means your cluster can now run:
VMs via the VM Service
Kubernetes Pods directly on ESXi hosts (as vSphere Pods)
Full upstream Kubernetes clusters using vSphere Kubernetes Service (VKS)
This hybrid model enables a consistent cloud-like experience for both traditional and modern workloads. Supervisor is part of VVF and VCF, not of standalone vSphere Standard or Enterprise Plus (see the vSphere editions comparison).
🔑 Key Components
vSphere Zone: Logical boundary to provide high availability. Clusters are mapped to Zones for resilience against failures.
vSphere Namespace: Think of it as a resource pool with policy-based limits (CPU, memory, storage) for workloads. It maps to Kubernetes namespaces but adds vSphere-specific governance.
Supervisor Networking: Uses either vSphere networking or NSX. Load balancers ensure external access for workloads.
Supervisor Storage: Utilizes storage policies to manage placement for VMs, Pods, persistent volumes, and container images.
🧩 Extensible Services
vSphere Supervisor comes with base services like:
VM Service
Kubernetes Service
Velero for backup
Additional services (like Grafana, Harbor, DNS, and vDPP) can be installed modularly to enhance the Supervisor’s capabilities.
🛠️ Module 2: Enabling and Configuring vSphere Supervisor
This module is all about getting your hands dirty — you’ll step through setting up vSphere Supervisor, deploying Namespaces, provisioning VMs and Kubernetes clusters, and expanding functionality with services.
⚡ Key Steps:
🔑 1️⃣ Prerequisites
Prepare clusters with vSAN or shared storage.
Define storage policies for control plane, VMs, Pods, and VKS clusters.
🔑 2️⃣ Enable vSphere Supervisor
Connect to the Management vCenter.
Create vSphere Zones for high availability.
Use the wizard to configure networking (NSX or vSphere stack), management network, and workload network.
Select control plane size and storage policy.
(Note: The lab walks through these steps but does not deploy a live Supervisor due to time constraints.)
🔑 3️⃣ Deploy & Configure a Namespace
Create a new Namespace and bind it to the Supervisor.
Assign VM Classes (defining VM sizing options).
Attach storage policies for workloads.
Create and associate a Content Library to provide VM templates.
🔑 4️⃣ Deploy Workloads
Deploy a VM using the VM Service and Consumption Interface.
Attach persistent storage and a Load Balancer.
Deploy a Kubernetes cluster (VKS) by specifying node pools and cluster config.
Validate external access via network service cards.
🔑 5️⃣ Add Services
Expand functionality by uploading YAMLs to register services like Grafana, Harbor, etc.
Supervisor and VKS troubleshooting: symptom → fix
The lab shows the happy path. These are the failures I have documented from real Supervisor and VKS environments, each with its cause and the fix:
Symptom
Cause
Fix
Supervisor stays in Configuring with “ERROR – Configured Core Supervisor Services”, services show ReconcileFailed
The Supervisor’s HTTPS proxy blocks access to the internal registry
✔️ Unified Operations: Manage VMs and Kubernetes side-by-side in the same cluster with consistent policies. ✔️ Self-Service for DevOps: Namespaces, storage, and VM classes empower developers with agility. ✔️ Resilience and Scalability: Zones and Supervisor Services ensure HA and modularity.
vSphere 9 features in VCF 9.0, tested in the lab: Memory Tiering, vLCM, Live Patch, mixed-vendor clusters and more.
If you’re ready to unlock the full power of VMware’s latest vSphere release, the HOL-2630-01-VCF-L hands-on lab is your perfect starting point. This lab provides a practical deep dive into the newest features, enhancements, and operational improvements in vSphere 9.0, all seamlessly integrated into VMware Cloud Foundation (VCF) 9.0.
In this walkthrough, I’ll break down what you’ll learn, module by module, to help you get the most out of your lab experience.
🗂️ Module 1: What’s New in vSphere 9 Overview
Kick things off with a comprehensive overview of what’s new in vSphere 9:
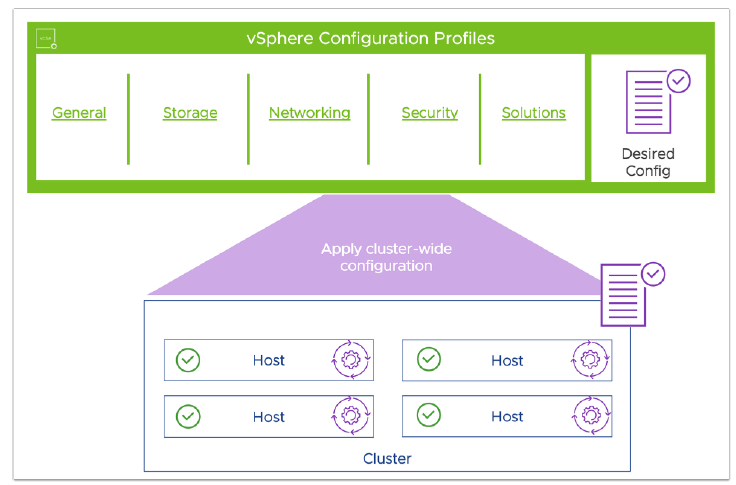
✅ Memory Tiering — Officially introduced, this feature allows NVMe devices to be used as tiered memory, expanding your host’s memory footprint while optimizing costs. ✅ Virtual Hardware Version 22 — Unlocks support for up to 960 logical processors, enhanced device support, and performance improvements for demanding workloads. ✅ VPC in vCenter — Create flexible Virtual Private Clouds and manage public/private networking seamlessly. ✅ Unified Licensing — Say goodbye to license keys — a new secure license file model simplifies lifecycle management. ✅ vSphere Configuration Profiles — The next-gen replacement for Host Profiles, offering cluster-wide desired state config at scale.
You’ll also experience the updated ESX Host Client UI, now with dark mode and deep customization options.
🔹 Staged Updates — Push update payloads to hosts before remediation to minimize maintenance downtime. 🔹 Parallel Remediation — Remediate multiple hosts simultaneously for faster patch cycles — perfect for large clusters. 🔹 Standalone Host Support — Manage isolated hosts via API or the new config profiles.
⚙️ Module 3: Resource Management — Enhanced DRS, vMMR, CPU Topology, and Latency
Efficiency meets performance:
✨ Enhanced DRS (Distributed Resource Scheduler) — Smarter load balancing with new automation levels and predictive DRS for proactive resource allocation. ✨ vMMR (vSphere Memory Monitoring & Remediation) — Gain granular insights into memory usage and performance impact. ✨ Simplified Virtual NUMA — New CPU topology tools simplify configuring vNUMA for VMs, improving latency for sensitive workloads.
🧩 Module 4: Guest OS and Workloads
Modern workloads, fully supported:
🔑 Virtual TPM (vTPM) Policies — Clone Windows 11 VMs securely by auto-replacing TPM devices. 📈 Virtual Hardware Upgrades — Upgrade clusters to the latest hardware version in bulk. 🔒 Device Virtualization Extensions — Expanded framework for vendors to build hardware-backed virtual devices with better live migration support.
🤝 Module 5: Mixed Vendor Clusters
In vSphere 9, clusters can mix hosts from multiple hardware vendors while still managing updates with cluster-based images. This makes infrastructure more flexible and vendor-agnostic.
🔄 Module 6: Live Patch
Zero downtime patching is here:
⏱️ Live Patch — Apply updates to ESXi hosts without reboots or maintenance mode. Improve security posture while keeping workloads running.
🧮 Module 7: Introduction to Memory Tiering
Dive deeper into Memory Tiering:
📚 Learn how to set up NVMe drives as cost-effective memory extensions, boosting capacity and lowering DRAM costs. 📊 See how this impacts workload density and CPU utilization.
🔑 Module 8: vSphere Licensing and Operations
Simplify your day-to-day management:
🗝️ Unified License Management — Use the VCF Business Services Console to license your entire Software Defined Data Center with a single license file. 📋 One Pane of Glass — Link vCenter instances for holistic operations and monitoring.
vSphere 9 is only available in VVF and VCF; standalone vSphere Standard and Enterprise Plus stop at 8.0 Update 3. See the vSphere editions comparison for 9.1 for what each edition includes.
Hands-on with the new operations capabilities in VMware Cloud Foundation 9.0, module by module, in lab HOL-2610-03-VCF-L.
Ready to elevate your VMware Cloud Foundation (VCF) operations game? In the latest Hands-On Lab HOL-2610-03-VCF-L, you’ll get practical experience with all the new operational capabilities in VMware Cloud Foundation 9.0, learning how to monitor, secure, troubleshoot, and manage your private cloud infrastructure efficiently.
Below is a deep dive into each module so you know exactly what to expect.
📊 Module 1: Monitoring Private Cloud Infrastructure with Diagnostic Findings and VCF Health
Kick off by mastering the new Diagnostic Findings and VCF Health tools.
Diagnostic Findings offers real-time checks for security advisories (VMSAs), vulnerabilities (CVEs), and best practice deviations. It categorizes issues as Critical, Immediate, or Warning and includes easy links to relevant KB articles.
VCF Health gives you a clear, unified view of the entire environment—instances, vCenters, clusters, hosts, and NSX. You can quickly pinpoint trouble spots and drill down into domains and specific components.
Use powerful filters, historical findings, and export features to stay on top of the operational state of your cloud.
🔑 Takeaway: Get proactive issue detection and a health dashboard for streamlined troubleshooting.
🌐 Module 2: Monitoring Network Operations
The new Network Operations Dashboard integrates NSX and vSphere network monitoring right into VCF Operations—no more jumping between consoles!
View the network inventory at a glance: NSX Instances, Edge Clusters, Transport Nodes, and more.
Check out NSX Health, analyze business application flows, and dig into traffic patterns.
Use the interactive vSphere Network Inventory to see object relationships visually, expand views, and trace connections down to distributed virtual switches.
🔑 Takeaway: Gain deep insights into your network’s health, traffic, and relationships—all in one place.
🗄️ Module 3: Monitoring Storage Operations
Next, manage your storage like a pro:
The Storage Operations Dashboard centralizes monitoring for vSAN and non-vSAN datastores.
Analyze storage alerts, usage trends, capacity distribution, and performance.
Dive into vSAN Clusters to see detailed configurations, efficiency metrics, and IOPS data.
You’ll learn to filter by storage type, run diagnostics, and use dashboards to ensure healthy storage across the environment.
🔑 Takeaway: Proactively monitor and troubleshoot storage issues before they impact workloads.
🔒 Module 4: Monitoring Security Operations
Security is a top priority in VCF 9.0—and the new Security Operations Dashboard puts control at your fingertips:
User Security: Track authentication activity, failed logins, and permission changes with detailed dashboards.
Infrastructure Security: Review host encryption status, vSAN cluster encryption, advisories, certificate health, and VM encryption in one unified view.
Use intuitive widgets and drill-down dashboards to manage compliance and spot risks fast.
🔑 Takeaway: Unified, real-time visibility into user actions and infrastructure security helps you strengthen compliance and reduce vulnerabilities.
💸 Module 5: Chargeback and Billing
Finally, master cost transparency and control:
Explore the enhanced Chargeback and Billing capabilities integrated into the unified operations console.
Dashboards let you view chargeback summaries by organizations, projects, region quotas, and running workloads.
Generate and manage bills seamlessly, and preview tenant-facing billing interfaces for greater transparency.
🔑 Takeaway: Simplify financial operations and ensure tenants have clear insights into their cloud usage and costs.
✅Summary
VMware Cloud Foundation 9.0 Operations introduces robust, integrated monitoring and management tools designed to:
Unify health checks, diagnostics, and security monitoring
Provide actionable insights across infrastructure, network, storage, and user activity
Streamline chargeback and billing for clearer financial accountability