Supervisor Deployment or Upgrade Stuck at “Installed and Started Kubernetes Node Agent on the ESXi Host”

Supervisor deployment or upgrade hangs in Configuring Host Nodes with repeated Apply Solution tasks? The spherelet VIB cannot install because the hosts are not compliant with the vLCM image, sometimes because of legacy BIOS boot (KB 393663).

Short answer: When a Supervisor deployment or upgrade hangs in Configuring Host Nodes with the pending task Installed and Started Kubernetes Node Agent on the ESXi Host and the vSphere Client keeps running Apply Solution tasks, the Kubernetes node agent (the spherelet VIB) cannot be installed because the ESXi hosts are not compliant with the cluster’s vSphere Lifecycle Manager (vLCM) image. Fix the image and the compliance errors, including hosts that still boot in legacy BIOS mode, and remediate the hosts; the Supervisor then installs spherelet and continues on its own (Broadcom KB 393663).

Symptoms

  • In Workload Management, the Supervisor shows Host Config Status: Configuring for a long time, during a new deployment or during a Supervisor upgrade.
  • The details list a pending task Installed and Started Kubernetes Node Agent on the ESXi Host, sometimes also Kubernetes Node Agent stopped on the ESXi Host for MaintenanceMode.
  • The vSphere Client shows the same Apply Solution task again and again on the cluster.
  • The Workload Management service log on vCenter says the solution specification in the image is incompatible with hosts and lists the ESXi hosts.

Confirm it on the vCenter appliance and on a host:

# vCenter appliance: Workload Management service log
grep -i "incompatible with hosts" /var/log/vmware/wcp/wcpsvc.log | tail -5

# ESXi host: is the spherelet VIB installed?
esxcli software vib list | grep -i spherelet

Why the Supervisor waits

Every ESXi host of a Supervisor runs spherelet, the agent that turns the host into a Kubernetes node for vSphere Pods. On clusters managed by a vLCM image, the Supervisor does not install the VIB directly: it adds spherelet to the cluster’s desired state as a solution and asks vLCM to apply it. vLCM applies a solution only to hosts that are compliant with the rest of the image. If a host is out of compliance or incompatible, the apply fails, the Supervisor retries, and you see the endless Apply Solution tasks.

Common reasons for non-compliance:

  • The image has a different ESXi version, vendor add-on, firmware add-on or component than the hosts actually run.
  • Hosts have extra VIBs that are not in the image, such as a driver installed by hand.
  • Legacy BIOS boot. The latest version of the KB adds this cause: hosts that still boot in legacy BIOS mode instead of UEFI can be reported as non-compliant, because legacy boot is deprecated in vSphere 8. See Broadcom KB 313152.

Fix: make the hosts compliant

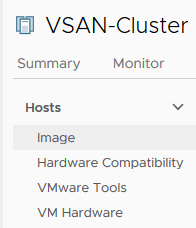
  1. Select the Supervisor cluster, open Updates > Hosts > Image.
  2. Edit the image so it matches what the hosts should run: ESXi version and, for an OEM custom image, the right vendor add-on. Save.
  3. Run Check Compliance. Read the reason for every non-compliant host; searching the exact compliance message in the Broadcom knowledge base usually finds the cause.
  4. Fix the causes: remove or add components in the image, change the boot mode of legacy BIOS hosts to UEFI (plan this carefully; it needs a reinstall or a supported conversion), then Remediate the hosts.
  5. When every host is compliant, the next Apply Solution succeeds, spherelet is installed, and the Supervisor deployment or upgrade continues without any further action.

Tip: run a compliance check on the cluster before you enable the Supervisor or start a Supervisor upgrade. Ten minutes in the Updates tab saves hours of a stuck Workload Management wizard.

Further reading

More Supervisor and VKS problems with their fixes are listed in the vSphere Supervisor in VCF 9 overview.

Convert vLCM Baselines to an Image: vSphere Lifecycle Manager Cluster Transition (vSphere 8 and 9)

Baselines are deprecated in vSphere 8 and can’t manage ESX 9. How to convert a cluster from vLCM baselines to an image, prerequisites and blockers.

Short answer: In the vSphere Client, select the cluster and open Updates > Image. vCenter runs an eligibility check first. Then you either use the image from a host in the cluster (vCenter 8.0 U3+), import a JSON image, or set one up manually. Finish with Finish image setup and remediate. The switch can’t be reversed. Baselines were deprecated in vSphere 8.0, and in vCenter 9.0 they can only patch ESXi 8.x hosts. You must convert before you move to ESX 9.

vLCM baselines status: deprecated in 8.0, removed for ESX 9

I wrote the first version of this post in 2020, right after upgrading my lab to ESXi 7.0. Back then images were new and optional. Here is what the Broadcom documentation says today:

ReleaseBaselines (VUM workflows)Source
vSphere 7.0Supported. vLCM images introduced as the declarative alternative.KB 322186
vSphere 8.0Deprecated. Still supported in vSphere 8, with removal planned for the next major release.vSphere 8.0 release notes, KB 322186
vCenter 9.0Removed as a way to manage clusters. Baselines only patch ESXi 8.x hosts. ESX 9 hosts can’t be patched or upgraded with them, ISO import and ISO-based upgrades are blocked, and new clusters and standalone hosts are image-managed by default.VCF 9.0 release notes, KB 379388

So an existing baseline-managed cluster with 8.x hosts keeps working under vCenter 9.0, but it can’t reach ESX 9. According to KB 379388, the way around those restrictions is to move from VUM to vLCM images.

Prerequisites and what blocks the conversion

When you start the switch, vCenter runs the Check cluster’s eligibility to be managed with a single image task. Its results come in three types.

Errors (block the conversion)

  • A host is not stateful, for example an Auto Deploy stateless host. It must boot from a disk.
  • A host runs a version earlier than ESXi 7.0. Upgrade it with an upgrade baseline first.
  • VIBs from an unintegrated solution are present. Deactivate the solution and retry.
  • The cluster is currently being remediated against a baseline.

Warnings (need action)

  • A standalone VIB for which a component exists in the depot. Add that component to the image, or the VIB is deleted during remediation.
  • An unknown VIB, with no component in the depot. Import a component that contains it, or it is deleted during remediation.

Other prerequisites

  • All hosts from the same hardware vendor.
  • The vLCM image privileges.
  • For third-party solutions, confirmation from the vendor that they work with vLCM.
  • For the “use an image from a host” option: hosts on 7.0 U2 or later and vCenter on 8.0 U3 or later.
  • For VCF environments: do this only through SDDC Manager, on VCF 5.2.2 or later or VCF 9 (KB 385617). Don’t convert VCF clusters directly in vCenter.

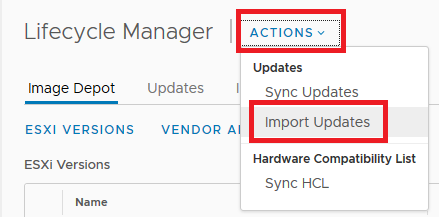
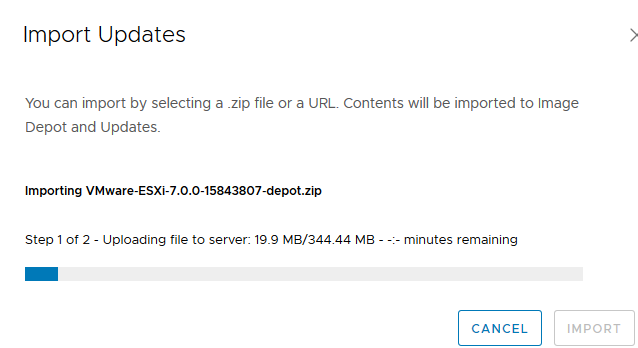
The depot also needs the content you plan to use in the image. On current releases, vLCM no longer downloads from the old public VMware URLs; each customer gets a unique download URL. See KB 390098 if the Software Depot doesn’t show recent releases. Offline, you can import a depot ZIP through Actions > Import Updates. These are my original vSphere 7.0 screenshots:

vSphere Lifecycle Manager Actions menu with Import Updates for adding an offline depot
Lifecycle Manager: Actions > Import Updates (vSphere 7.0 UI)
Importing the VMware-ESXi-7.0.0-15843807-depot.zip offline bundle into the vLCM depot
Importing VMware-ESXi-7.0.0-15843807-depot.zip
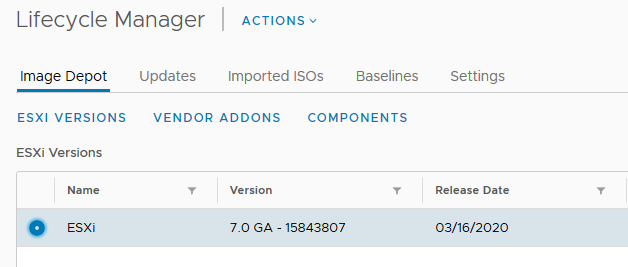
Lifecycle Manager Image Depot listing ESXi 7.0 GA build 15843807 after importing the offline bundle
Image Depot: ESXi 7.0 GA – 15843807 available after the import

How to convert vLCM baselines to an image (step by step)

These steps follow the TechDocs procedure for Option 3: Set Up a New Image Manually. Options 1 and 2 start the same way.

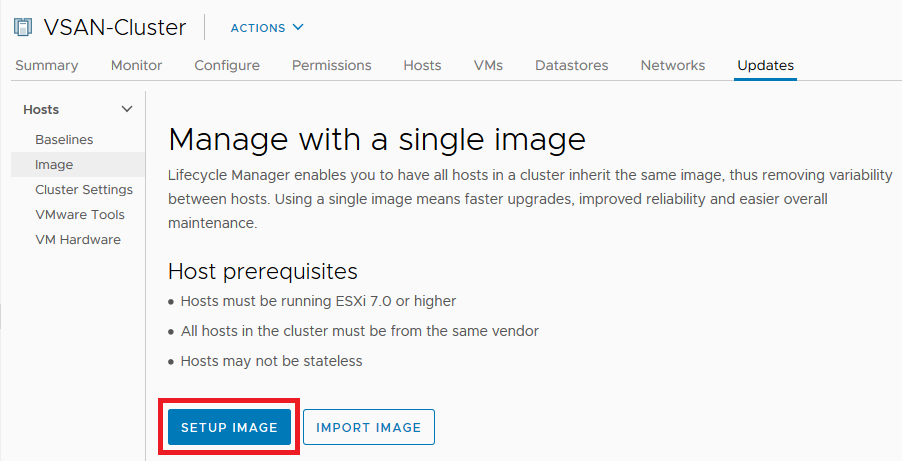
  1. Open the image setup. In the vSphere Client, select the baseline-managed cluster and go to Updates > Image.
  2. Choose how to build the image. Pick one of the three options. Set up image manually builds it by hand. Import image takes a JSON file. On vCenter 8.0 U3+, you can also choose one of the “Currently running images in the cluster” and click Proceed with selected image. The eligibility check runs; fix any errors and start again.
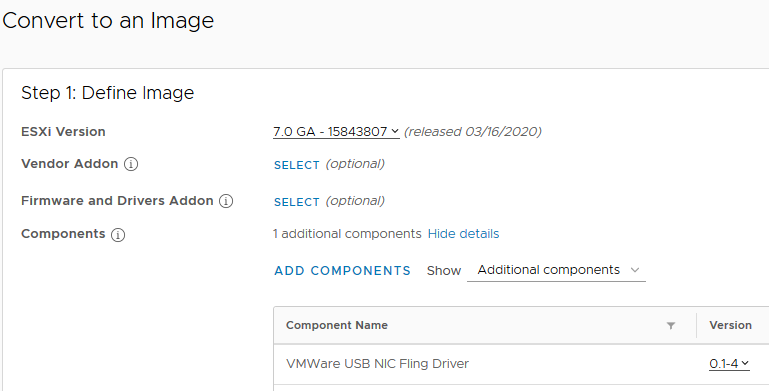
  3. Define the image. In the Convert to an Image pane, select the ESXi Version. Optionally add a Vendor Addon, a Firmware and Drivers Addon (this needs a hardware support manager) and extra Components.
  4. Validate and save. Click Validate to catch missing dependencies and conflicts, then Save. Saving triggers a compliance check of all hosts against the image.
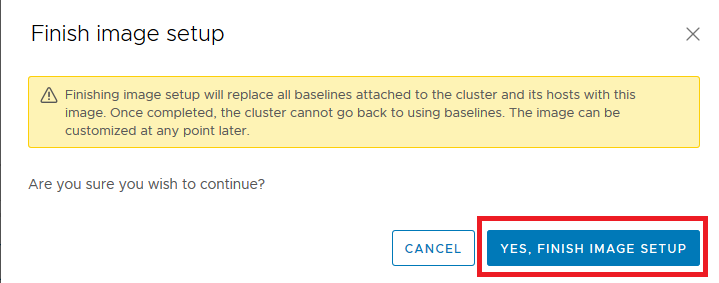
  5. Finish the setup. Click Finish image setup and confirm with Yes, finish image setup. From now on the cluster is managed by a single image.
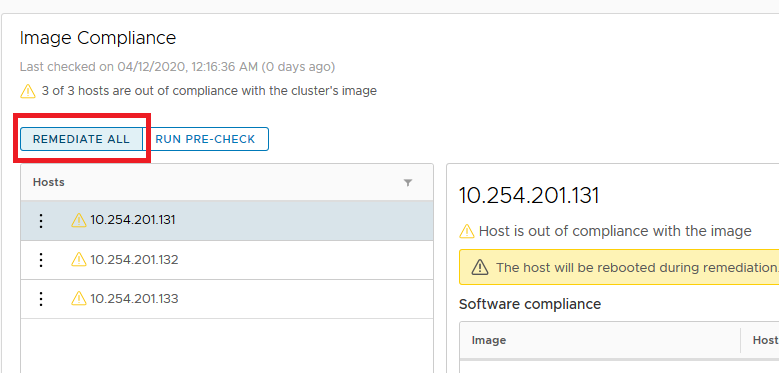
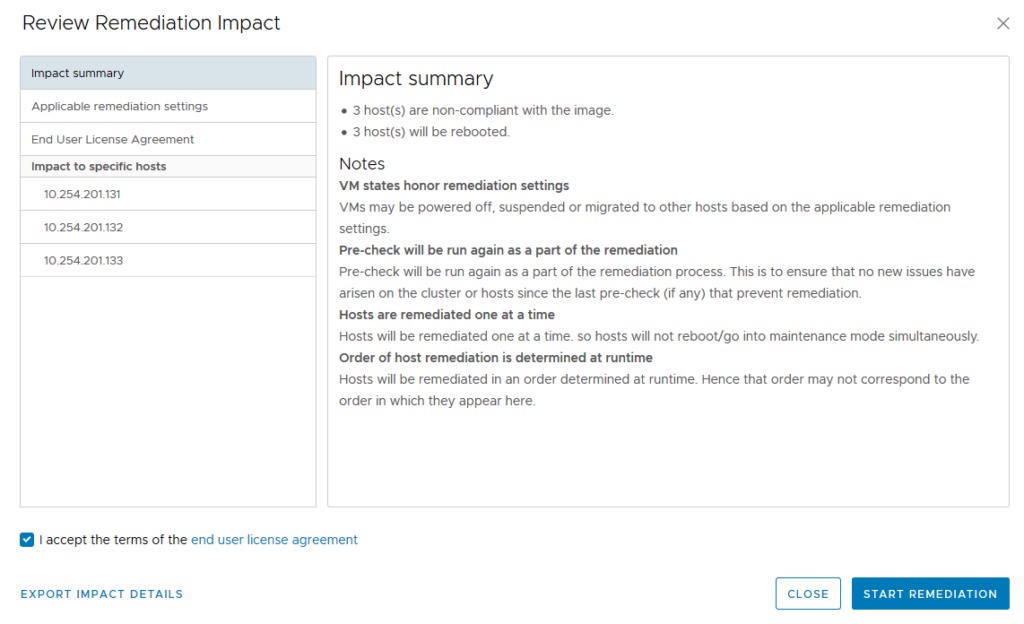
  6. Remediate. Run the pre-check and then Remediate All. Switching the management method alone does not change the hosts; only remediation applies the image.
Cluster Updates tab in vSphere Client with the Setup Image button for converting from baselines to a vLCM image
Cluster > Updates: start with SETUP IMAGE (vSphere 7.0 UI)
Defining a vLCM image: selecting the ESXi version and adding a component (USB NIC Fling driver)
Select the ESXi version and add components (example: USB NIC Fling driver)
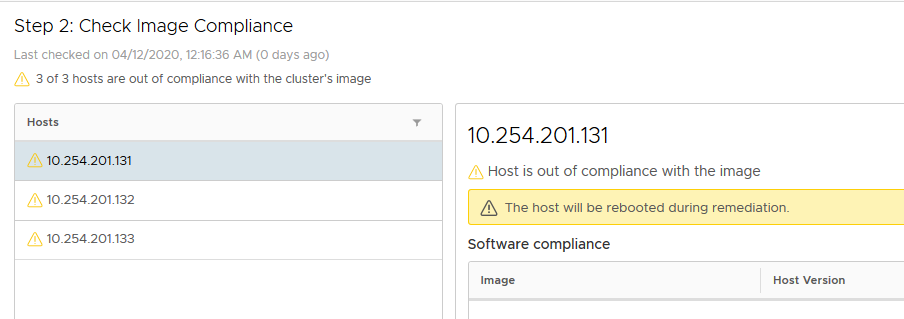
vLCM Step 2 Check Image Compliance: 3 of 3 hosts out of compliance with the cluster image, host will be rebooted during remediation
Step 2: image compliance check (3 of 3 hosts out of compliance before remediation)
Finish image setup confirmation dialog in vSphere Lifecycle Manager
Finish image setup: confirm with YES
Cluster Updates tab after conversion: the Baselines menu is gone and the cluster is image-managed
After the conversion the Baselines menu disappears
Remediate All dialog for applying the vLCM image to all hosts in the cluster
REMEDIATE ALL: start dialog
vLCM remediation installing the added component on the cluster hosts
START REMEDIATION installs the example USB NIC Fling driver

What changes after the switch

  • There is no way back. A cluster can’t return to baselines. You can only move hosts into another cluster that still uses baselines.
  • Remediation removes what the image doesn’t include. Standalone VIBs and agents of non-integrated solutions are deleted. Put every driver and tool you need into the image first.
  • Standalone hosts keep the image only under certain conditions. A host removed from an image-managed cluster keeps the image only when vCenter and ESXi are 8.0 U3+ and NSX, if present, is 4.2 or later. Otherwise it reverts to baselines.
  • Unsupported configurations are still possible. If you enable a solution that doesn’t work with vLCM on an empty cluster (Dell EMC VxRail is the documented example), the transition succeeds but the configuration is unsupported.

Sources

Related on vdan.cz

vSphere 6 Update Manager -> vSphere 7 Lifecycle Manager : upgrade ESXi 6.7 to ESXi 7

Move from vSphere 6 Update Manager to vSphere 7 Lifecycle Manager and upgrade ESXi 6.7 hosts to ESXi 7.0 step by step.

vSphere Update Manager – vSphere 6

In vSphere 6 we can use various methods and tools to deploy ESXi hosts and maintain their software lifecycle.

To deploy and boot an ESXi host, you can use an ESXi installer image or VMware vSphere® Auto Deploy™. The availability of choice options results in two different underlying ESXi platforms:

  • Using vSphere Auto Deploy – stateless mode
  • Using an installer ESXi image – statefull mode

vSphere Lifecycle Manager Images: A Single Platform, Single Tool, Single Workflow

By introducing the concept of images, vSphere Lifecycle Manager provides a unified platform for ESXi lifecycle management.
You can use vSphere Lifecycle Manager for stateful hosts only, but starting with vSphere 7.0, you can convert the Auto Deploy-based stateless hosts into stateful hosts, which you can add to clusters that you manage with vSphere Lifecycle Manager images.

How to Upgrade ESXi 6.7 to 7 with vSphere Lifecycle Manager?

After upgrade VCSA 7.0, We prepare upgrade for ESXi 6.7. It is simular logic like in vSphere Update Manager:

IMPORT ISO – We can upload ISO for example VMware-VMvisor-Installer-7.0.0-15843807.x86_64.iso
Step 1 of 2 – Uploading file to server
Step 2 of 2 – Adding to repository
After ISO upload We could check ISO image context
Next step is Create Baseline
Create Baseline – for ISO image
Select uploaded ISO image
Check summary
On Targer Cluster We attach our Baseline
Select ESXi 7 Baseline
– Check Compliance
– We can see Non-compliant for 3x ESXi host
REMEDIATE will start upgrade dialoge
It is necessary accept EULA
REMEDIATE will start ESXi 7 upgrade
In Recent Task We caould chek progress.
We can check ESXi 7.0 upgrade result.