VCF 9 SAP HANA Network Design: Why 6 NICs Matter for vMotion and NFS

SAP HANA on VCF 9 with NFS: why storage needs its own NICs, separate from vMotion. The 2, 4 and 6 NIC models compared on Cisco VIC and HPE Synergy.

Short answer: on VCF 9 hosts that run SAP HANA on NFS, give storage its own pair of physical NICs (vNICs on Cisco UCS), separate from vMotion. The VCF 9.1 Design Library’s 6‑NIC Storage and Workload Separation model does this and also isolates NSX workloads, so I recommend it as the baseline. The 4‑NIC Storage Separation model also isolates NFS storage, but it puts SAP client traffic on the same switch as vMotion. The reason is host maintenance. A vMotion of a 2 TB HANA VM lands on the same receive queues as the NFS log writes of every HANA database on that host, unless storage has a vNIC of its own. HANA commits wait for those log writes. A faster adapter does not change that, and VCF 9 makes it worse by allowing only one vMotion VMkernel adapter per host. You can watch all of it happen in an interactive model: vdan.cz/vcf9-sap-hana-tdi-design.
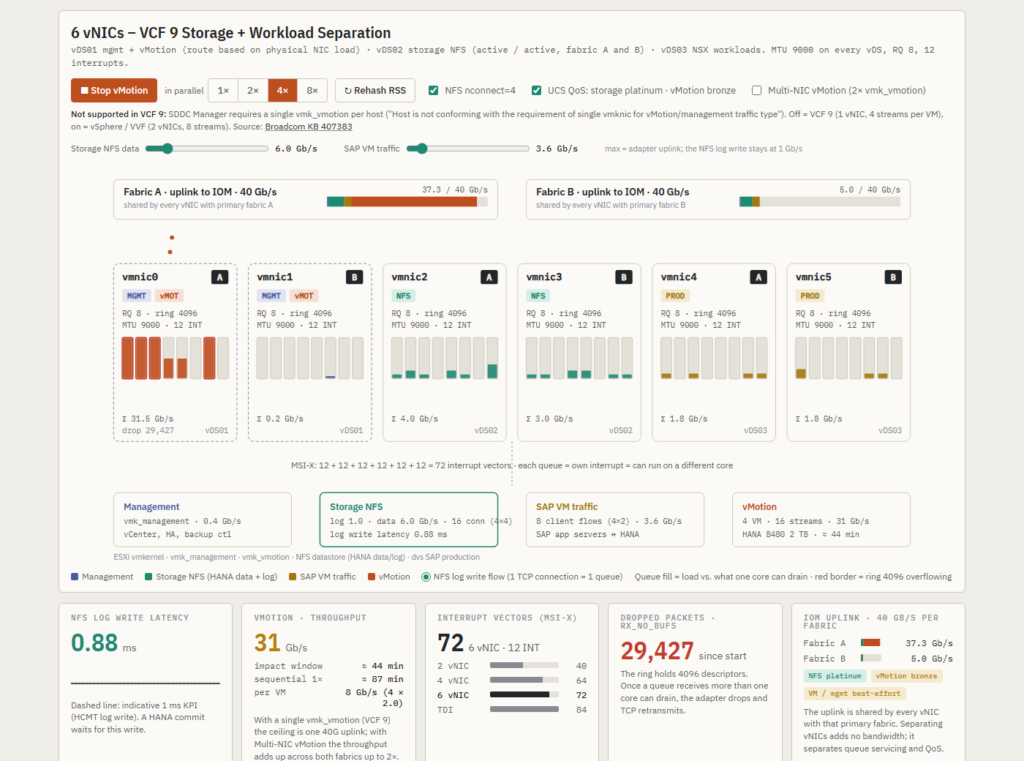
VCF 9 SAP HANA 6-NIC network model: four parallel vMotions on vmnic0 while the NFS log write on vDS02 stays under 1 ms
6 vNICs, four HANA VMs migrating at once. vMotion saturates vmnic0, the storage vNICs on vDS02 carry only the 16 NFS connections of those four VMs, and the log write stays under 1 ms.

Why vMotion is a HANA problem and not just a network problem

HANA writes its redo log synchronously. A transaction commit returns only after storage has acknowledged the log write, so log write latency turns directly into application response time. The SAP HCMT tool checks this, and the indicative KPI for log write latency is about 1 ms. Under normal load a well built NFS path delivers a few hundred microseconds.

Now migrate a HANA VM with 1 to 2 TB of RAM. On a 40 Gb/s uplink a vMotion runs at 16 to 35 Gb/s for 10 to 20 minutes, including the dirty page iterations at the end. If that traffic shares the network path with storage, the log write latency jumps from sub‑millisecond to several milliseconds, commits stall, and the application servers see timeouts. This is why SAP and the FlexPod CVD separate vMotion from storage in the first place. The interesting part is where the sharing happens, because it is not only bandwidth.

What happens inside the adapter

On a Cisco UCS blade with a VIC, every vNIC in the service profile gets its own set of receive queues. The adapter policy used in the FlexPod TDI design gives each vNIC on a VIC 1380 8 receive queues with a ring of 4096 descriptors and 12 MSI‑X interrupts. On a VIC 15231 the policy is 16 queues, a ring of up to 16384 and 20 interrupts. Three details matter:

  • The adapter spreads incoming flows across the queues with an RSS hash of IP addresses and ports. It does not know what a flow is. One NFS log connection always lands on exactly one queue.
  • Each queue has its own interrupt and is serviced by one CPU core. A queue that receives more than its core can drain fills its ring and the adapter drops packets. That shows up as rx_no_bufs in esxcli network nic stats.
  • Queues belong to the vNIC. Two vNICs on the same physical adapter never compete for queues or cores. They share only the uplink to the IOM or IFM, and that is where QoS can help.

So if vMotion streams and the NFS log flow arrive on the same vNIC, the hash will sooner or later put a vMotion stream on the queue that also carries the log write. Network I/O Control cannot see that. NIOC shares bandwidth between port groups on the uplink, it does not assign queues. Only a separate vNIC does.

One remark for readers on HPE Synergy. The Synergy 6310C is a Broadcom NetXtreme‑E adapter (ESXi driver bnxtnet). A port is split into up to eight FlexNICs that share the ASIC’s pool of queues and interrupt vectors, and RSS defaults to 4 queues per function. A FlexNIC is still a separate function with its own RSS, so the storage FlexNIC does not receive vMotion packets, but the queues behind it are not dedicated in the way a Cisco VIC vNIC’s are, and there are fewer of them. The model treats it that way and I come back to it below.

The four layouts

I modelled the three VCF 9.1 network models and the classic FlexPod TDI layout side by side. Same host, same VIC 1380 with 2 × 40 Gb/s, same traffic: NFS log 1 Gb/s, NFS data 6 Gb/s, SAP client traffic 3.6 Gb/s and management. Every HANA VM on the host mounts its data and log with nconnect, so it brings four NFS connections and two client flows of its own. The number of VMs is the parallel selector: with four VMs the storage class has 16 NFS data connections and the VM class 8 flows, with eight VMs 32 and 16. Then those one to eight HANA B480 VMs with 2 TB RAM are migrated at once. The VCF 9 rows use the single vMotion VMkernel adapter VCF 9 allows, the TDI row uses Multi‑NIC vMotion as the CVD configures it. The numbers are model output, not measurements. The model exists to show the mechanism.

LayoutvNICsStorage isolated from vMotionLog write · idle1× vMotion4× vMotion8× vMotion
VCF 9 Single Distributed Switch2no0.34 ms1.82 ms2.37 ms3.49 ms
VCF 9 Workload Separation4no0.34 ms1.82 ms2.26 ms3.49 ms
VCF 9 Storage + Workload Separation6yes0.34 ms0.35 ms0.88 ms0.83 ms
FlexPod SAP HANA TDI (Multi‑NIC vMotion)7yes0.34 ms0.35 ms0.89 ms0.84 ms

The split is clean. The two layouts that put vMotion and storage on the same vNIC cross the 1 ms KPI with a single migration. The two that give storage its own vNIC stay under it with eight. What remains in the 6 and 7 vNIC rows has two parts: uplink pressure, which is what the UCS QoS policy is for, and the fact that eight VMs bring 32 NFS data connections into the 16 storage queues, so the log flow starts sharing a queue with data connections of other databases. That second part is the argument for more queues on the storage vNIC, and I come back to it with the VIC 15231.

2 NICs: Single Distributed Switch

One vDS, everything on two uplinks, NIOC with storage and VMs at High and vMotion at Low, MTU 9000. It is the simplest model to run and the worst one for HANA. All four traffic classes hash into the same queues of the same vNIC. NIOC holds vMotion at the uplink limit, the queue collision remains.
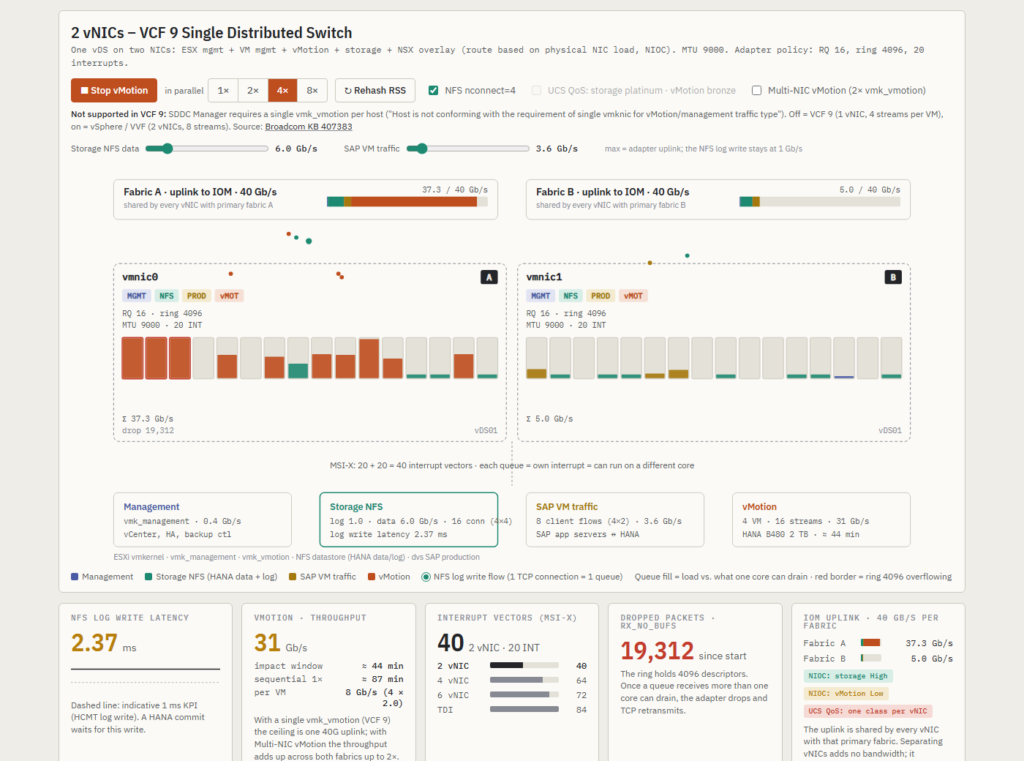
VCF 9 Single Distributed Switch model with 2 vNICs: vMotion streams overflow the receive queues shared with the NFS log
2 vNICs, four migrations. All 16 vMotion streams enter through vmnic0, they sit in the same queues as the NFS log and the 16 data connections, the rings overflow and the log write is at 2.4 ms.

4 NICs: Workload Separation

Two vDS. The NSX workloads get their own pair, which is good for the VMs. Management, vMotion and storage still share vDS01, so for the HANA log it changes almost nothing. The numbers are within hash luck of the 2‑NIC model. Note the greyed out QoS switch in the screenshot: UCS assigns a QoS class per vNIC, so storage and vMotion on one vNIC cannot be told apart on the uplink either.
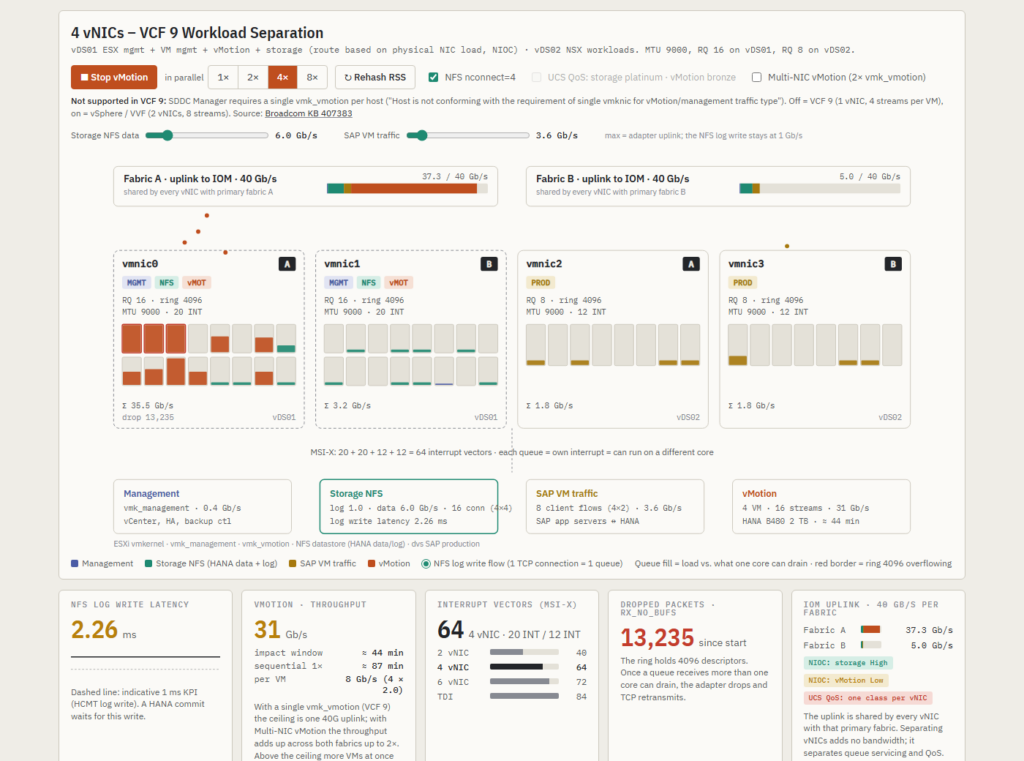
VCF 9 Workload Separation model with 4 vNICs: vMotion and NFS log traffic share the same receive queues on vDS01
4 vNICs, four migrations. vDS02 is quiet, vDS01 carries vMotion and the NFS log in the same queues.

4 NICs the other way: Storage Separation

The Design Library also has a 4‑NIC Storage Separation Distributed Switch Model. It uses the same two vDS as Workload Separation but splits them differently: one vDS is dedicated to storage, and the other carries everything else (management, vMotion and workloads). The Design Library lists it for NFS as well as vSAN, so it is a valid option for NetApp NFS datastores. I did not simulate this layout, so it has no row in the table. By the mechanism described above, it protects the HANA log write the way the 6‑NIC model does, because the storage vNICs never receive vMotion packets. It is still not the layout I recommend for HANA. The SAP application server traffic on the NSX segments now shares a vDS, its uplinks and its receive queues with vMotion, so every host evacuation affects the client path instead of the log. If a host has only four ports, Storage Separation is the better of the two 4‑NIC models, but plan for six.

6 NICs: Storage and Workload Separation

Three vDS on three NIC pairs. vDS01 carries management and vMotion, vDS02 carries storage on both uplinks active/active, vDS03 carries the NSX workloads. Storage now has its own pair of vNICs on both fabrics, its own queues and cores and its own UCS QoS class. vMotion shares a pair only with management, which is negligible traffic. The log write stays under 1 ms with eight parallel migrations. What moves the number from 0.35 to about 0.9 ms is not vMotion at all, it is the 32 NFS data connections of eight databases sharing 16 queues with the log flow. This is the layout I would make the baseline for any VCF 9 cluster that hosts HANA.
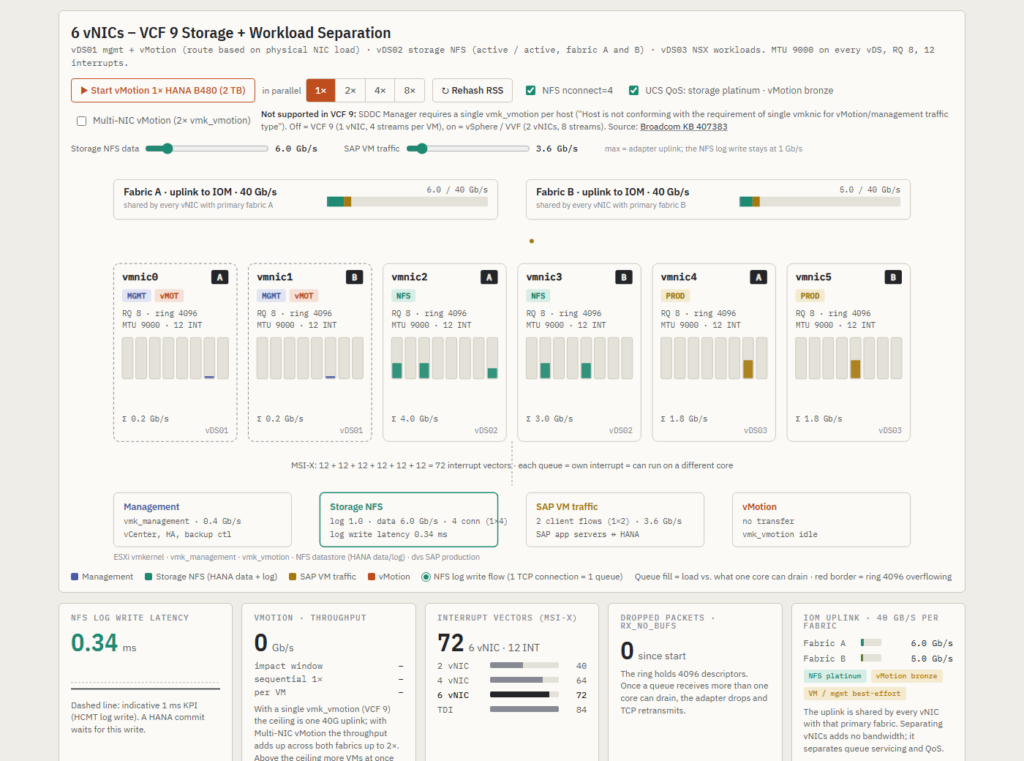
VCF 9 Storage and Workload Separation model at idle: NFS log and data connections spread over vmnic2 and vmnic3
6 vNICs at idle with one HANA VM. The NFS log and the four data connections spread over vmnic2 and vmnic3, so storage has 16 queues on two fabrics and nothing else in them.

7 NICs: FlexPod SAP HANA TDI

The Cisco CVD layout goes one step further and gives management its own vNIC as well, and it runs vMotion with two VMkernel adapters on two vNICs. A 2 TB VM then migrates in about 11 minutes instead of 22. For the HANA log it behaves like the 6‑NIC layout, because the storage vNICs are separate either way. If you build on FlexPod without VCF, use it. If you build on VCF 9, the 6‑NIC model gets you the same protection for HANA with one vNIC template less.
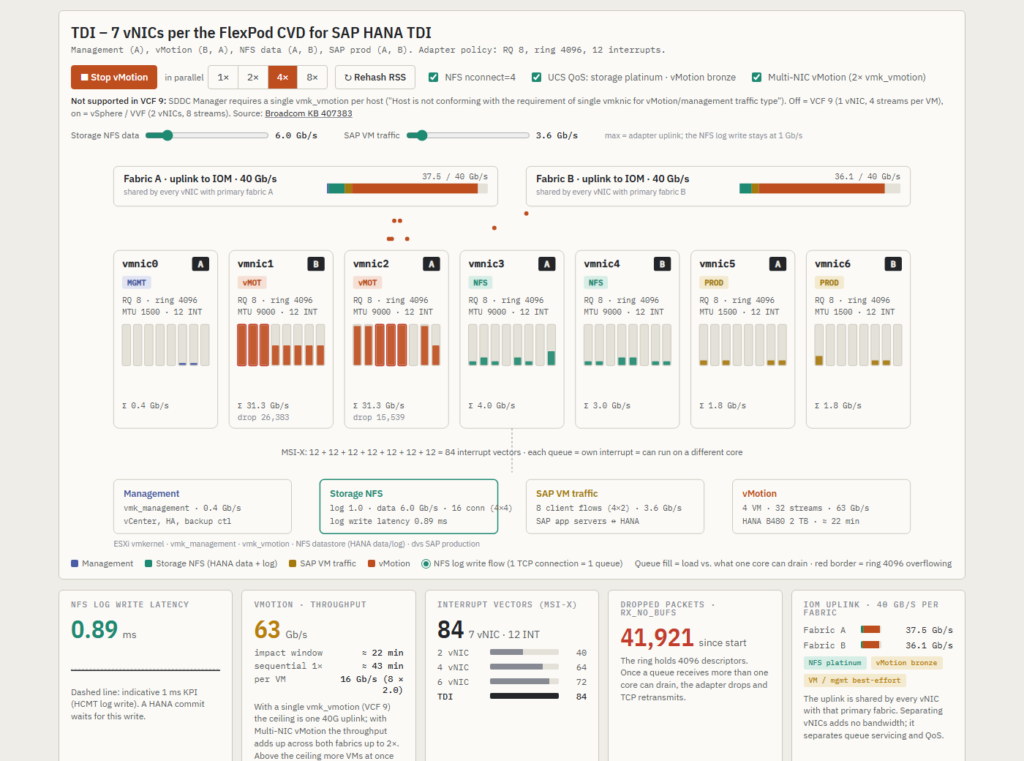
FlexPod SAP HANA TDI layout with 7 vNICs and Multi-NIC vMotion across both fabrics
7 vNICs per the FlexPod CVD, four migrations with Multi‑NIC vMotion. The streams spread over vmnic1 and vmnic2 on both fabrics, the storage vNICs carry only NFS.

QoS and NIOC are two different things

Separate vNICs alone are not enough. The uplink is still shared, and four parallel migrations will fill it. With a UCS QoS policy that puts the storage vNIC in the platinum class and vMotion in bronze, storage keeps its bandwidth and the log stays under 1 ms. Without it, vMotion takes the whole uplink and even the TDI layout ends up above 4 ms.

FlexPod TDI layout with eight vMotions and UCS QoS disabled: the shared uplink raises NFS log latency
The same TDI layout, eight migrations, QoS off. The queues are still isolated, the uplink is not.

The reverse holds as well. NIOC on the 2 and 4‑NIC models does protect bandwidth, and the model gives it credit for that, but it cannot protect queues. You need both: a vNIC of its own for storage, and a QoS class of its own on the uplink.

Multi-NIC vMotion is currently not supported by VCF 9.x SDDC Manager workflows

On plain vSphere you would give vMotion two VMkernel adapters on two uplinks, so a migration can use both fabrics. vSphere and VVF support Multi-NIC vMotion, but VCF 9.x SDDC Manager requires exactly one VMkernel adapter tagged for vMotion per host. When a host has a second one, SDDC Manager flags it after an inventory sync with the message “Host is not conforming with the requirement of single vmknic for vMotion/management traffic type”. The fix is to remove the second adapter and re-run host commissioning. Broadcom KB 407383 describes the issue. It notes that hosts with multiple vMotion adapters reach far lower vMotion concurrency in VCF 9.x than in vSphere 8.x, and that Load-based Teaming on the single vMotion VMkernel adapter is the exception to that limit.

For HANA hosts this has two consequences. A single migration gets only half the stream helpers and one 40 Gb/s path, about 16 Gb/s in the model, so a 2 TB VM takes about 22 minutes instead of 11. And on the 2 and 4‑NIC layouts every one of those streams enters through the single vNIC that also carries the NFS log, which is why the table above shows the KPI broken from the first migration. The simulator has a Multi‑NIC vMotion switch so you can compare both cases. It is off by default because that is what VCF 9 gives you.

Parallel vMotion during maintenance

vSphere allows up to eight concurrent vMotions per host. With one vMotion adapter on a 40 Gb/s uplink, one 2 TB HANA VM uses about 16 Gb/s and takes about 22 minutes. Two in parallel fill the uplink at about 31 Gb/s and still finish in about 22 minutes, so the second one is free. From there on more parallelism buys nothing: four VMs take about 44 minutes and eight about 89 minutes, the same as running them two at a time. What grows is the impact window on the shared layouts, because every additional VM puts more vMotion streams into the queues the log flow lives in. When you evacuate a host with HANA VMs on VCF 9, two at a time is the sensible limit.

Does a faster adapter fix it?

The first question I got after showing the model was whether a 100 Gb/s adapter makes the discussion go away. The simulator now has three adapters to switch between: the Cisco VIC 1380 with 2 × 40 Gb/s, the Cisco VIC 15231 with 2 × 100 Gb/s and 16 receive queues per vNIC, and the HPE Synergy 6310C with 2 × 50 Gb/s. The table shows the 2 vNIC and 6 vNIC layouts on each, single vMotion adapter, UCS or NIOC bandwidth protection on.

AdapterLayoutIdle1× vMotion4× vMotion8× vMotion2 TB VM, one migration
Cisco VIC 1380 · 2 × 40G · RQ 82 vNIC0.34 ms1.82 ms2.37 ms3.49 ms16 Gb/s · ≈ 22 min
6 vNIC0.34 ms0.35 ms0.88 ms0.83 ms
Cisco VIC 15231 · 2 × 100G · RQ 162 vNIC0.27 ms1.74 ms4.98 ms3.42 ms32 Gb/s · ≈ 11 min
6 vNIC0.27 ms0.27 ms0.71 ms0.71 ms
HPE Synergy 6310C · 2 × 50G · RSS 42 vNIC1.81 ms3.92 ms18.44 ms40.17 ms16 Gb/s · ≈ 22 min
6 vNIC0.34 ms0.34 ms0.87 ms0.87 ms

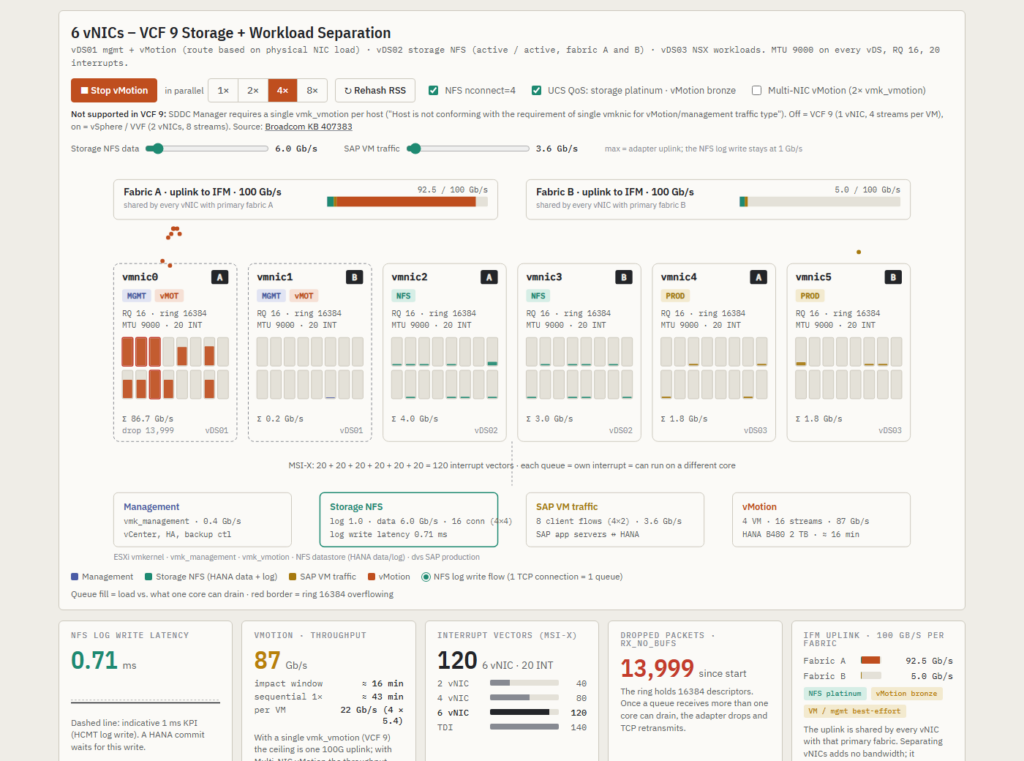
The VIC 15231 halves the migration time and the wider ring drops far fewer packets, but on the 2 vNIC layout the log write still sits well above the KPI from the first migration. Bandwidth was never the only problem. The vMotion streams still land in the same queues and on the same cores as the log flow, and at 8 Gb/s per stream they fill a core faster than before. On the 6 vNIC layout the 15231 is better in every column, and the 16 storage queues per vNIC are exactly what the 32 NFS connections of eight databases need.
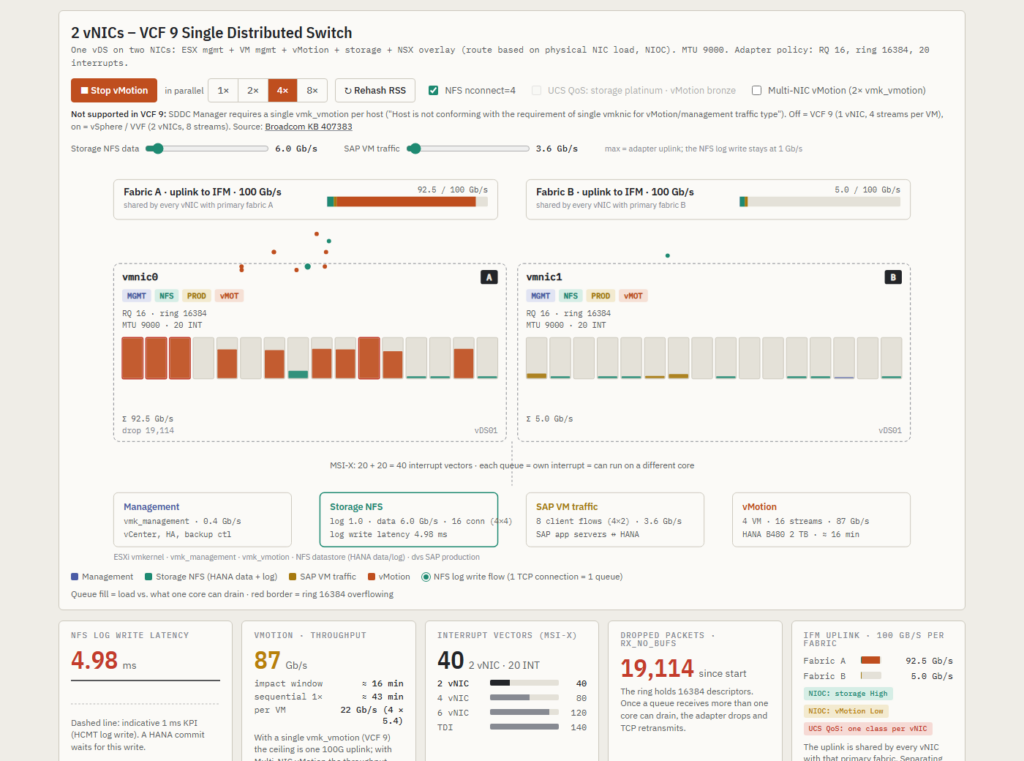
Cisco VIC 15231 with 2 vNICs: vMotion still shares receive queues with the NFS log flow
2 vNICs on a VIC 15231, four migrations. Sixteen queues, a ring of 16384 and a 100G uplink. The vMotion streams still share queues with the NFS log flow, log write at 5.0 ms.
Cisco VIC 15231 with 6 vNICs: four vMotions at 87 Gb/s with the storage vNICs untouched
6 vNICs on a VIC 15231, four migrations at 87 Gb/s. The storage vNICs are untouched and the impact window shrinks to about 16 minutes.

The Synergy 6310C is the other direction. With four RSS queues per FlexNIC, the 2 vNIC layout is above the KPI before any vMotion starts: the log flow of a single HANA VM already shares its queue with NFS data and client traffic. Every migration then lands in the same four queues, and at four and eight migrations the model’s latency formula runs off the scale, so take the direction from those cells and not the digits. The 6 vNIC layout still protects the log, because the storage FlexNIC never sees vMotion packets, but the headroom is smaller than on either VIC. If you run HANA on Synergy, raise the RSS queue count of the storage function from the default and give storage its own FlexNIC pair in Virtual Connect with a bandwidth minimum.
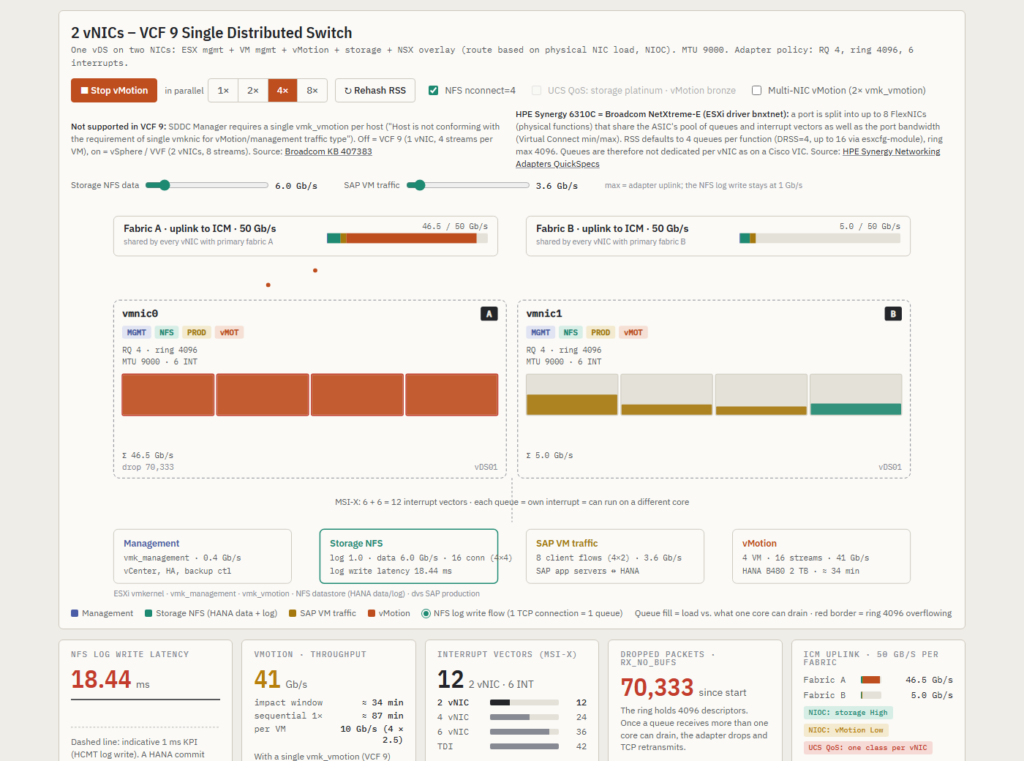
HPE Synergy 6310C with 2 vNICs: four RSS queues per FlexNIC carry vMotion next to the NFS flows
2 vNICs on a Synergy 6310C, four migrations. Four queues per FlexNIC, every one of them carries vMotion next to the NFS flows, and the log write is at 18.4 ms in the model.

Lifecycle note for the VIC 1380: Broadcom KB 391170 lists the UCS VIC 1340 and VIC 1380 as Restricted in ESX 9.0, under both nenic and nfnic. They still work on 9.0 and stay listed in the compatibility guide, but they get no new features or driver enhancements and only best-effort fixes, and Restricted devices are removed in the next major release. The VIC 15231 isn’t in either the Restricted or the End of Life list. If you are planning new HANA hosts for VCF 9, start from the 15231, and check your exact adapter and firmware in the Broadcom Compatibility Guide. The full list is on ESXi 9.0 – Deprecated and unsupported devices.

What I recommend

  • For HANA hosts on VCF 9, use the 6‑NIC Storage and Workload Separation model. If a host has only four ports, Storage Separation is better than Workload Separation because it keeps the NFS log away from vMotion, but SAP client traffic then shares the path with vMotion, so plan for six. On FlexPod without VCF, keep the 7‑vNIC TDI layout from the CVD.
  • Put the storage vNICs in a platinum QoS class in UCS and vMotion in bronze. NIOC is not a substitute on the uplink, and it is no help at all in the queues.
  • Do not buy a faster adapter to avoid the layout decision. A VIC 15231 shortens the maintenance window, it does not separate the queues. Where it does pay off is the storage vNIC: 16 queues for the NFS connections of many databases on one host.
  • Mount HANA data and log with nconnect, or with several mounts. One TCP connection is one queue and one core. Count the connections: eight databases with nconnect=4 are 32 data connections plus their log flows on the storage vNIC.
  • Limit concurrent HANA vMotions per host to two during maintenance windows. With the single vMotion adapter VCF 9 allows, two migrations fill the uplink and a third one only stretches the window.
  • Run HCMT at idle and during a vMotion of one and two HANA VMs, and keep the result as a baseline. On a performance ticket SAP and Broadcom ask about deviations from best practice first.
  • Watch rx_no_bufs on the storage vNICs. If the counter increases during the test, the receive ring is being exhausted. Correlate this with per-queue statistics and traffic load before attributing the drops to RSS/queue contention.

Try it yourself

The interactive model is on this site: vdan.cz/vcf9-sap-hana-tdi-design. You can switch between the four layouts and the three adapters, set one to eight HANA VMs and migrate them in parallel, toggle the UCS QoS policy, nconnect and Multi‑NIC vMotion, move the NFS data and SAP client traffic sliders up to the adapter’s line rate, and re‑roll the RSS hash to see how much of the effect is luck. The numbers update live, including the log write latency, the number of NFS and client connections per layout, the interrupt vector count and the dropped packets on the rings. It is available in Czech and English.

A word on the model: queue capacity, stream rates and the latency formula are illustrative and documented on the page. They are there to explain why the layouts behave differently, not to replace a measurement on your own hardware.

Related on vdan.cz

Sources

Cisco UCS 4.3(5a) Security Fixes: OpenSSH regreSSHion (CVE-2024-6387), libexpat, and What Came After

Cisco UCS 4.3(5a) security fixes: CSCwk62264, CSCwk62723 (OpenSSH CVE-2024-6387) and CSCwk75392 (libexpat), plus later 4.3 fixes up to 4.3(6j).

Cisco UCS Manager 4.3 release notes: security fixes section

Short answer: Cisco UCS 4.3(5a), released 22 October 2024, lists three security fixes in the current UCS Manager 4.3 release notes. CSCwk62264 covers OpenSSH “regreSSHion” (CVE-2024-6387) on 6400/6500 Fabric Interconnects in UCS Manager mode. CSCwk62723 covers the same CVE in Serial over LAN on B-Series and X-Series. CSCwk75392 covers libexpat CVE-2023-52425 in UCS Manager. Later 4.3 releases add more fixes; 4.3(6j) is the newest.

Cisco UCS 4.3(5a) security fixes

Defect IDAffected componentCVEWhat it is
CSCwk62264UCS 6400 and 6500 Series Fabric Interconnects in UCS Manager modeCVE-2024-6387OpenSSH sshd signal-handler race (a regression of CVE-2006-5051). An unauthenticated remote attacker can trigger it by not authenticating within the login grace time.
CSCwk62723UCS B-Series blade servers and X-Series compute nodes, Serial over LAN (SOL)CVE-2024-6387The same OpenSSH issue in the SOL component used for remote console access
CSCwk75392Cisco UCS ManagerCVE-2023-52425libexpat through 2.5.0: denial of service (resource consumption) when a large token needs many full reparsings

For every entry, Cisco uses the same wording: the affected third-party component “has been upgraded to a version that includes fixes for the vulnerability”. None of the three has a configuration workaround listed. The fix is the upgrade.

What changed since my original post

  • My October 2024 version also listed CSCwb81661 (OpenSSL CVE-2021-4160, CVE-2022-0778, CVE-2022-1292) under 4.3(5a). The current release notes do not list that defect in the 4.3(5a) section. CVE-2022-0778 appears under 4.3(2c) as CSCwh46667.
  • CVE-2024-6387 is also listed under 4.3(4c) as CSCwk62264 for “Cisco UCS Manager”. So the OpenSSH fix arrived in two steps: UCS Manager in 4.3(4c), and the Fabric Interconnect and SOL components in 4.3(5a).

Security fixes after 4.3(5a)

Upgrading to 4.3(5a) alone is no longer enough. These are the later 4.3 security fixes, from the same release notes:

ReleaseDefect IDScope
4.3(5c)CSCwm73573Intel CPU and firmware CVEs on C-Series M7 and X-Series M7 (for example CVE-2024-27457, CVE-2024-23918, CVE-2024-21820)
4.3(5d)noneNo security fixes
4.3(6a)CSCwm82813, CSCwm73565A large set of OpenSSL CVEs in UCS Manager third-party software, and CVE-2024-28047 (Intel UEFI) on M5 servers
4.3(6c)CSCwo49706, CSCwo49702, CSCwo49711Intel CVE-2024-45332 on M5/M6, plus CVE-2025-20103 and CVE-2025-20054 on M7
4.3(6d)CSCwq36167Intel CVE-2025-20067 on M6, and CVE-2025-21096, CVE-2025-20053, CVE-2025-24305, CVE-2025-20613, CVE-2025-21090, CVE-2025-22853 on M7
4.3(6f)CSCwn23026, CSCwm68934UCS Manager’s own vulnerabilities: CVE-2023-20077 (command injection by an authenticated admin) and CVE-2023-20076 (privilege escalation from read-only CLI)
4.3(6b), 4.3(6e), 4.3(6g), 4.3(6h), 4.3(6i)noneNo security fixes

Which Cisco UCS 4.3 release to run now

  • Newest 4.3 release: 4.3(6j), added to the release notes on 24 September 2026. Cisco also publishes UCS Manager 6.0 release notes.
  • Avoid 4.3(4a) to 4.3(4d): Cisco has deprecated them and removed their firmware files, and recommends 4.3(4e) or later. See FN74201 (UCS Manager inaccessible after upgrade with integrated S3260) and FN74209 (vFC interfaces may flap). FN74209 lists 4.3(4e) and 4.3(5a) as fixed releases.
  • Cisco publishes no single “recommended” 4.3 build in the release notes. Pick the newest release that supports your server generations, VIC firmware and ESXi drivers, and follow the upgrade path tables in the release notes. Per the 4.3(6) table, you can upgrade directly from any 4.3(x), 4.2(2) or 4.2(3) release, and from 4.2(1i) or a later 4.2(1) patch.

Upgrade order for a UCS domain

  1. Check the upgrade path table for your current release in the 4.3 release notes.
  2. Upgrade the infrastructure A bundle (UCS Manager, NX-OS on the Fabric Interconnects, IOM and FEX firmware). This carries the UCS Manager and FI fixes such as CSCwk62264 and CSCwk75392.
  3. Upgrade the server bundles (B/C/X) through host firmware packages. The SOL fix (CSCwk62723) and the Intel CPU/BIOS fixes are server-side components. Put each ESXi host into maintenance mode first.
  4. Update the ESXi nenic/nfnic drivers to the versions that match the new VIC firmware.

Sources

Related on vdan.cz

CSCwj01478: UCSX-9508 PSU Shows “Power: Error” in UCS Manager (Fixed in 4.3(4a))

Cisco bug CSCwj01478: UCSX-9508 PSUs show Power: Error and Input Source: Unknown in UCSM. Affected from 4.3(2b), fixed in 4.3(4a), workaround.

Cisco UCS Manager 4.3 release notes: resolved caveats

Short answer: CSCwj01478 is a Cisco UCS Manager bug. A UCSX-9508 chassis with 6454 Fabric Interconnects and 9108 25G IFMs shows its PSUs as “Power: Error” and “Input Source: Unknown” while the PSU LEDs are green. The major faults stay even after the chassis is decommissioned and re-acknowledged. The first affected bundle is 4.3(2b)A, and Cisco’s workaround is to reboot the primary IFM. The bug is fixed in 4.3(4a). Because 4.3(4a) to 4.3(4d) are deprecated, upgrade to 4.3(4e) or later.

CSCwj01478 symptom

According to the UCS Manager 4.3 release notes, the problem appears “during the deployment of Cisco UCSX-9508 chassis equipped with Cisco UCS 6454 FI and Cisco UCS 9108 25G Intelligent Fabric Module (IFM) with Cisco UCS Manager integration”. What you see:

  • In the chassis PSU view in UCS Manager: Power: Error and Input Source: Unknown.
  • On the chassis itself: the PSU LEDs are green and the power supplies work normally.
  • Major PSU faults in UCS Manager do not clear, even after you decommission and re-acknowledge the chassis.

The problem is in how the status is reported, not in the power supplies. Its real cost is operational: a permanent major fault hides real alarms, breaks clean health checks, and can get in the way of automation that waits for a fault-free domain.

Affected and fixed releases

ItemValue (UCS Manager 4.3 release notes)
Defect IDCSCwj01478
First bundle affected4.3(2b)A
Listed as openOpen Caveats for Release 4.3(3a)
Documented workaroundReboot the primary IFM
Resolved in4.3(4a) (Resolved Caveats in Release 4.3(4a))
HardwareUCSX-9508 chassis, UCS 6454 FI, UCS 9108 25G IFM, UCS Manager managed

An earlier version of this post called it a “4.3(4a) bug”. That was wrong. 4.3(4a) is the release that fixes it, and the bug affects 4.3(2b) and later 4.3 releases before 4.3(4a).

Workarounds

  1. Cisco’s workaround: reboot the primary IFM of the affected chassis. Do it in a maintenance window, and first check that the servers in the chassis have working paths through both fabrics.
  2. What worked for me: before the fix, I set the chassis fan policy to Max, which cleared the status for a while. This is not in Cisco’s documentation. Treat it as a temporary lab observation, not a fix.

Fix: which release to upgrade to

The fix is in 4.3(4a), but Cisco has since deprecated 4.3(4a), 4.3(4b), 4.3(4c) and 4.3(4d) and removed their firmware files (see FN74201 and FN74209). Cisco recommends 4.3(4e) or later. The newest 4.3 maintenance release in the release notes is currently 4.3(6j). After the infrastructure upgrade, check the chassis PSU view and the fault list.

Sources

Related on vdan.cz

Cisco UCS VMware-v2 Adapter Policy (UCSM 4.3(4a)): Values, VIC Support and When to Use It

What the UCSM 4.3(4a) VMware-v2 adapter policy sets on Cisco VIC (1 TX, 8 RX, 4096 rings, RSS) and when to use it vs VMWare or VMWarePassThru.

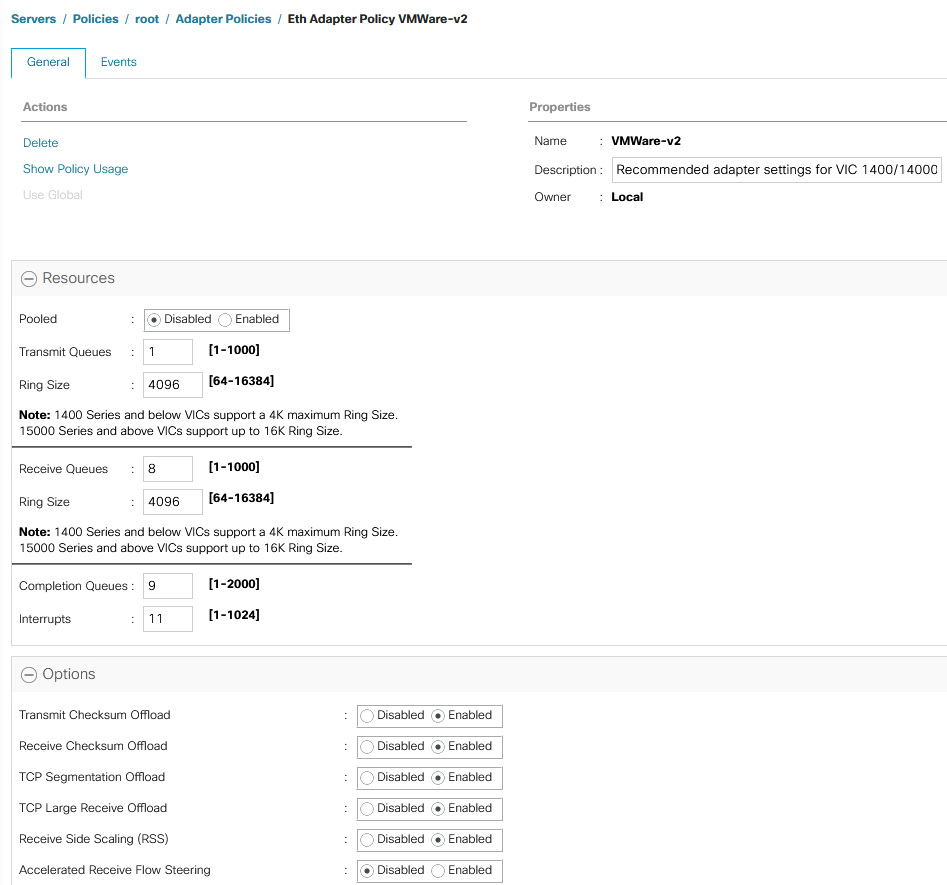
Short answer: The VMware-v2 adapter policy is a system-provided Ethernet adapter policy that Cisco added in UCS Manager 4.3(4a). It builds Cisco’s recommended ESXi settings into a default: 1 TX queue, 8 RX queues, 4096-entry TX and RX rings, 9 completion queues, 11 interrupts and RSS enabled. The release notes cover VIC 1400, 14000 and 15000 adapters. Use it for ordinary ESXi vNICs instead of the old “VMWare” policy. VMWarePassThru is only for VM-FEX.

I wrote this post in October 2024, when 4.3(4a) shipped. We had been running almost the same values in our own custom policy for years; the one difference was 12 interrupts instead of 11. This September 2026 update checks the values against Cisco’s current documentation and adds the upgrade caveats.

Cisco UCS Manager 4.3(4a) Ethernet adapter policy settings for the VMware-v2 policy on a Cisco VIC

What the VMware-v2 adapter policy is

The UCS Manager 4.3 release notes say that from 4.3(4a), “new optimized adapter policies are available for Windows, Linux, and VMware operating systems, for the Cisco UCS VIC 1400, 14000 and 15000 series adapter”. Cisco’s VIC 15000 best-practices white paper explains what that means: the recommended adapter parameters “have now been built into new system provided adapter policies, suffixed with ‘-v2′”. Intersight Managed Mode gained the same policies at the same release level.

The main point is that you no longer need a hand-built custom policy for the standard ESXi RSS configuration. Select VMWare-v2 on the vNIC or vNIC template and you get Cisco’s baseline.

VMware-v2 adapter policy values

These are the ESXi values in Cisco’s “Recommended adapter policy for the best performance with RSS” (VIC 15000 white paper, Table 3). The v2 policies are built from this table.

ParameterVMware-v2 / Cisco ESXi recommendation
Transmit queues1
TX ring size4096
Receive queues8
RX ring size4096
Completion queues9 (TX + RX)
Interrupts11 (CQ + 2)
Receive Side Scaling (RSS)Enabled

A note on interrupts: the UCS Manager 4.3 Network Management Guide gives the formula as “(Completion Queues + 2) rounded up to nearest power of 2”, which would be 16. The white paper uses 11 for ESXi and gives 16 as its own worked example. Both are Cisco documents. VMware-v2 uses 11. Our custom policy used 12 for years without problems.

Ring size and RX queue limits

  • VIC 1400 and 14000 series support a ring size of up to 4096 (4K). This is the maximum, and VMware-v2 already uses it.
  • VIC 15000 series and later support ring sizes up to 16384 (16K). If you want more than 4096, you need a custom policy.
  • RSS spreads receive processing across CPU cores and is set per vNIC through the adapter policy. Cisco states that most ESXi versions support up to 16 RX queues (ESXi 6.0 supports 8). The Intersight best-practices guide recommends 16 RX queues for ESXi 8.0. Again, going above the v2 default of 8 requires a custom policy.

Which Cisco VIC adapters use it

The release notes and the Network Management Guide name the VIC 1400, 14000 and 15000 series for the 4.3(4a) optimized policies. The VIC 15000 white paper words the v2 policies as being for operating systems “that use VIC 15000 adapters”. Older VIC 1200 and 1300 adapters are not named.

VMware-v2 vs VMWare vs VMWarePassThru

PolicyUse it for
VMWare-v2Standard ESXi vNICs (management, vMotion, VM traffic, NFS/iSCSI) on VIC 1400/14000/15000 with UCSM 4.3(4a) or later. RSS with 8 RX queues.
VMWareThe older system policy. Keep it only if you deliberately want the old values. Compare both policies under Servers > Policies > root > Adapter Policies before switching.
VMWarePassThruCisco’s system policy for VM-FEX in high-performance mode (dynamic vNICs). Not for normal static vNICs.
Custom policyNeeded for GENEVE offload (disabled by default in every adapter policy), 16 RX queues, or VIC 15000 rings above 4096.

For NSX host transport nodes, Cisco’s recommended GENEVE policy is different from VMware-v2: 1 TX queue, 8 RX queues, 4096 rings, 16 completion queues, 32 interrupts, RSS on and GENEVE offload enabled.

How to apply the VMware-v2 adapter policy

  1. Upgrade the UCS domain to 4.3(4e) or later (see the upgrade note below).
  2. In UCS Manager, open Servers > Policies > root > Adapter Policies and check the values of VMWare-v2.
  3. In the vNIC template, or in the vNIC of the LAN connectivity policy or service profile, set Adapter Policy to VMWare-v2.
  4. UCS Manager shows whether the change needs a server reboot. If it does, the reboot follows the service profile’s maintenance policy, so put the ESXi host into maintenance mode first.
  5. Verify on the ESXi host with the commands in Cisco’s vNIC tuning guide:
vsish -e get /net/pNics/vmnic0/txqueues/info
vsish -e get /net/pNics/vmnic0/rxqueues/info
esxcli network nic ring current get -n vmnic0

Upgrade note: 4.3(4a) to 4.3(4d) are deprecated

Cisco has deprecated UCS Manager 4.3(4a), 4.3(4b), 4.3(4c) and 4.3(4d), and their firmware files are no longer available. Cisco recommends 4.3(4e) or later. Two field notices are behind this. FN74201: UCS Manager can become inaccessible after an upgrade with integrated S3260 servers. FN74209: virtual Fibre Channel interfaces may flap. At the time of writing the newest 4.3 maintenance release is 4.3(6j), and Cisco also publishes UCS Manager 6.0.

Sources

Related on vdan.cz

Cisco UCS Manager Plugin for vSphere: Remote Plugin 4.0(0) and 4.0(1) for vCenter 8.0 U2, 8.0 U3 and 9.0

Cisco UCS Manager remote plugin for the vSphere HTML client: 4.0(0) vs 4.0(1), supported vCenter 7.0 U1 to 9.0, appliance sizing, install and Proactive HA.

Short answer: The Cisco UCS Manager plugin for vSphere is a remote plugin for the vSphere HTML client. It runs from its own OVA appliance. Version 4.0(0) was released in November 2023 and added support for vSphere 8.0 U2. The current release is 4.0(1). Cisco’s release notes list both versions for vSphere 7.0 U1 to U3, 8.0 GA to 8.0 U3, and 9.0, with UCS Manager 3.2 or later. The appliance needs 4 vCPU and 8 GB RAM.

I first wrote this post in November 2023 after rolling out 4.0(0) across about 13 UCS Manager domains and 411 ESXi 8.0 U2 hosts. This September 2026 update adds 4.0(1) and the current compatibility matrix from Cisco’s release notes, and keeps my hands-on notes.

Cisco UCS Manager plugin vSphere compatibility

vSphere HTML clientCisco UCS Manager plugin versions
7.03.0(4), 3.0(5), 3.0(6)
7.0 U1, 7.0 U23.0(5), 3.0(6), 4.0(0), 4.0(1)
7.0 U33.0(5), 3.0(6), 4.0(0), 4.0(1)
8.0, 8.0 U1, 8.0 U2, 8.0 U34.0(0), 4.0(1)
9.04.0(0), 4.0(1)

UCS Manager support is listed as “Release 3.2 and later”. Two known limitations are still open: CSCwi01415, where vCenter 7.0 GA is not supported (use 7.0 U1 or later), and CSCwi01422, where vSphere 8.0.1 does not show some appliance network fields (IP address, gateway, netmask).

Cisco UCS Manager remote plugin 4.0(0) vs 4.0(1)

ReleaseDateNew in this release
4.0(0)6 November 2023Plugin registration through the Cisco UCS Manager plugin appliance, registration of multiple vCenter Servers, support bundle logs (vCenter and appliance), adding and deleting custom faults, list of Proactive HA faults
4.0(1)Release notes created March 2024, last updated December 2025Plugin upgrade from the CLI, adding a certificate, changing the appliance IP and password, and actions removed for unmanaged servers. Fixes CSCwi01416, CSCwi01417, CSCwi01420, CSCwi01423, CSCwi03516 and CSCwj65650 (including FQDN registration and upper-case hostname issues).

If you are still on 4.0(0), move to 4.0(1). It fixes several registration bugs, and the CLI upgrade makes later updates easier.

What the plugin does in vCenter

  1. Physical hierarchy view of the UCS domain: chassis, blades, rack servers.
  2. Inventory: installed firmware, faults, and power and temperature statistics.
  3. Mapping of ESXi hosts to physical servers.
  4. Firmware management for B-Series and C-Series servers.
  5. Launch of the UCS Manager GUI and the KVM console from vCenter.
  6. Locator LED control.
  7. Cisco UCS provider for vSphere Proactive HA, with configurable faults.
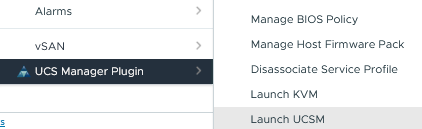
Cisco UCS Manager plugin menu in the vSphere HTML client

Install the plugin and register vCenter

  1. Download the plugin OVA from Cisco Software Download (Cisco.com login required).
  2. Deploy the OVA with 4 vCPU and 8 GB RAM, on a 4 GB thin-provisioned or 100 GB thick-provisioned datastore.
  3. Log in to the appliance and register one or more vCenter Servers. The steps are in the chapter “Installing the Plug-in OVA and Registering the VMware vCenter Servers” of the user guide.
  4. In the vSphere client, open the plugin and register your UCS Manager domains.
  5. Optional: enable the Cisco UCS provider for Proactive HA on the cluster and choose which faults it should act on.
Cisco UCS Manager plugin login screen

Proactive HA experience from production

Proactive HA worked as intended with fault F1236. When it was raised, the plugin’s provider put the blade’s ESXi host into Quarantine mode automatically.

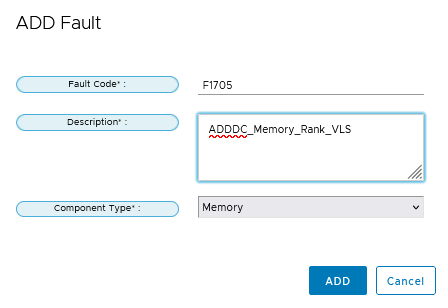
I had trouble with a custom fault, F1705: Proactive HA did not trigger on it. It was probably a configuration issue on my side, but I would like Cisco to include F1705 in the default fault list. I describe the setup in Add F1705 alert to Cisco UCS Manager plugin 4.0(0).

Sources

Related on vdan.cz

Add F1705 Alert to Cisco UCS Manager Plugin 4.0(0)

Add Cisco UCS fault F1705 (Rank VLS) as a custom fault in the UCS Manager Plugin 4.0(0) for the vSphere HTML client, so Proactive HA can react to it.

New Cisco UCS firmware brings possibility to have notification about F1705 Alerts – Rank VLS.

In latest version of Cisco UCS Manager Plugin for VMware vSphere HTML Client (Version 4.0(0)) we could add Custom fault addition for proactive HA monitoring. How to do it?

Cisco UCS / Proactive HA Registration / Registered Fault / Add / ADDDC_Memory_Rank_VLS

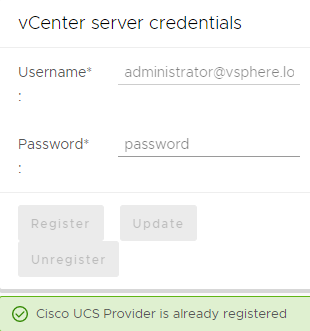
If You can’t Add, it is necessary to Unregister UCSM Manager Plugin.

Cisco UCS / Proactive HA Registration / Registered Fault / Add
Cisco UCS / Proactive HA Registration / vCenter server credentials / Register
Cisco UCS / Proactive HA Registration / Register
How Could I check it? Edit Proactive HA / Providers
It is better use Name “ADDDC_Memory_Rank_VLS” without spaces. On my picture I used “My F1705 Alerts”

Adding Custom Alert is only possible with unregistered Cisco UCS Provider, it is better to do it immediatly after Cisco UCS Manager Plugin instalation.

Now I can deceided If I will block F1705 or NOT. I personaly preffer to have F1705 Alert under Proactive HA. Then I only restart Blades with F1705. During reboot Hard-PPR permanently remaps accesses from a designated faulty row to a designated spare row.

Links:

CVE-2022-40982 (Downfall) and VMware ESXi: No ESXi Patch – Fix Is CPU Microcode in Cisco UCS M5/M6 Firmware

CVE-2022-40982 on VMware: no VMSA or ESXi patch. The fix is Intel microcode in the server BIOS, on Cisco UCS M5/M6 in 4.3(2b) or 4.2(3h).

Downfall (CVE-2022-40982, Intel Gather Data Sampling) vulnerability logo

Short answer: VMware never published a VMSA or an ESXi patch for CVE-2022-40982 (Downfall / Gather Data Sampling). The VMware Security Response Center said hypervisor patches are not required. The fix is Intel CPU microcode, which you get with a server BIOS/firmware update. On Cisco UCS, the M5 fix is defect CSCwf30468 and the M6 fix is CSCwf30460, both in UCS Manager 4.3(2b) and 4.2(3h). Intel says some workloads may lose up to 50% performance.

CVE-2022-40982 and VMware: is there a VMSA or ESXi patch?

No. On 8 August 2023, the day Intel published INTEL-SA-00828, the VMware Security Response Center posted its response. It rated the issue Moderate (CVSSv3.1 6.5) and said VMware hypervisors may be impacted when they run on an affected Intel processor, but that hypervisor patches are not required. VMware told customers to check INTEL-SA-00828 to see whether their CPU family is affected, and to ask their hardware vendor for a firmware update. No VMSA and no ESXi build is tied to this CVE. So when a scanner flags ESXi for CVE-2022-40982, the fix belongs to the server BIOS, not to an ESXi patch baseline or image.

LayerWhat fixes DownfallAction
CPUIntel microcode (INTEL-SA-00828, 2023.3 IPU)Comes with the server BIOS
Server firmwareBIOS that contains the new microcodeCisco UCS: 4.3(2b) / 4.2(3h) or later (see below)
ESXiNo patch required (VMware statement)None for this CVE
Guest OSKernel reports status, can opt out, or can disable AVX if microcode is missingLeave the mitigation on (the default)

What Downfall (Gather Data Sampling) is

According to the Linux kernel documentation, when a transiently executed gather instruction hits a fault, it can forward stale data from vector registers. An attacker can then infer that data with cache-timing side channels. The victim does not need to use gather instructions, only vector registers. The buffers are shared between Hyper-Threads, so cross-thread attacks are possible. The kernel documentation lists guest-to-host and guest-to-guest among the boundaries GDS can cross. That is why it matters on a virtualisation host even though the CVE requires local access.

Cisco UCS M5 and M6 firmware for CVE-2022-40982

Cisco documents the fix in the UCS release notes under “Security Fixes”. I did not find a separate Cisco PSIRT advisory for this CVE. The defects and first fixed releases are:

PlatformDefectCVEs in the fixUCS Manager (B-Series and FI-attached C-Series)Standalone C-Series (IMC)
UCS M5CSCwf30468CVE-2022-40982, CVE-2022-435054.3(2b) (16 Aug 2023), 4.2(3h)4.3(2.230207), 4.2(3h)
UCS M6CSCwf30460CVE-2022-40982, CVE-2022-41804, CVE-2023-23908, CVE-2022-373434.3(2b), 4.2(3h)4.3(2.230207), 4.2(3h)

In practice, stay on your release train. Environments on 4.2(3) go to 4.2(3h) or later. Environments on 4.3 go to 4.3(2b) or later, and ideally to the current recommended 4.3 release, which also carries later security fixes. Upgrade the server firmware bundle (host firmware package), not only UCS Manager infrastructure, because the microcode ships in the BIOS. After the reboot, you can confirm the new microcode revision from ESXi (see the related post below).

Downfall mitigation performance impact

With the mitigation on, the results of a gather load are held back for extra time before software can use them. Intel says the impact on most workloads is minimal, but “specific workloads may show performance impacts of up to 50%”. Intel lets users opt out through OS vendor options. On Linux, that is gather_data_sampling=off or mitigations=off. Opt out only if your threat model allows it, for example on a single-tenant host with no untrusted code.

Intel SGX exception: when the microcode is loaded through the FIT (that is, from an updated BIOS), SGX is enabled and Hyper-Threading is disabled, the mitigation is locked on. Otherwise system software can enable or disable it.

Checking a Linux guest (and why EVC is not a fix)

Inside a Linux VM, the kernel reports GDS status in sysfs:

cat /sys/devices/system/cpu/vulnerabilities/gather_data_sampling

Possible values include Not affected, Vulnerable: No microcode, Mitigation: Microcode, Mitigation: Microcode (locked), Mitigation: AVX disabled, no microcode and, in a VM, Unknown: Dependent on hypervisor status. The last one means the guest cannot tell whether the host CPU is mitigated.

In my 2023 lab I also ran the open-source spectre-meltdown-checker in a VM on an affected host before its microcode was updated, with two different EVC modes on the cluster:

wget https://raw.githubusercontent.com/speed47/spectre-meltdown-checker/master/spectre-meltdown-checker.sh
sh spectre-meltdown-checker.sh --variant downfall --explain

EVC Intel “Skylake” Generation:

CVE-2022-40982 aka 'Downfall, gather data sampling (GDS)'
> STATUS:  VULNERABLE  (Your microcode doesn't mitigate the vulnerability, and your kernel doesn't support mitigation)
> SUMMARY: CVE-2022-40982:KO

EVC Intel “Broadwell” Generation:

CVE-2022-40982 aka 'Downfall, gather data sampling (GDS)'
> STATUS:  NOT VULNERABLE  (your CPU vendor reported your CPU model as not affected)
> SUMMARY: CVE-2022-40982:OK

The Broadwell result is a reporting difference, not a mitigation. The checker decides from the CPU model the guest sees (“your CPU vendor reported your CPU model”). The VM still runs on the same physical, unpatched CPU. Treat EVC as a compatibility feature, not a workaround for Downfall. The real fix is the BIOS update on the host.

For bare-metal Linux or guests where microcode is not yet available, the kernel offers gather_data_sampling=force. It uses the microcode mitigation when present and otherwise disables AVX by turning off XSAVE YMM support. clearcpuid=avx does the same. Applications that check AVX incorrectly can break, so this is a stopgap only.

Checklist

  1. Check your CPUs in INTEL-SA-00828 (Intel’s affected processor table, Gather Data Sampling column).
  2. Cisco UCS M5/M6: upgrade the server firmware to 4.3(2b)+ or 4.2(3h)+ (standalone C-Series: 4.3(2.230207)+ or 4.2(3h)+). Other vendors: install the BIOS that contains the 2023.3 IPU microcode.
  3. Do not wait for an ESXi patch for this CVE. Record the VMware statement as the justification in your scanner exception.
  4. Keep the guest mitigation enabled. Benchmark AVX-heavy workloads (HPC, analytics, crypto) before and after.

Sources

Related on vdan.cz

ESXi Check Secure Boot Status: secureBoot.py, Enabling Secure Boot (Cisco UCS) and the “Host secure boot was disabled” Alarm

Check ESXi Secure Boot status and readiness with secureBoot.py -s/-c, enable it in firmware or a Cisco UCS boot policy, and fix unsigned-VIB failures.

Short answer: SSH to the host and run /usr/lib/vmware/secureboot/bin/secureBoot.py -s. It prints Enabled or Disabled. Before you switch Secure Boot on in the firmware, run the same script with -c; it reports either “Secure boot can be enabled” or “Secure boot CANNOT be enabled” and lists the VIBs that block it. On hosts with a TPM, esxcli system settings encryption get also shows whether Secure Boot is enforced.

ESXi check Secure Boot status with secureBoot.py

ESXi (and ESX 9) ships with a validation script. It has three modes. This is the help output from one of my hosts:

/usr/lib/vmware/secureboot/bin/secureBoot.py -h
usage: secureBoot.py [-h] [-a | -c | -s]

optional arguments:
  -h, --help            show this help message and exit
  -a, --acceptance-level-check
                        Validate acceptance levels for installed vibs
  -c, --check-capability
                        Check if the host is ready to enable secure boot
  -s, --check-status    Check if UEFI secure boot is enabled
OptionWhat it answersTypical output
-sIs UEFI Secure Boot enabled right now?Enabled / Disabled
-cCan Secure Boot be enabled on this install?Secure boot can be enabled: ... or Secure boot CANNOT be enabled: ...
-aDo the installed VIBs meet the required acceptance levels?Acceptance level validation result

Status on a host that still boots with Secure Boot off:

/usr/lib/vmware/secureboot/bin/secureBoot.py -s
Disabled

Check whether the host is ready for Secure Boot (-c)

Run the capability check before you change anything in the firmware. This matters most on hosts that were upgraded from older releases. Here is a host that passes:

/usr/lib/vmware/secureboot/bin/secureBoot.py -c
Secure boot can be enabled: All vib signatures verified. All tardisks validated. All acceptance levels validated

According to the Broadcom upgrade documentation, the result depends on how the host was upgraded:

  • Every installed VIB needs an acceptance level of at least PartnerSupported. A single CommunitySupported VIB blocks Secure Boot.
  • The signature of every installed VIB must be stored on the system. Older ESXi versions did not save the signatures, and an upgrade done with ESXCLI commands doesn’t save them either. An ISO-based upgrade, including a vSphere Lifecycle Manager upgrade that uses the ISO, does save them.
  • An old third-party driver VIB that the upgrade did not replace stays on the host without a stored signature, so it blocks Secure Boot.
  • The script does not check whether the bootloader is up to date, and Secure Boot needs a current one.

ESXi Secure Boot enable: firmware and Cisco UCS boot policy

ESXi doesn’t turn Secure Boot on by itself. You enable it in the server firmware, and the host must boot in UEFI mode. On most servers you do this in the BIOS/UEFI setup, usually under Boot or Security. Shut the host down gracefully first.

On Cisco UCS Manager-managed servers the setting lives in the boot policy. Set Boot Mode to UEFI and check Boot Security (UEFI Secure Boot), then associate the policy through the service profile. Cisco lists these points in its boot configuration guide:

  • UEFI boot mode must be enabled in the boot policy before you can use UEFI Secure Boot.
  • Cisco UCS Manager and the BIOS firmware must be Release 2.2 or later. User-generated encryption keys are not supported.
  • On UCSM-managed servers, only Cisco UCS Manager can control UEFI Secure Boot.
  • You cannot mix UEFI and legacy boot mode on the same server. Moving an existing legacy-BIOS ESXi install to UEFI is a separate task (see the related post below).
Cisco UCS Manager boot policy with Boot Mode set to UEFI and Boot Security (UEFI Secure Boot) enabled for an ESXi host
Cisco UCS Manager boot policy: UEFI boot mode with Boot Security (UEFI Secure Boot) enabled

After the host reboots with the new policy, check the status again:

/usr/lib/vmware/secureboot/bin/secureBoot.py -s
Enabled

Secure Boot enforcement on hosts with a TPM

On vSphere 7.0 Update 2 and later, a host with an active TPM can enforce Secure Boot on every boot. This setting is separate from the firmware toggle and you manage it with ESXCLI:

esxcli system settings encryption get
   Mode: TPM
   Require Executables Only From Installed VIBs: false
   Require Secure Boot: true

If Mode shows NONE, activate the TPM in the firmware and run esxcli system settings encryption set --mode=TPM. Broadcom warns that you cannot undo this once it is set. To enforce Secure Boot, first enable it in the firmware and restart. Then run the following:

esxcli system settings encryption set --require-secure-boot=T
esxcli system settings encryption get
/bin/backup.sh 0

To turn enforcement off, use --require-secure-boot=F and run /bin/backup.sh 0 again.

“Host secure boot was disabled”: the vCenter alarm

Broadcom KB 369525 documents this condition as the Host TPM attestation alarm in the vSphere Client (vCenter 8.x, ESXi 7.x/8.x). The main cause is that vCenter sees Secure Boot disabled on a host that has a TPM. Secure Boot is a requirement for successful attestation. The alarm can also fire when host and vCenter data get out of sync after a network glitch, a restart or a new host being added. The KB resolution:

  1. Check the current state with secureBoot.py -s.
  2. If it’s disabled, run secureBoot.py -c. If the host is compatible, enable Secure Boot in the firmware and boot ESXi.
  3. If Secure Boot is already enabled and the alarm stays, disconnect and reconnect the host. Then go to Monitor > Issues and Alarms and use Reset to Green on the alarm.
  4. If Secure Boot can’t be enabled on that hardware, the KB says you can use Reset to Green to suppress the alarm.

Fixing “Secure boot CANNOT be enabled” and unsigned VIB failures

  • Find the blocking VIB. The -c output names the VIBs whose signatures it could not verify. Compare them with esxcli software vib list, which includes an AcceptanceLevel column.
  • Replace or remove it. Install the vendor’s current signed driver or add-on, or remove a VIB you no longer need. Then run -c again.
  • Reboot after patching. KB 319600 describes a false failure on esx-base with “Failed to verify checksum for payload btldr”. It appears when you run the check after a live VIB install but before the reboot. Reboot and check again.
  • Purple screen “UEFI Secure Boot failed: Failed to verify signatures of the following vibs”. TechDocs says to reboot with Secure Boot disabled, run the validation script, and check /var/log/esxupdate.log.
  • VIB install fails on a host that already has TPM and Secure Boot. KB 384314 covers the error “Could not find a trusted signer”. The VIB must be signed through the VMware partner program. Disabling Secure Boot is not the recommended fix.
vSphere Secure Boot

Sources

Related on vdan.cz

Field Notice: FN – 72368 – Some DIMMs Might Fail Prematurely Due to a Manufacturing Deviation – Hardware Upgrade Available

Cisco Field Notice FN-72368: some DIMMs might fail prematurely due to a manufacturing deviation. What’s affected, and why ADDDC and PPR help.

Cisco announced Field Notice: FN – 72368 – Some DIMMs Might Fail Prematurely Due to a Manufacturing Deviation – Hardware Upgrade Available

My personal recommendation please use ADDDC and PPR – It could prevent hardware failures … UCS-ML-128G4RT-H is in 2nd revision from 28-Oct-22.

Problem Description

A limited number of DIMMs shipped from Cisco are impacted by a known deviation in the memory supplier’s manufacturing process. This deviation might result in a higher rate of failure.

Background

DIMM manufacturers compose their DIMMs of multiple memory modules to reach the desired capacity. A 16GB DIMM might be composed of the same modules that a 32GB DIMM is composed of. In this case, a manufacturing deviation in specific modules impacts 16GB, 32GB, 64GB, and 128GB DIMMs. This deviation was contained to a specific date range, and the DIMMs which use these chips were manufactured during the middle to end of 2020. Since the discovery of this deviation, additional limits have been imposed on the manufacturing process to ensure that future DIMMs are not exposed to this process variation.

Problem Symptom

Most DIMMs with this manufacturing deviation will exhibit persistent correctable memory errors. If left untreated, the DIMMs might eventually encounter an uncorrectable memory event. If encountered during runtime, uncorrectable errors will cause a sudden unexpected server reset. If encountered during Power-On Self-Test (POST), the DIMM will be mapped out and the total available memory reduced. In some cases a boot error might be seen.

Various DIMM Reliability, Availability, and Serviceability (RAS) features or even operating system features might mask the extent of these correctable errors. It is recommended to check your DIMMs for exposure using the Serial Number Validation Tool described in the Serial Number Validation section of this field notice. Only specific DIMMs are impacted by this issue, so do not rely solely on the DIMM error count to judge exposure.

Workaround/Solution

This is a hardware failure. A replacement is strongly recommended in order to avoid potential for unexpected server failure.

UCS-M2-HWRAID ESXi Boot: RAID 1 on the Cisco Boot-Optimized M.2 RAID Controller (UCS Manager, Intersight, CIMC)

Boot ESXi from a RAID 1 M.2 volume on Cisco UCS-M2-HWRAID: controller limits, UCS Manager, Intersight and CIMC steps, and ESXi 8/9 boot device rules.

Short answer: UCS-M2-HWRAID is Cisco’s boot-optimized M.2 RAID controller for UCS M5 and M6 servers. It holds two identical M.2 SATA SSDs and supports only RAID 1 or JBOD (default JBOD). It boots only in UEFI mode, and one virtual drive always uses the full capacity. To boot ESXi, create a RAID 1 LUN in UCS Manager, Intersight or CIMC, set a UEFI boot policy to local disk (MSTOR-RAID), and install ESXi to that volume.

What is UCS-M2-HWRAID

The Cisco Boot-Optimized M.2 RAID Controller (PID UCS-M2-HWRAID) is a module that plugs into the mini-storage connector on the motherboard. It has two slots for SATA M.2 SSDs and an integrated 6 Gbps SATA RAID controller. In UCS Manager, Intersight and CIMC the controller shows as MSTOR-RAID. Its job is to give ESXi a mirrored local boot device without using the front drive bays or an SD card.

PropertyValue (Cisco documentation)
ServersUCS C220 M5, C240 M5, C480 M5, B200 M5, B480 M5 (UCS Manager 4.1 guide); also required for M.2 SATA on C220 M6 (spec sheet)
Minimum firmwareUCS Manager 4.0(4a) for the RAID procedure (tech note); Cisco IMC / UCS Manager 4.2(1) on M6
M.2 drives240 GB and 960 GB SATA M.2 (UCSM 4.1 guide); C220 M6 spec sheet lists UCS-M2-240G, UCS-M2-480G, UCS-M2-960G
RAID levelsRAID 1 or JBOD only (default JBOD)
Boot modeUEFI only; legacy boot not supported
Virtual drivesOne, using the entire disk capacity
Mixing drivesNot supported (use two identical SSDs)
Hot-plugNot supported; power the server off to replace a drive (M6 spec sheet)

Other UCS Manager limitations: the Local Disk Configuration policy is not supported, the LUN must be created in the Local LUNs tab of a storage profile (not with controller definitions), and existing LUN migration is not supported.

UCS-M2-HWRAID in UCS Manager: create the RAID 1 boot LUN

These screenshots are from my UCS Manager setup.

1. Disk group policy: Storage > Storage Policies > root > Disk Group Policies

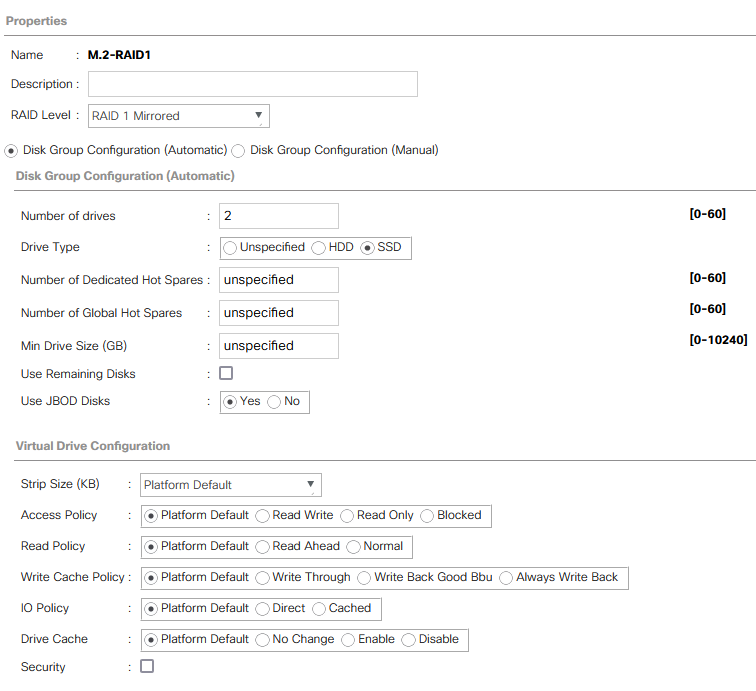
Create a policy (here M.2-RAID1) with RAID Level RAID 1 Mirrored, 2 drives, drive type SSD.

UCS Manager disk group policy M.2-RAID1 with RAID 1 Mirrored, 2 SSD drives, automatic disk group configuration

If the service profile association fails with Server does not fulfill Local Disk config requirements, Cisco’s tech note says to use Disk Group Configuration (Manual) with the two M.2 slots and to disable pSATA. With manual configuration, leave the span ID unspecified and set the disk role to normal.

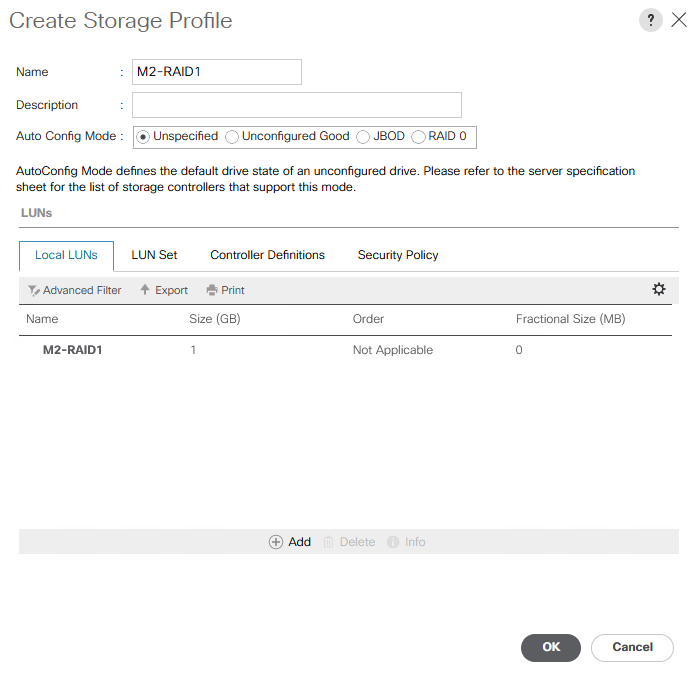
2. Storage profile: Storage > Storage Profiles > root

UCS Manager Create Storage Profile dialog M2-RAID1 with one local LUN M2-RAID1

3. Local LUN inside the storage profile

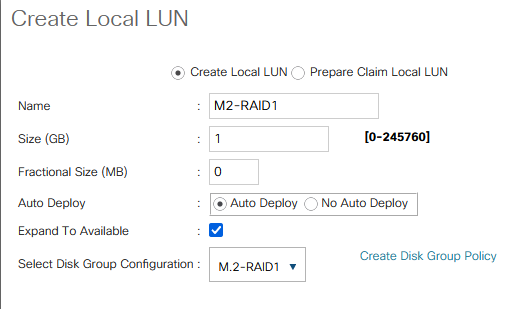
Add a local LUN, select the disk group policy and enable Expand To Available. The controller supports only one LUN over the whole mirror anyway.

UCS Manager Create Local LUN M2-RAID1 with Expand To Available and disk group configuration M.2-RAID1

4. Attach the storage profile to the service profile

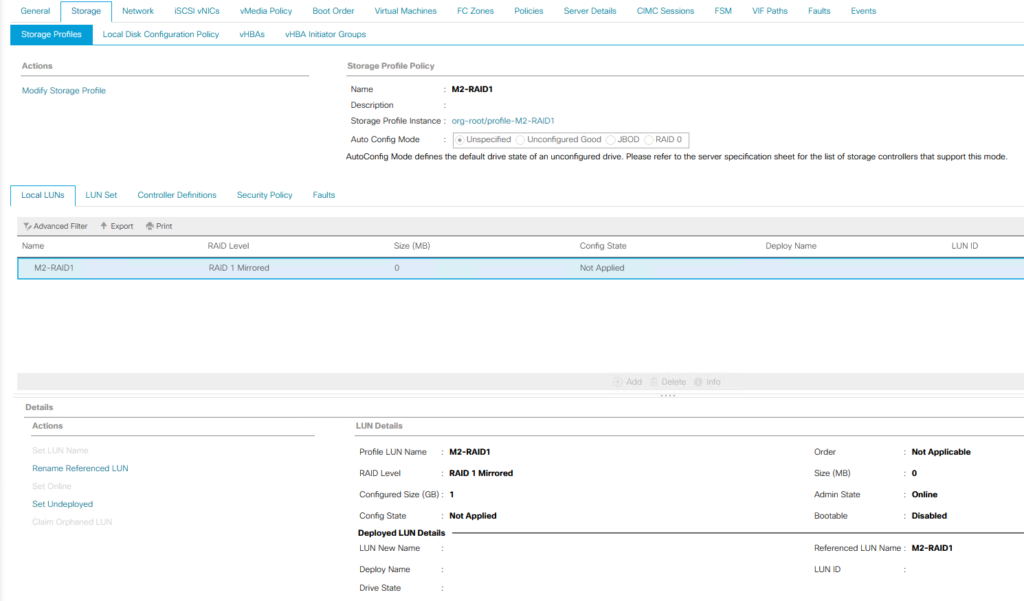
In the service profile, open Storage > Storage Profiles > Modify Storage Profile and select the profile. The LUN shows Not Applied until the profile is associated.

UCS Manager service profile Storage tab with storage profile M2-RAID1 and local LUN RAID 1 Mirrored

5. Boot policy: UEFI, Local Disk first

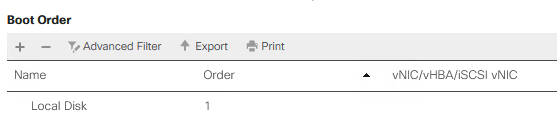
Use a boot policy with boot mode UEFI (the controller does not boot in legacy mode) and put the local disk first.

UCS Manager boot order with Local Disk as the first boot device

UCS-M2-HWRAID in Intersight Managed Mode

  1. Create a Storage policy and enable M.2 RAID Configuration. Keep the default virtual drive name MStorBootVd or set your own. Select the M.2 controller slot: MSTOR-RAID-1 for C-Series and X-Series. Only the B200 M6 can have a second controller (MSTOR-RAID-2).
  2. Create a Boot Order policy (Policies > Create Policy > UCS Server > Boot Order) in UEFI mode. Add Local Disk with the slot set to the M.2 controller from the server inventory (MSTOR-RAID), then add virtual media for the installer.
  3. Add both policies to the server profile and deploy it. The RAID 1 volume should be visible in the ESXi installer.

UCS-M2-HWRAID in standalone CIMC

  1. Storage > Cisco Boot optimized M.2 Raid controller (MSTOR-RAID). In Physical Drive Info, check that both drives are healthy.
  2. Create Virtual Drive from Unused Physical Drives, move both M.2 drives to the drive group, choose RAID 1 (the only option on this controller) and click Create Virtual Drive.
  3. Compute > Configure Boot Order > Advanced. Add Local HDD with slot MSTOR-RAID, or use Add Embedded Storage.

Without CIMC access, the same controller menu is in BIOS setup: press F2 during POST, then go to Advanced > Cisco Boot optimized M.2 RAID Controller.

UCS-M2-HWRAID ESXi driver and support

Cisco does not ship a separate ESXi driver download for this controller in the documents above. Whether a given ESXi release is supported on your server with this controller is defined by the Cisco UCS Hardware and Software Compatibility tool (ucshcltool.cloudapps.cisco.com) and the Broadcom Compatibility Guide. Check both for your exact server, firmware bundle and ESXi build before you upgrade. Install from the Cisco custom ESXi ISO so that the Cisco drivers match the firmware.

After installation, confirm which driver ESXi bound to the controller, and that the boot device is the RAID volume:

esxcli storage core adapter list
esxcli storage core device list

ESXi 7, 8 and 9 boot device requirements

Broadcom KB 317631 (formerly 85685, “SD card/USB boot device revised guidance”) is the reference for boot media. A RAID 1 M.2 SATA SSD volume is exactly the kind of local persistent boot device it recommends:

RequirementESXi 8.xESX 9.x
Boot device size32 GB minimum, 128 GB recommended128 GB minimum
Endurance128 TBW over 5 years
IO performanceAt least 100 MB/s
MediaPCIe NVMe, SAS, SATA/SATADOM SSD; industrial-grade flash (SLC or pSLC)
SD card / USBStill supported through VCF 9.0 on previously certified servers, but not recommended; new platforms are not certified with SD/USB boot

Every M.2 size listed above (240, 480 or 960 GB) meets the ESX 9 minimum of 128 GB. Check the endurance rating of your specific SSD model against the 128 TBW requirement. On ESXi 7.x, SD cards can still hold all partitions, but Broadcom strongly recommends moving to a persistent device. If you are replacing SD cards on M5/M6 servers, UCS-M2-HWRAID is the natural choice.

Sources

Related on vdan.cz