Lost or corrupted .vmx? Rebuild it from vmware.log on ESXi 8 with a short shell script over SSH (KB 1023880), including the #!/bin/ash fix for ESXi 8.
Introduction
Short answer: if a VM’s .vmx file is lost or corrupted, you can rebuild it from the configuration that ESXi writes into the VM’s vmware.log. SSH to the host, change to the VM’s folder, and run the small shell script below. On ESXi 8 the script needs #!/bin/ash as its first line, otherwise it fails with Operation not permitted. Back up the VM folder first.
Rebuilding a VMX file from vmware.log in VMware ESXi can be crucial for restoring a virtual machine’s configuration. This guide will walk you through the process using SSH according KB 1023880, but with update for ESXi 8.0. It was necessary add #!/bin/ash because of error “Operation not permitted”.
Step 1: SSH into Your ESXi Host
First, ensure SSH is enabled on your ESXi host. Then, use an SSH client to connect to the host.
Step 2: Navigate to the Virtual Machine’s Directory
Change to the directory where your VM resides. This is usually under /vmfs/volumes/.
cd /vmfs/volumes/name-volume/name-vm
Step 3: Create and Prepare the Script File
Create a new file named vmxrebuild.sh and make it executable:
touch vmxrebuild.sh && chmod +x vmxrebuild.sh
Step 4: Edit the Script File for ESXi 8
Edit the vmxrebuild.sh file using the vi editor:
Run vi vmxrebuild.sh.
Press i to enter insert mode.
Copy and paste the following script (adjust for your ESXi host version).
This process extracts the necessary configuration details from the vmware.log file and recreates the VMX file, which is vital for VM configuration. Always back up your VM files before performing such operations.
vCenter 8.0 U2 can’t edit settings of powered-on VMs with virtual hardware 9 or older in the vSphere Client. Symptoms, workarounds and resolution.
Introduction
I was unable to manage Virtual Machines with virtual Hardware Version 9 or older via the vSphere Client while they are in a powered on state.
Symptoms
vCenter Server Version: The problem is specific to vCenter Server version 8.0 U2 – 22385739.
Virtual Machine Hardware Version: Affected VMs are those with hardware version 9 or below.
VM State: The issue occurs when the Virtual Machine is in a powered-on state.
UI Glitches: In the vSphere Client, when attempting to open the ‘Edit Settings’ for the affected VMs, users notice red exclamation marks next to the Virtual Hardware and VM Options tabs. Additionally, the rest of the window appears empty, hindering any further action.
Impact and Risks:
The primary impact of this issue is a significant management challenge:
Users are unable to manage Virtual Machines with Virtual Hardware Version 9 or older through the vSphere Client while they remain powered on. This limitation can affect routine operations, maintenance, and potentially urgent modifications needed for these VMs.
Workarounds:
In the meantime, users can employ either of the following workarounds to manage their older VMs effectively:
Power Off the VM: By powering off the VM, the ‘Edit Settings’ window should function correctly. While this is not ideal for VMs that need to remain operational, it can be a temporary solution for making necessary changes.
Use ESXi Host Client: Alternatively, users can connect directly to the ESXi Host Client to perform the ‘Edit Settings’ operations. This method allows the VM to remain powered on, which is beneficial for critical systems that cannot afford downtime.
Tesla P40 specs (24 GB GDDR5, 250 W, 10.5-inch dual slot, compute 6.1), cooling and ESXi passthrough setup, llama.cpp benchmarks, and CUDA 13 limits.
Short answer: the NVIDIA Tesla P40 is a 2016 Pascal data-center GPU with 24 GB GDDR5, a 250 W power limit and a dual-slot, 10.5-inch PCIe Gen3 card with no fan of its own. It’s one of the cheapest ways to get 24 GB of VRAM for local LLMs in a homelab. It runs fine with ESXi PCIe passthrough and in my tests was 16–26× faster than the CPU in llama.cpp. The catch in 2026: CUDA 13 no longer targets Pascal, so you stay on CUDA 12.x.
Tesla P40 specifications
Architecture / GPU
Pascal, GP102
CUDA cores
3,840
Compute capability
6.1
Memory
24 GB GDDR5, 384-bit
Max power
250 W
Form factor
Dual-slot, 10.5-inch, full height, PCI Express Gen3 x16
Cooling
No fan: designed for server airflow
INT8 inference
47 TOPS
Source: NVIDIA Tesla P40 datasheet; compute capability as reported by CUDA in the benchmark output below.
Why I picked the P40
For Private AI in HomeLAB, I was searching for budget-friendly GPUs with a minimum of 24GB RAM. Recently, I came across the refurbished NVIDIA Tesla P40 on eBay, which boasts some intriguing specifications:
GPU Chip: GP102
Cores: 3840
TMUs: 240
ROPs: 96
Memory Size: 24 GB
Memory Type: GDDR5
Bus Width: 384 bit
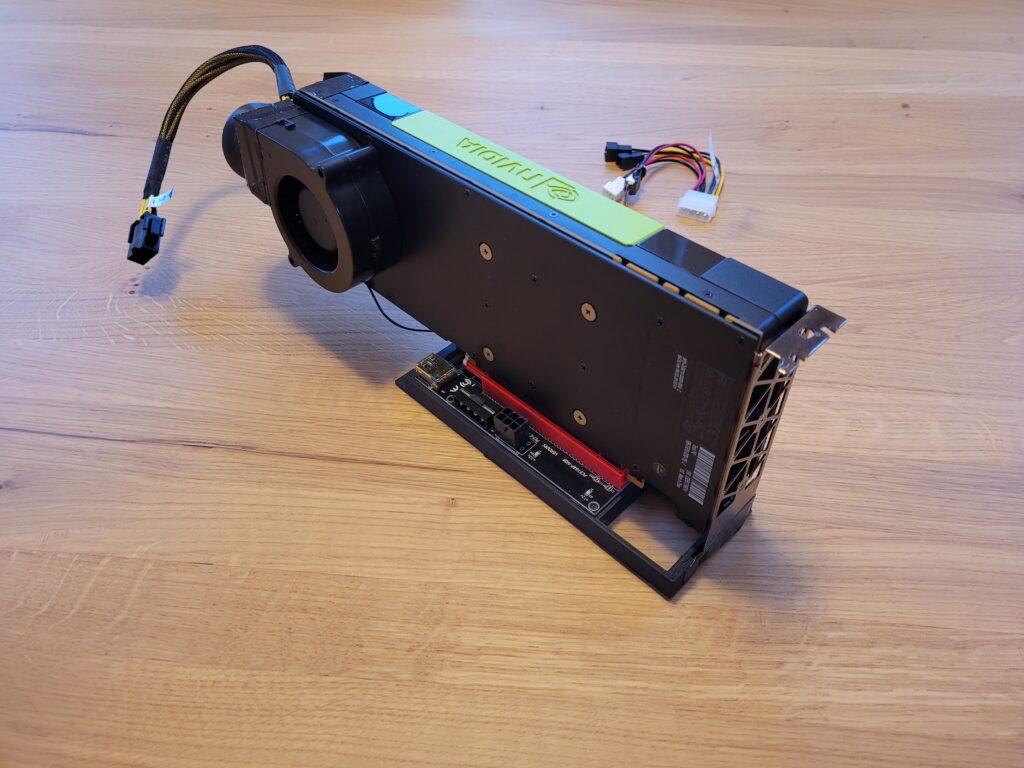
Fitting and cooling the P40 in a homelab
Since the NVIDIA Tesla P40 comes in a full-profile form factor, we needed to acquire a PCIe riser card.
A PCIe riser card, commonly known as a “riser card,” is a hardware component essential in computer systems for facilitating the connection of expansion cards to the motherboard. Its primary role comes into play when space limitations or specific orientation requirements prevent the direct installation of expansion cards into the PCIe slots on the motherboard.
Furthermore, I needed to ensure adequate cooling, but this posed no issue. I utilized a 3D model created by MiHu_Works for a Tesla P100 blower fan adapter, which you can find at this link: Tesla P100 Blower Fan Adapter.
As for the fan, the Titan TFD-B7530M12C served the purpose effectively. You can find it on Amazon: Titan TFD-B7530M12C.
ESXi PCIe passthrough settings
Currently, I am using a single VM with PCIe pass-through. However, it was necessary to implement specific Advanced VM parameters:
Now, you might wonder about the performance. It’s outstanding, delivering speeds up to 16x-26x times faster than the CPU. To provide you with an idea of the performance, I conducted a llama-bench test:
Feel free to explore this setup for your Private AI in HomeLAB.
Is the Tesla P40 still worth it in 2026?
CUDA: CUDA Toolkit 13.0 removed offline compilation and library support for Maxwell, Pascal and Volta. You can keep building for the P40 with CUDA 12.x, but newer toolkits can’t target it (CUDA 13.1 release notes).
Still good for: running quantized models that need a lot of VRAM on a budget, where 24 GB matters more than raw speed.
Plan for: power (250 W) and your own airflow, because the card has no fan.
Cisco UCS Manager remote plugin for the vSphere HTML client: 4.0(0) vs 4.0(1), supported vCenter 7.0 U1 to 9.0, appliance sizing, install and Proactive HA.
Short answer: The Cisco UCS Manager plugin for vSphere is a remote plugin for the vSphere HTML client. It runs from its own OVA appliance. Version 4.0(0) was released in November 2023 and added support for vSphere 8.0 U2. The current release is 4.0(1). Cisco’s release notes list both versions for vSphere 7.0 U1 to U3, 8.0 GA to 8.0 U3, and 9.0, with UCS Manager 3.2 or later. The appliance needs 4 vCPU and 8 GB RAM.
I first wrote this post in November 2023 after rolling out 4.0(0) across about 13 UCS Manager domains and 411 ESXi 8.0 U2 hosts. This September 2026 update adds 4.0(1) and the current compatibility matrix from Cisco’s release notes, and keeps my hands-on notes.
Cisco UCS Manager plugin vSphere compatibility
vSphere HTML client
Cisco UCS Manager plugin versions
7.0
3.0(4), 3.0(5), 3.0(6)
7.0 U1, 7.0 U2
3.0(5), 3.0(6), 4.0(0), 4.0(1)
7.0 U3
3.0(5), 3.0(6), 4.0(0), 4.0(1)
8.0, 8.0 U1, 8.0 U2, 8.0 U3
4.0(0), 4.0(1)
9.0
4.0(0), 4.0(1)
UCS Manager support is listed as “Release 3.2 and later”. Two known limitations are still open: CSCwi01415, where vCenter 7.0 GA is not supported (use 7.0 U1 or later), and CSCwi01422, where vSphere 8.0.1 does not show some appliance network fields (IP address, gateway, netmask).
Cisco UCS Manager remote plugin 4.0(0) vs 4.0(1)
Release
Date
New in this release
4.0(0)
6 November 2023
Plugin registration through the Cisco UCS Manager plugin appliance, registration of multiple vCenter Servers, support bundle logs (vCenter and appliance), adding and deleting custom faults, list of Proactive HA faults
4.0(1)
Release notes created March 2024, last updated December 2025
Plugin upgrade from the CLI, adding a certificate, changing the appliance IP and password, and actions removed for unmanaged servers. Fixes CSCwi01416, CSCwi01417, CSCwi01420, CSCwi01423, CSCwi03516 and CSCwj65650 (including FQDN registration and upper-case hostname issues).
If you are still on 4.0(0), move to 4.0(1). It fixes several registration bugs, and the CLI upgrade makes later updates easier.
What the plugin does in vCenter
Physical hierarchy view of the UCS domain: chassis, blades, rack servers.
Inventory: installed firmware, faults, and power and temperature statistics.
Mapping of ESXi hosts to physical servers.
Firmware management for B-Series and C-Series servers.
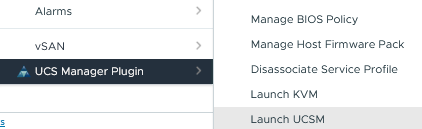
Launch of the UCS Manager GUI and the KVM console from vCenter.
Locator LED control.
Cisco UCS provider for vSphere Proactive HA, with configurable faults.
Install the plugin and register vCenter
Download the plugin OVA from Cisco Software Download (Cisco.com login required).
Deploy the OVA with 4 vCPU and 8 GB RAM, on a 4 GB thin-provisioned or 100 GB thick-provisioned datastore.
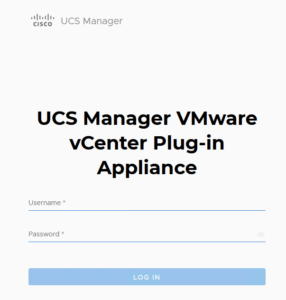
Log in to the appliance and register one or more vCenter Servers. The steps are in the chapter “Installing the Plug-in OVA and Registering the VMware vCenter Servers” of the user guide.
In the vSphere client, open the plugin and register your UCS Manager domains.
Optional: enable the Cisco UCS provider for Proactive HA on the cluster and choose which faults it should act on.
Proactive HA experience from production
Proactive HA worked as intended with fault F1236. When it was raised, the plugin’s provider put the blade’s ESXi host into Quarantine mode automatically.
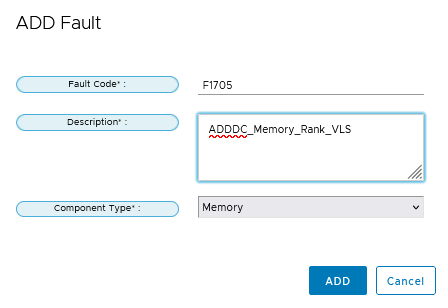
I had trouble with a custom fault, F1705: Proactive HA did not trigger on it. It was probably a configuration issue on my side, but I would like Cisco to include F1705 in the default fault list. I describe the setup in Add F1705 alert to Cisco UCS Manager plugin 4.0(0).
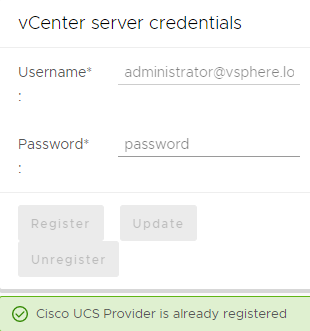
Cisco UCS / Proactive HA Registration / vCenter server credentials / Register
Cisco UCS / Proactive HA Registration / Register
How Could I check it? Edit Proactive HA / Providers
It is better use Name “ADDDC_Memory_Rank_VLS” without spaces. On my picture I used “My F1705 Alerts”
Adding Custom Alert is only possible with unregistered Cisco UCS Provider, it is better to do it immediatly after Cisco UCS Manager Plugin instalation.
Now I can deceided If I will block F1705 or NOT. I personaly preffer to have F1705 Alert under Proactive HA. Then I only restart Blades with F1705. During reboot Hard-PPRpermanently remaps accesses from a designated faulty row to a designated spare row.
vSphere 8.0 Update 2 adds federated authentication with Azure Active Directory (Microsoft Entra ID) for vCenter, as presented at VMware Explore 2023.
At the 2023 VMware Explore event in Barcelona. I was on presentation with Viviana Miranda relates to the way users authenticate to vCenter.
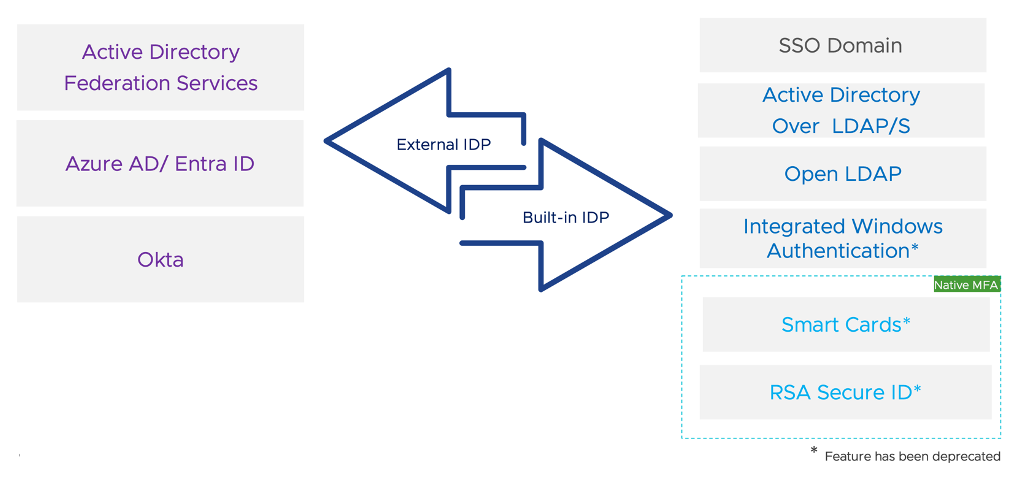
vSphere 8.0 Update 2 update heralds a number of groundbreaking features, with one standout enhancement in user authentication methods for vCenter. vCenter Server 8.0 Update 2 has now incorporated federated authentication capabilities with Azure Active Directory.
Dive into the details of this integration and discover how to activate it.
The Advantages of External Identity Providers
Organizations that leverage external identity providers can expect to reap substantial benefits:
- Integration with existing identity provider infrastructure to streamline processes.
- Implementation of Single Sign-On to simplify access across services.
- Adherence to the best practices of role separation between infrastructure management and identity administration.
- Utilization of robust multi-factor authentication options that come with their chosen identity providers.
Supported Identity Providers in vSphere 8.0 U2
While our focus here is the Azure Active Directory integration, it’s essential to highlight the comprehensive range of authentication methods now supported with vCenter Server 8.0 U2.
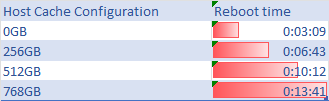
Exploring the vSphere environment, I’ve found that configuring a large Host Cache with VMFS Datastore can significantly extend reboot times.
It’s a delicate balance of performance gains versus system availability. For an in-depth look at my findings and the impact on your VMware setup, stay tuned.
CVE-2022-40982 on VMware: no VMSA or ESXi patch. The fix is Intel microcode in the server BIOS, on Cisco UCS M5/M6 in 4.3(2b) or 4.2(3h).
Short answer: VMware never published a VMSA or an ESXi patch for CVE-2022-40982 (Downfall / Gather Data Sampling). The VMware Security Response Center said hypervisor patches are not required. The fix is Intel CPU microcode, which you get with a server BIOS/firmware update. On Cisco UCS, the M5 fix is defect CSCwf30468 and the M6 fix is CSCwf30460, both in UCS Manager 4.3(2b) and 4.2(3h). Intel says some workloads may lose up to 50% performance.
CVE-2022-40982 and VMware: is there a VMSA or ESXi patch?
No. On 8 August 2023, the day Intel published INTEL-SA-00828, the VMware Security Response Center posted its response. It rated the issue Moderate (CVSSv3.1 6.5) and said VMware hypervisors may be impacted when they run on an affected Intel processor, but that hypervisor patches are not required. VMware told customers to check INTEL-SA-00828 to see whether their CPU family is affected, and to ask their hardware vendor for a firmware update. No VMSA and no ESXi build is tied to this CVE. So when a scanner flags ESXi for CVE-2022-40982, the fix belongs to the server BIOS, not to an ESXi patch baseline or image.
Layer
What fixes Downfall
Action
CPU
Intel microcode (INTEL-SA-00828, 2023.3 IPU)
Comes with the server BIOS
Server firmware
BIOS that contains the new microcode
Cisco UCS: 4.3(2b) / 4.2(3h) or later (see below)
ESXi
No patch required (VMware statement)
None for this CVE
Guest OS
Kernel reports status, can opt out, or can disable AVX if microcode is missing
Leave the mitigation on (the default)
What Downfall (Gather Data Sampling) is
According to the Linux kernel documentation, when a transiently executed gather instruction hits a fault, it can forward stale data from vector registers. An attacker can then infer that data with cache-timing side channels. The victim does not need to use gather instructions, only vector registers. The buffers are shared between Hyper-Threads, so cross-thread attacks are possible. The kernel documentation lists guest-to-host and guest-to-guest among the boundaries GDS can cross. That is why it matters on a virtualisation host even though the CVE requires local access.
Cisco UCS M5 and M6 firmware for CVE-2022-40982
Cisco documents the fix in the UCS release notes under “Security Fixes”. I did not find a separate Cisco PSIRT advisory for this CVE. The defects and first fixed releases are:
In practice, stay on your release train. Environments on 4.2(3) go to 4.2(3h) or later. Environments on 4.3 go to 4.3(2b) or later, and ideally to the current recommended 4.3 release, which also carries later security fixes. Upgrade the server firmware bundle (host firmware package), not only UCS Manager infrastructure, because the microcode ships in the BIOS. After the reboot, you can confirm the new microcode revision from ESXi (see the related post below).
Downfall mitigation performance impact
With the mitigation on, the results of a gather load are held back for extra time before software can use them. Intel says the impact on most workloads is minimal, but “specific workloads may show performance impacts of up to 50%”. Intel lets users opt out through OS vendor options. On Linux, that is gather_data_sampling=off or mitigations=off. Opt out only if your threat model allows it, for example on a single-tenant host with no untrusted code.
Intel SGX exception: when the microcode is loaded through the FIT (that is, from an updated BIOS), SGX is enabled and Hyper-Threading is disabled, the mitigation is locked on. Otherwise system software can enable or disable it.
Checking a Linux guest (and why EVC is not a fix)
Inside a Linux VM, the kernel reports GDS status in sysfs:
Possible values include Not affected, Vulnerable: No microcode, Mitigation: Microcode, Mitigation: Microcode (locked), Mitigation: AVX disabled, no microcode and, in a VM, Unknown: Dependent on hypervisor status. The last one means the guest cannot tell whether the host CPU is mitigated.
In my 2023 lab I also ran the open-source spectre-meltdown-checker in a VM on an affected host before its microcode was updated, with two different EVC modes on the cluster:
wget https://raw.githubusercontent.com/speed47/spectre-meltdown-checker/master/spectre-meltdown-checker.sh
sh spectre-meltdown-checker.sh --variant downfall --explain
EVC Intel “Skylake” Generation:
CVE-2022-40982 aka 'Downfall, gather data sampling (GDS)'
> STATUS:  VULNERABLE  (Your microcode doesn't mitigate the vulnerability, and your kernel doesn't support mitigation)
> SUMMARY: CVE-2022-40982:KO
EVC Intel “Broadwell” Generation:
CVE-2022-40982 aka 'Downfall, gather data sampling (GDS)'
> STATUS:  NOT VULNERABLE  (your CPU vendor reported your CPU model as not affected)
> SUMMARY: CVE-2022-40982:OK
The Broadwell result is a reporting difference, not a mitigation. The checker decides from the CPU model the guest sees (“your CPU vendor reported your CPU model”). The VM still runs on the same physical, unpatched CPU. Treat EVC as a compatibility feature, not a workaround for Downfall. The real fix is the BIOS update on the host.
For bare-metal Linux or guests where microcode is not yet available, the kernel offers gather_data_sampling=force. It uses the microcode mitigation when present and otherwise disables AVX by turning off XSAVE YMM support. clearcpuid=avx does the same. Applications that check AVX incorrectly can break, so this is a stopgap only.
Checklist
Check your CPUs in INTEL-SA-00828 (Intel’s affected processor table, Gather Data Sampling column).
Cisco UCS M5/M6: upgrade the server firmware to 4.3(2b)+ or 4.2(3h)+ (standalone C-Series: 4.3(2.230207)+ or 4.2(3h)+). Other vendors: install the BIOS that contains the 2023.3 IPU microcode.
Do not wait for an ESXi patch for this CVE. Record the VMware statement as the justification in your scanner exception.
Keep the guest mitigation enabled. Benchmark AVX-heavy workloads (HPC, analytics, crypto) before and after.
Configure NVMe/TCP between vSphere 8.0 Update 1 and NetApp ONTAP 9.13.1 for VMFS datastores: ESXi adapters, ONTAP subsystem and namespaces.
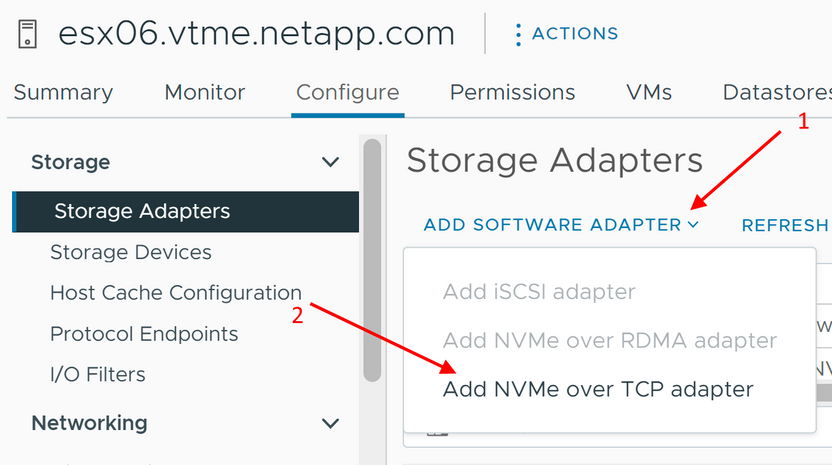
vSphere 8U1 – Deep dive on configuring NVMe-oF (Non-Volatile Memory Express over Fabrics) for VMware vSphere datastores.
What’s new
With vSphere 8.0 update 1, VMware has completed their journey to a completely native end-to-end NVMe storage stack. Prior to 8.0U1, there was a SCSI translation layer which added some complexity to the stack and slightly decreased some of the efficiencies inherent in the NVMe protocol.
Check ESXi Secure Boot status and readiness with secureBoot.py -s/-c, enable it in firmware or a Cisco UCS boot policy, and fix unsigned-VIB failures.
Short answer: SSH to the host and run /usr/lib/vmware/secureboot/bin/secureBoot.py -s. It prints Enabled or Disabled. Before you switch Secure Boot on in the firmware, run the same script with -c; it reports either “Secure boot can be enabled” or “Secure boot CANNOT be enabled” and lists the VIBs that block it. On hosts with a TPM, esxcli system settings encryption get also shows whether Secure Boot is enforced.
ESXi check Secure Boot status with secureBoot.py
ESXi (and ESX 9) ships with a validation script. It has three modes. This is the help output from one of my hosts:
/usr/lib/vmware/secureboot/bin/secureBoot.py -h
usage: secureBoot.py [-h] [-a | -c | -s]

optional arguments:
  -h, --help            show this help message and exit
  -a, --acceptance-level-check
                        Validate acceptance levels for installed vibs
  -c, --check-capability
                        Check if the host is ready to enable secure boot
  -s, --check-status    Check if UEFI secure boot is enabled
Option
What it answers
Typical output
-s
Is UEFI Secure Boot enabled right now?
Enabled / Disabled
-c
Can Secure Boot be enabled on this install?
Secure boot can be enabled: ... or Secure boot CANNOT be enabled: ...
-a
Do the installed VIBs meet the required acceptance levels?
Acceptance level validation result
Status on a host that still boots with Secure Boot off:
Check whether the host is ready for Secure Boot (-c)
Run the capability check before you change anything in the firmware. This matters most on hosts that were upgraded from older releases. Here is a host that passes:
/usr/lib/vmware/secureboot/bin/secureBoot.py -c
Secure boot can be enabled: All vib signatures verified. All tardisks validated. All acceptance levels validated
According to the Broadcom upgrade documentation, the result depends on how the host was upgraded:
Every installed VIB needs an acceptance level of at least PartnerSupported. A single CommunitySupported VIB blocks Secure Boot.
The signature of every installed VIB must be stored on the system. Older ESXi versions did not save the signatures, and an upgrade done with ESXCLI commands doesn’t save them either. An ISO-based upgrade, including a vSphere Lifecycle Manager upgrade that uses the ISO, does save them.
An old third-party driver VIB that the upgrade did not replace stays on the host without a stored signature, so it blocks Secure Boot.
The script does not check whether the bootloader is up to date, and Secure Boot needs a current one.
ESXi Secure Boot enable: firmware and Cisco UCS boot policy
ESXi doesn’t turn Secure Boot on by itself. You enable it in the server firmware, and the host must boot in UEFI mode. On most servers you do this in the BIOS/UEFI setup, usually under Boot or Security. Shut the host down gracefully first.
On Cisco UCS Manager-managed servers the setting lives in the boot policy. Set Boot Mode to UEFI and check Boot Security (UEFI Secure Boot), then associate the policy through the service profile. Cisco lists these points in its boot configuration guide:
UEFI boot mode must be enabled in the boot policy before you can use UEFI Secure Boot.
Cisco UCS Manager and the BIOS firmware must be Release 2.2 or later. User-generated encryption keys are not supported.
On UCSM-managed servers, only Cisco UCS Manager can control UEFI Secure Boot.
You cannot mix UEFI and legacy boot mode on the same server. Moving an existing legacy-BIOS ESXi install to UEFI is a separate task (see the related post below).
On vSphere 7.0 Update 2 and later, a host with an active TPM can enforce Secure Boot on every boot. This setting is separate from the firmware toggle and you manage it with ESXCLI:
esxcli system settings encryption get
   Mode: TPM
   Require Executables Only From Installed VIBs: false
   Require Secure Boot: true
If Mode shows NONE, activate the TPM in the firmware and run esxcli system settings encryption set --mode=TPM. Broadcom warns that you cannot undo this once it is set. To enforce Secure Boot, first enable it in the firmware and restart. Then run the following:
esxcli system settings encryption set --require-secure-boot=T
esxcli system settings encryption get
/bin/backup.sh 0
To turn enforcement off, use --require-secure-boot=F and run /bin/backup.sh 0 again.
“Host secure boot was disabled”: the vCenter alarm
Broadcom KB 369525 documents this condition as the Host TPM attestation alarm in the vSphere Client (vCenter 8.x, ESXi 7.x/8.x). The main cause is that vCenter sees Secure Boot disabled on a host that has a TPM. Secure Boot is a requirement for successful attestation. The alarm can also fire when host and vCenter data get out of sync after a network glitch, a restart or a new host being added. The KB resolution:
Check the current state with secureBoot.py -s.
If it’s disabled, run secureBoot.py -c. If the host is compatible, enable Secure Boot in the firmware and boot ESXi.
If Secure Boot is already enabled and the alarm stays, disconnect and reconnect the host. Then go to Monitor > Issues and Alarms and use Reset to Green on the alarm.
If Secure Boot can’t be enabled on that hardware, the KB says you can use Reset to Green to suppress the alarm.
Fixing “Secure boot CANNOT be enabled” and unsigned VIB failures
Find the blocking VIB. The -c output names the VIBs whose signatures it could not verify. Compare them with esxcli software vib list, which includes an AcceptanceLevel column.
Replace or remove it. Install the vendor’s current signed driver or add-on, or remove a VIB you no longer need. Then run -c again.
Reboot after patching. KB 319600 describes a false failure on esx-base with “Failed to verify checksum for payload btldr”. It appears when you run the check after a live VIB install but before the reboot. Reboot and check again.
Purple screen “UEFI Secure Boot failed: Failed to verify signatures of the following vibs”. TechDocs says to reboot with Secure Boot disabled, run the validation script, and check /var/log/esxupdate.log.
VIB install fails on a host that already has TPM and Secure Boot. KB 384314 covers the error “Could not find a trusted signer”. The VIB must be signed through the VMware partner program. Disabling Secure Boot is not the recommended fix.