By default, the new VMware Cloud Foundation (VCF) 9.0 Installer will validate the ESXi management interface is at a 10GbE network adaptor and it will prevent users from proceeding if the minimum link speed is not detected. This pre-check had also existed in VCF 5.x and users could bypass the […]
In this blog, with the release of VMware Cloud Foundation (VCF) 9.0, we explore three separate technical use-cases for VMware Private AI Foundation with NVIDIA. We show some of the high-level steps to achieve these use cases and give the rationale behind each one. Use Case 1: Models as a […]
For a major new vSphere release, it can be challenging to understand whether your existing hardware will continue to work or if you need to upgrade. During the development of VMware Cloud Foundation (VCF) 9.0, I had put together a survey that would crowdsource from internal users who have […]
When we assign a full GPU or part of a GPU to a VM in the vSphere Client , we use a “vGPU Profile” to achieve that. The set of vGPU profiles is fixed by the host vGPU driver based on the GPU hardware models in the servers in that cluster. Many different vGPU profiles […]
VMware Cloud Foundation (VCF) 9.0 supports two types of deployment mode for the applicable components (e.g. NSX Manager, VCF Operations, VCF Automation, etc), Simple (Single-node) or High Availability (Three-node). For Lab/Learning Purposes or Proof-of-Concepts, the Simple VCF deployment […]
After deploying the new VMware Cloud Foundation 9.0 Installer appliance, the first thing you must setup is the software depot which is where the VCF Installer will go to download the software binaries for deploying either VMware vSphere Foundation (VVF) or VMware Cloud Foundation (VCF). Users […]
The vSphere Cluster Services (vCLS) are a critical part of maintaining cluster features like vSphere DRS and HA in your VMware environment. But there might be scenarios where you need to disable vCLS on a cluster — for example, for troubleshooting or special configurations. This is where Retreat Mode comes in.
In this post, you’ll learn:
What Retreat Mode is
The impact of using it
How to enable or disable it safely across different vSphere versions
📌 What is vCLS and Retreat Mode?
vCLS deploys lightweight agent VMs in every vSphere cluster to maintain cluster services. Without these VMs, some services like vSphere DRS and HA cannot function properly in vSphere versions prior to 9.0.
Retreat Mode is a way to tell vCenter: “Stop running vCLS VMs on this cluster.” This disables vCLS for that cluster — but at a cost.
👉 Good news: Starting with vSphere 9.0, you can disable vCLS without losing DRS or HA functionality!
👉 Important for older versions: In versions before vSphere 9.0, disabling vCLS means DRS will stop working and HA placement will be suboptimal. Also, vSAN cluster health might show as degraded.
⚠️ Risks and Impacts of Retreat Mode
If you enter Retreat Mode on a cluster:
✅ vCLS VMs will be removed
❌ DRS will stop balancing workloads automatically
❌ HA can still restart VMs, but may pick less optimal hosts
❌ vSAN cluster health may show “Degraded”
Use Retreat Mode only when absolutely necessary.
🛠️ How to Enable Retreat Mode
✅ vSphere 7.0 U3o, 8.0 U2, and Later
VMware has made this easy in recent updates:
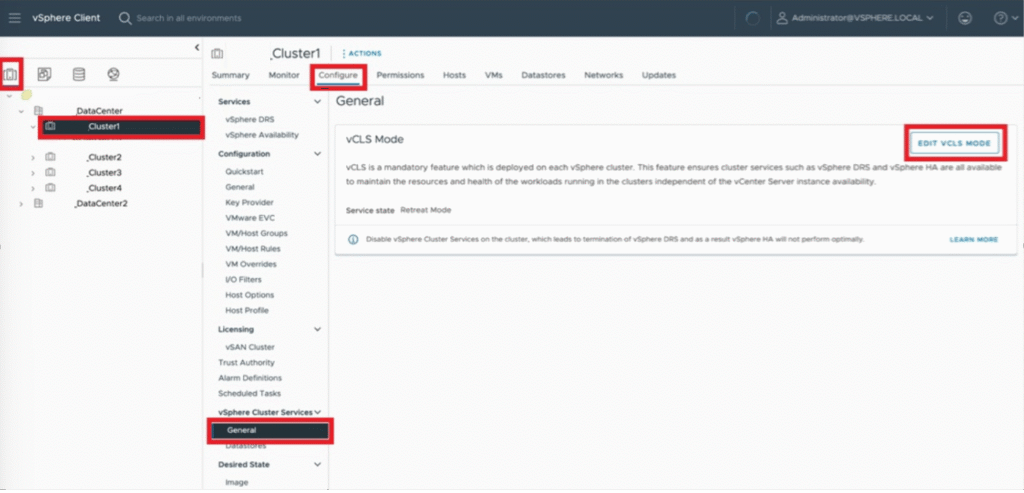
Log in to the vSphere HTML5 Client.
Go to Hosts and Clusters.
Select your cluster.
Click the Configure tab.
Under vSphere Cluster Services, click General.
Click EDIT VCLS MODE (top right).
Select Retreat Mode and click OK.
Done! The vCLS VMs will be cleaned up automatically.
✅ Older Versions (before 7.0 U3o / 8.0 U2)
This takes a few extra steps:
1️⃣ Log in to vSphere Client. 2️⃣ Go to your cluster and copy its domain ID from the URL. Example:
domain-c1006
⚠️ Only use the domain-c<number>! Using the wrong ID can break vCenter.
3️⃣ In the vCenter Server, go to Configure → Advanced Settings → Edit Settings.
One of the features that transformed how virtualization is used is vSphere vMotion. During a vMotion task, one or more VMs are migrated to a different host while still powered on and available to users. The application running in the VM is unaware of this process. The VM goes through a very […]
If you’re planning an upgrade to VMware vSphere 9.0 or just exploring which edition is the right fit for your organization, here’s a clear overview straight from the official vSphere 9.0 Product Line Comparison PDF.
In version 9.0, VMware shifts its focus:
The traditional vSphere Standard and vSphere Enterprise Plus editions are only available up to version 8 Update 3.
vSphere 9.0 capabilities are now exclusively packaged as part of VMware vSphere Foundation 9.0 and VMware Cloud Foundation 9.0.
This means new features and innovations, especially around Kubernetes integration, AI services, advanced storage architectures, and modern cloud operations, require the Foundation or Cloud Foundation bundles.
📊 Full Feature Comparison Table (Extracted and Formatted)
Below is a condensed and formatted table showing a selection of key features across the three product lines:
vSphere Standard → Ideal for small deployments with core virtualization needs.
vSphere Enterprise Plus → Full suite for automation, DRS, and powerful resource scheduling, but limited to version 8.
vSphere Foundation 9.0 → Next-gen features including Kubernetes, AI services, advanced storage architectures, compliance management, and tight integration with Cloud Foundation.
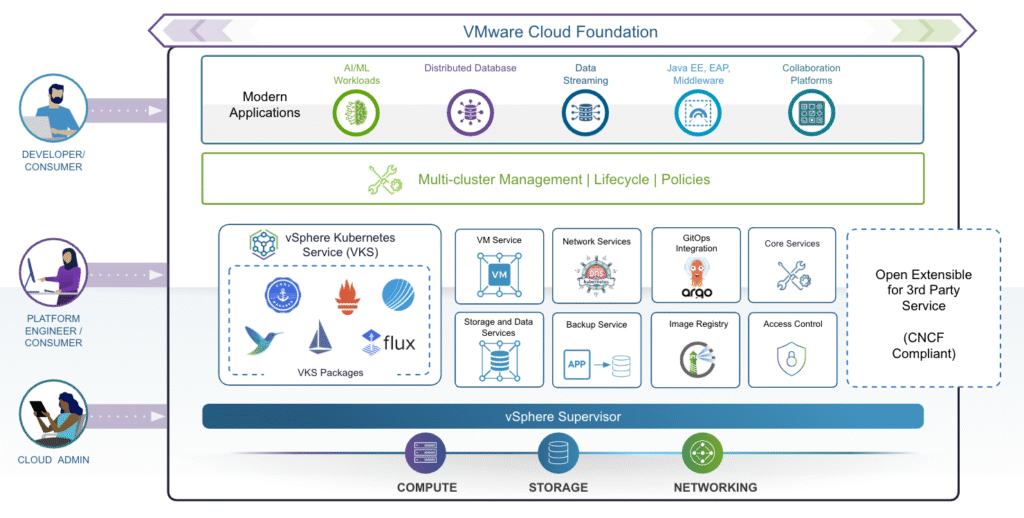
Modern IT teams are increasingly challenged to manage both traditional virtual machines (VMs) and modern Kubernetes workloads side-by-side. VMware Cloud Foundation 9.0 rises to this challenge by tightly integrating vSphere Supervisor, transforming your vSphere clusters into a robust hybrid platform for VMs and Kubernetes.
In this Hands-On Lab (HOL-2633-01-VCF-L), you’ll get guided, practical experience on how to unify VM and Kubernetes management using vSphere Supervisor, from foundational concepts to deploying real workloads.
📚 Lab Modules at a Glance
Module
Title
Duration
Level
1
What is the vSphere Supervisor?
15 min
Beginner
2
How does the vSphere Supervisor work?
30 min
Beginner
Let’s break down each module.
⚙️ Module 1: vSphere Supervisor Concepts and Components
✅ What is vSphere Supervisor?
vSphere Supervisor introduces a declarative Kubernetes control plane natively into your vSphere cluster. This means your cluster can now run:
VMs via the VM Service
Kubernetes Pods directly on ESXi hosts (as vSphere Pods)
Full upstream Kubernetes clusters using vSphere Kubernetes Service (VKS)
This hybrid model enables a consistent cloud-like experience for both traditional and modern workloads.
🔑 Key Components
vSphere Zone: Logical boundary to provide high availability. Clusters are mapped to Zones for resilience against failures.
vSphere Namespace: Think of it as a resource pool with policy-based limits (CPU, memory, storage) for workloads. It maps to Kubernetes namespaces but adds vSphere-specific governance.
Supervisor Networking: Uses either vSphere networking or NSX. Load balancers ensure external access for workloads.
Supervisor Storage: Utilizes storage policies to manage placement for VMs, Pods, persistent volumes, and container images.
🧩 Extensible Services
vSphere Supervisor comes with base services like:
VM Service
Kubernetes Service
Velero for backup
Additional services (like Grafana, Harbor, DNS, and vDPP) can be installed modularly to enhance the Supervisor’s capabilities.
🛠️ Module 2: Enabling and Configuring vSphere Supervisor
This module is all about getting your hands dirty — you’ll step through setting up vSphere Supervisor, deploying Namespaces, provisioning VMs and Kubernetes clusters, and expanding functionality with services.
⚡ Key Steps:
🔑 1️⃣ Prerequisites
Prepare clusters with vSAN or shared storage.
Define storage policies for control plane, VMs, Pods, and VKS clusters.
🔑 2️⃣ Enable vSphere Supervisor
Connect to the Management vCenter.
Create vSphere Zones for high availability.
Use the wizard to configure networking (NSX or vSphere stack), management network, and workload network.
Select control plane size and storage policy.
(Note: The lab walks through these steps but does not deploy a live Supervisor due to time constraints.)
🔑 3️⃣ Deploy & Configure a Namespace
Create a new Namespace and bind it to the Supervisor.
Assign VM Classes (defining VM sizing options).
Attach storage policies for workloads.
Create and associate a Content Library to provide VM templates.
🔑 4️⃣ Deploy Workloads
Deploy a VM using the VM Service and Consumption Interface.
Attach persistent storage and a Load Balancer.
Deploy a Kubernetes cluster (VKS) by specifying node pools and cluster config.
Validate external access via network service cards.
🔑 5️⃣ Add Services
Expand functionality by uploading YAMLs to register services like Grafana, Harbor, etc.
🎓 Summary
✔️ Unified Operations: Manage VMs and Kubernetes side-by-side in the same cluster with consistent policies. ✔️ Self-Service for DevOps: Namespaces, storage, and VM classes empower developers with agility. ✔️ Resilience and Scalability: Zones and Supervisor Services ensure HA and modularity.