Modern IT teams are increasingly challenged to manage both traditional virtual machines (VMs) and modern Kubernetes workloads side-by-side. VMware Cloud Foundation 9.0 rises to this challenge by tightly integrating vSphere Supervisor, transforming your vSphere clusters into a robust hybrid platform for VMs and Kubernetes.
In this Hands-On Lab (HOL-2633-01-VCF-L), you’ll get guided, practical experience on how to unify VM and Kubernetes management using vSphere Supervisor, from foundational concepts to deploying real workloads.
📚 Lab Modules at a Glance
| Module | Title | Duration | Level |
|---|---|---|---|
| 1 | What is the vSphere Supervisor? | 15 min | Beginner |
| 2 | How does the vSphere Supervisor work? | 30 min | Beginner |
Let’s break down each module.
⚙️ Module 1: vSphere Supervisor Concepts and Components
✅ What is vSphere Supervisor?
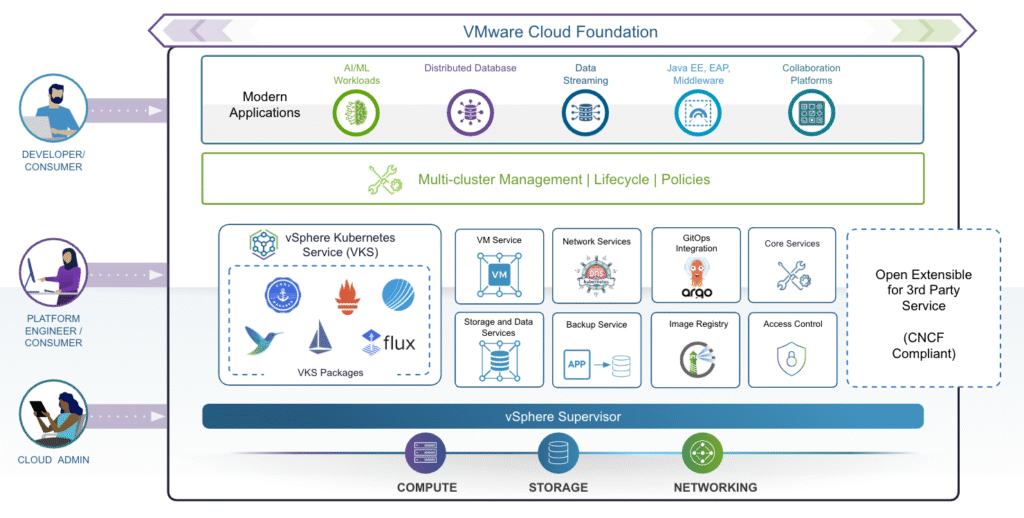
vSphere Supervisor introduces a declarative Kubernetes control plane natively into your vSphere cluster. This means your cluster can now run:
- VMs via the VM Service
- Kubernetes Pods directly on ESXi hosts (as vSphere Pods)
- Full upstream Kubernetes clusters using vSphere Kubernetes Service (VKS)
This hybrid model enables a consistent cloud-like experience for both traditional and modern workloads.
🔑 Key Components
- vSphere Zone: Logical boundary to provide high availability. Clusters are mapped to Zones for resilience against failures.
- vSphere Namespace: Think of it as a resource pool with policy-based limits (CPU, memory, storage) for workloads. It maps to Kubernetes namespaces but adds vSphere-specific governance.
- Supervisor Networking: Uses either vSphere networking or NSX. Load balancers ensure external access for workloads.
- Supervisor Storage: Utilizes storage policies to manage placement for VMs, Pods, persistent volumes, and container images.
🧩 Extensible Services
vSphere Supervisor comes with base services like:
- VM Service
- Kubernetes Service
- Velero for backup
Additional services (like Grafana, Harbor, DNS, and vDPP) can be installed modularly to enhance the Supervisor’s capabilities.
🛠️ Module 2: Enabling and Configuring vSphere Supervisor
This module is all about getting your hands dirty — you’ll step through setting up vSphere Supervisor, deploying Namespaces, provisioning VMs and Kubernetes clusters, and expanding functionality with services.
⚡ Key Steps:
🔑 1️⃣ Prerequisites
- Prepare clusters with vSAN or shared storage.
- Define storage policies for control plane, VMs, Pods, and VKS clusters.
🔑 2️⃣ Enable vSphere Supervisor
- Connect to the Management vCenter.
- Create vSphere Zones for high availability.
- Use the wizard to configure networking (NSX or vSphere stack), management network, and workload network.
- Select control plane size and storage policy.
(Note: The lab walks through these steps but does not deploy a live Supervisor due to time constraints.)
🔑 3️⃣ Deploy & Configure a Namespace
- Create a new Namespace and bind it to the Supervisor.
- Assign VM Classes (defining VM sizing options).
- Attach storage policies for workloads.
- Create and associate a Content Library to provide VM templates.
🔑 4️⃣ Deploy Workloads
- Deploy a VM using the VM Service and Consumption Interface.
- Attach persistent storage and a Load Balancer.
- Deploy a Kubernetes cluster (VKS) by specifying node pools and cluster config.
- Validate external access via network service cards.
🔑 5️⃣ Add Services
- Expand functionality by uploading YAMLs to register services like Grafana, Harbor, etc.
🎓 Summary
✔️ Unified Operations: Manage VMs and Kubernetes side-by-side in the same cluster with consistent policies.
✔️ Self-Service for DevOps: Namespaces, storage, and VM classes empower developers with agility.
✔️ Resilience and Scalability: Zones and Supervisor Services ensure HA and modularity.