Vulnerability in the VMware Directory Service (vmdir) (CVE-2020-3952) – VMSA-2020-0006

On April 9th, 2020 VMSA-2020-0006 was published. This advisory documents a critical severity sensitive information disclosure vulnerability identified by CVE-2020-3952.

Affected versions

The vulnerability received a CVSSv3 score of 10 out of 10. Which means this is a very serious security issue. Response matrix is VMSA-2020-0006.

How I can check it?

Additional Documentation for VMSA-2020-0006: Determining if a vCenter 6.7 deployment w/embedded or external Platform Services Controller (PSC) is affected by CVE-2020-3952 (78543)

https://kb.vmware.com/s/article/78543

Virtual Appliance Log File Location: /var/log/vmware/vmdird/vmdird-syslog.log or in /var/log/vmware/vmdird/vmdird-syslog.log.*.gz

zgrep "ACL" /var/log/vmware/vmdird/*.gz
/var/log/vmware/vmdird/vmdird-syslog.log.x.gz:2020-xx-xxTxxxxxx+00:00 info vmdird t@xxxxxx: ACL MODE: Legacy

Notes from KB:

  • In order to be affected by CVE-2020-3952, a deployment must meet 2 criteria. First, it must be a 6.7 deployment prior to 6.7u3f. Second, it must be running in legacy ACL mode.
  • Because the ACL MODE: Legacy log entry is only thrown at vmdir startup,  it is possible that it will be absent due to log file rollover even on affected deployments.
  • The ACL MODE: Legacy log entry will still be thrown after upgrading to 6.7u3f and/or 7.0 even though CVE-2020-3952 is resolved in these releases.

Path it NOW ! – PoC was published !

It is recommended to block any access over the LDAP port (389) except for administrative use.

Clean installations of vCenter Server 6.7 (embedded or external PSC) are not affected.

vCenter Server 6.7 (embedded or external PSC) prior to 6.7u3f is affected by CVE-2020-3952 if it was upgraded from a previous release line such as 6.0 or 6.5.

Path it ASAP because:

  • On April 15th, 2020 was relased information about How to reconstructed the faulty code flow that led to this vulnerability.

How to fix? The CPU in this host is not supported by ESXi 7.0.0. -> allowLegacyCPU=True

Thank You William for these Quick Tip.

On my HomeLAB I have older server with NOT supported CPU for ESXi 7.0. During install I had an error:

The CPU in this host is not supported by ESXi 7.0.0.

CPU_SUPPORT ERROR:
The CPU in this host is not supported by ESXi
7.0.0. Please refer to the VMware Compatibility Guide (VCG) for
the list of supported CPUs.
Only possibilty is F11 Reboot.

FIX – The CPU in this host may not be supported in future ESXi releases …

It could be fix during boot SHIFT-O:

allowLegacyCPU=True
SHIFT-O will open options for boot:
With adding > allowLegacyCPU=True. Installer will convert an error to a warning.
Now we have only Warning – Enter will continue.
CPU_SUPPORT WARNING:
The CPU in this host is not supported by ESXi
7.0.0. Please refer to the VMware Compatibility Guide (VCG) for
the list of supported CPUs.

\UPGRADE\PRECHECK.PY

On ISO image VMware-VMvisor-Installer-7.0.0-15843807.x86_64.iso is \UPGRADE\PRECHECK.PY script which is checking it during instalation.

On line 1720 we could see our solution allowLegacyCPU = True

Disclaimer: This is not officially supported by VMware and you run on your own risk.

Automated vSphere 7 and vSphere with Kubernetes…

Automated vSphere 7 and vSphere with Kubernetes Lab Deployment Script

Automated vSphere 7 and vSphere with Kubernetes…

I know many of you have been asking me about my vSphere with Kubernetes automation script which I had been sharing snippets of on Twitter. For the past couple of weeks, I have been hard at work making the required changes between the vSphere 7 Beta and GA workflows, some additional testing and of course […]


VMware Social Media Advocacy

vSphere Lifecycle Manager Convert Baselines -> Image

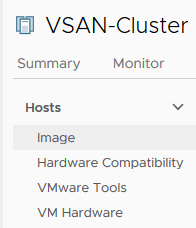
After sucessfull ESXi 7.0 upgrade. We can start using vSphere Lifecycle Manager and convert VUM Baselines -> vLCM Image.

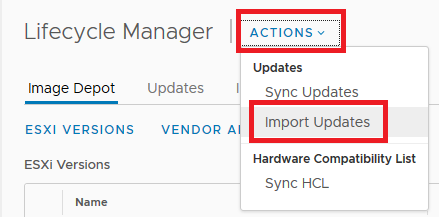
ACTION – Import Updates
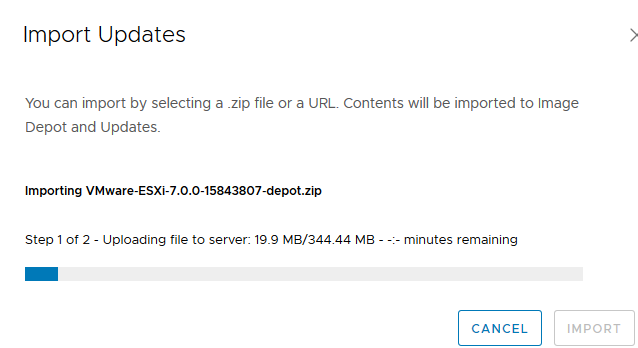
Import VMware-ESXi-7.0.0-15843807-depot.zip
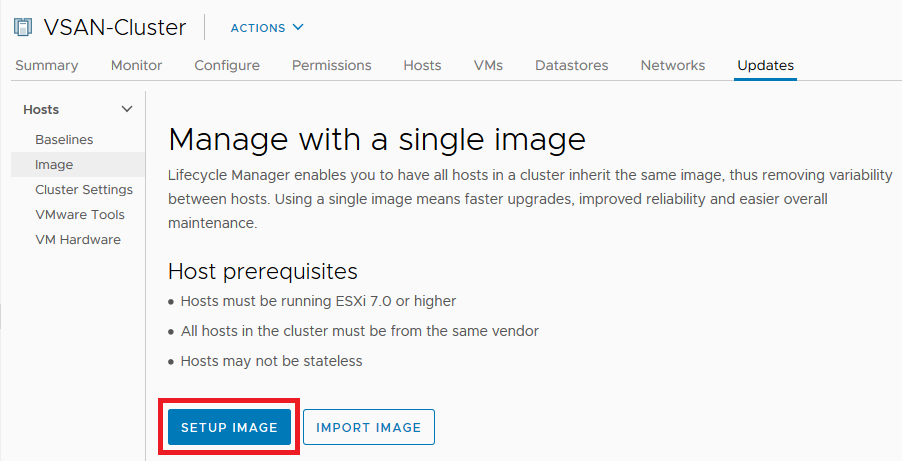
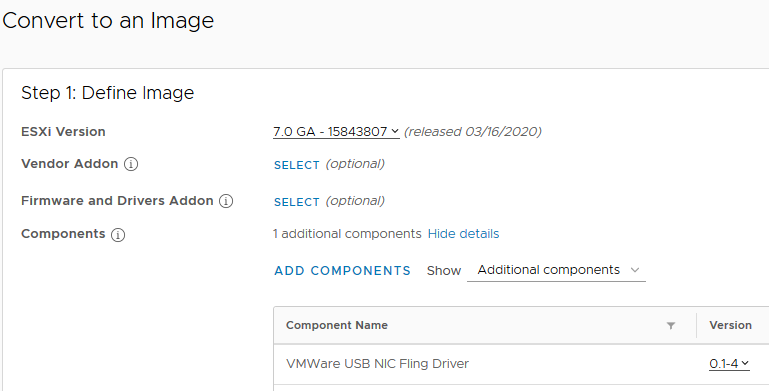
We start with SETUP IMAGE
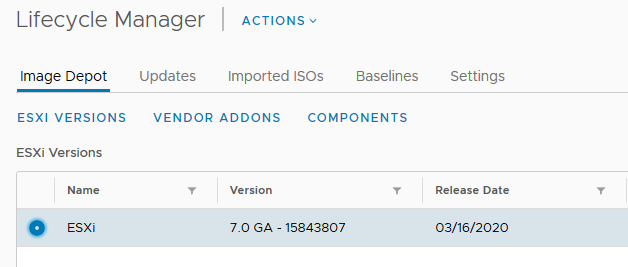
– Select ESXi version
– ADD COMPONENTS – example VMWare USB NIC Fling Driver
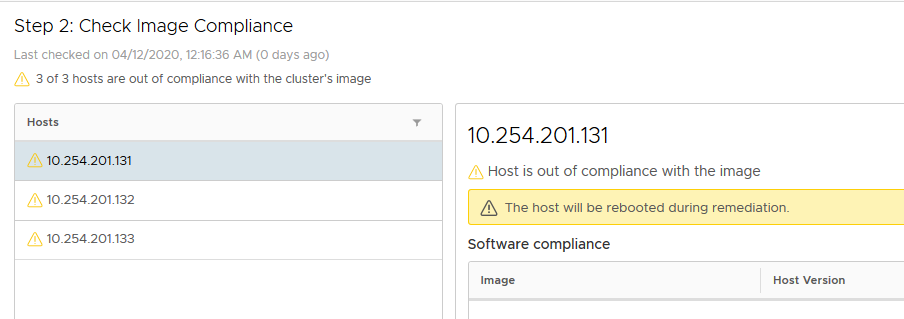
Check Step 2
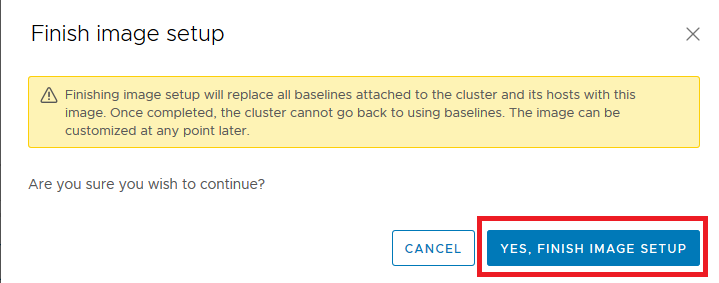
FINISH IMAGE SETUP with YES
Baselines menu disapear …
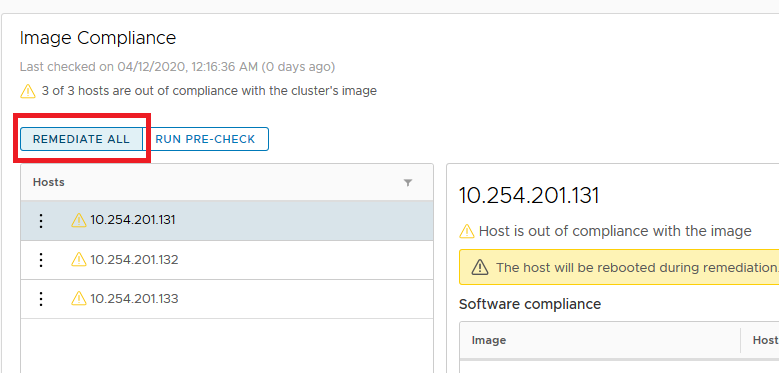
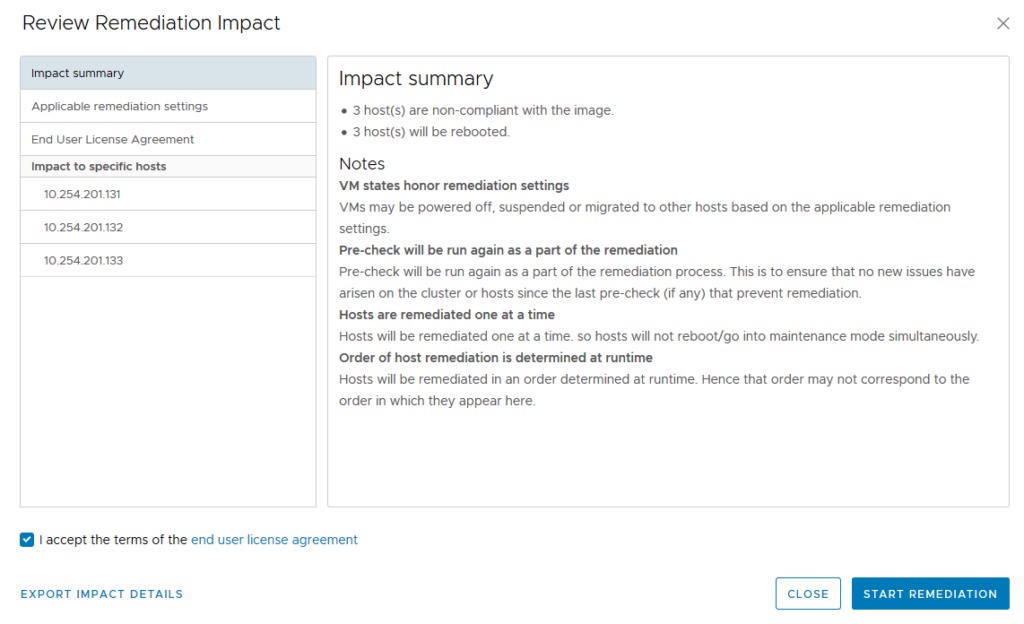
REMEDIATE ALL – start dialog
START REMETIATION will install our example VMWare USB NIC Fling Driver

VMware Introduces NSX-T 3.0

VMware Introduces NSX-T 3.0

We are excited to announce the general availability of VMware NSX-T™ 3.0, a major release of our full stack Layer 2 to Layer 7 networking platform that offers virtual networking, security, load balancing, visibility, and analytics in a single platform. NSX-T 3.0 includes key innovations across cloud-scale networking, security, containers, and operations that help enterprises achieve one-click public cloud experience wherever their workloads are deployed. As enterprises adopt cloud,…Read More


VMware Social Media Advocacy

How to Configure vSphere 6.7 Proactive HA with Cisco UCS Manager Plugin for VMware vSphere?

I wrote in previous blog latest Cisco UCS Manager Plugin is working with vCenter 6.7 U3b.

Install Cisco UCS Manager Plugin

vSphere Web Client – Enable Proactive HA

From vSphere Web Client -> Cluster Properties -> Configure -> vSphere Availability -> Proactive HA is Turned OFF – Click on Edit. You can notice vSphere Proactive HA is disabled by default.

  • Automation Level – Determine whether host quarantine or maintenance mode and VM migrations are recommendations or automatic.
    • Manual – vCenter Server suggests migration recommendations for virtual machines.
    • Automated – Virtual machines are migrated to healthy hosts and degraded hosts are entered into quarantine or maintenance mode depending on the configured Proactive HA automation level.
  • Remediation – Determine what happens to partially degraded hosts.
    • Quarantine mode – for all failures. Balances performance and availability, by avoiding the usage of partially degraded hosts provided that virtual machine performance is unaffected.
    • Mixed mode – Quarantine mode for moderate and Maintenance mode for severe failure (Mixed). Balances performance and availability, by avoiding the usage of moderately degraded hosts provided that virtual machine performance is unaffected. Ensures that virtual machines do not run on severely failed hosts.
    • Maintenance mode – for all failures. Ensures that virtual machines do not run on partially failed hosts.
Best options is Automated + Mixed Mode
Select Cisco UCS Provider – NOT Block Failure Conditions

How is Proactive HA working?

With settings Automatic Level – Automated and Remediation – Mixed Mode after HW Failure. Proactive HA is Entering Host Into Quarantine Mode and Migrate all VMs from ESXi with HW Failure:

After 4:10 mintes Proactive HA migrated all VMs from ESXi host with failure.

vSphere 6 Update Manager -> vSphere 7 Lifecycle Manager : upgrade ESXi 6.7 to ESXi 7

vSphere Update Manager – vSphere 6

In vSphere 6 we can use various methods and tools to deploy ESXi hosts and maintain their software lifecycle.

To deploy and boot an ESXi host, you can use an ESXi installer image or VMware vSphere® Auto Deploy™. The availability of choice options results in two different underlying ESXi platforms:

  • Using vSphere Auto Deploy – stateless mode
  • Using an installer ESXi image – statefull mode

vSphere Lifecycle Manager Images: A Single Platform, Single Tool, Single Workflow

By introducing the concept of images, vSphere Lifecycle Manager provides a unified platform for ESXi lifecycle management.
You can use vSphere Lifecycle Manager for stateful hosts only, but starting with vSphere 7.0, you can convert the Auto Deploy-based stateless hosts into stateful hosts, which you can add to clusters that you manage with vSphere Lifecycle Manager images.

How to Upgrade ESXi 6.7 to 7 with vSphere Lifecycle Manager?

After upgrade VCSA 7.0, We prepare upgrade for ESXi 6.7. It is simular logic like in vSphere Update Manager:

IMPORT ISO – We can upload ISO for example VMware-VMvisor-Installer-7.0.0-15843807.x86_64.iso
Step 1 of 2 – Uploading file to server
Step 2 of 2 – Adding to repository
After ISO upload We could check ISO image context
Next step is Create Baseline
Create Baseline – for ISO image
Select uploaded ISO image
Check summary
On Targer Cluster We attach our Baseline
Select ESXi 7 Baseline
– Check Compliance
– We can see Non-compliant for 3x ESXi host
REMEDIATE will start upgrade dialoge
It is necessary accept EULA
REMEDIATE will start ESXi 7 upgrade
In Recent Task We caould chek progress.
We can check ESXi 7.0 upgrade result.

How to Get vSphere with Kubernetes

How to Get vSphere with Kubernetes

How to Get vSphere with Kubernetes

We’re very excited to announce the general availability of vSphere 7 today! It caps off a massive across-the-board effort by the many engineering teams within VMware. We have built a ton of new capabilities into vSphere 7, including drastically improved lifecycle management, many new security features, and broader application focus and support. But of course, The post How to Get vSphere with Kubernetes appeared first on VMware vSphere Blog.


VMware Social Media Advocacy

Cisco UCS M5 Boot Time Enhancements

How to speedup BOOT time in Cisco UCS M5?

Adaptive Memory Training drop-down list

When this token is enabled, the BIOS saves the memory training results (optimized timing/voltage values) along with CPU/memory configuration information and reuses them on subsequent reboots to save boot time. The saved memory training results are used only if the reboot happens within 24 hours of the last save operation. This can be one of the following:

  • Disabled—Adaptive Memory Training is disabled.
  • Enabled—Adaptive Memory Training is enabled.
  • Platform Default—The BIOS uses the value for this attribute contained in the BIOS defaults for the server type and vendor.

BIOS Techlog Level

Enabling this token allows the BIOS Tech log output to be controlled at more a granular level. This reduces the number of BIOS Tech log messages that are redundant, or of little use. This can be one of the following:

This option denotes the type of messages in BIOS tech log file. The log file can be one of the following types:

  • Minimum – Critical messages will be displayed in the log file.
  • Normal – Warning and loading messages will be displayed in the log file.
  • Maximum – Normal and information related messages will be displayed in the log file.

Note: This option is mainly for internal debugging purposes.

Note: To disable the Fast Boot option, the end user must set the following tokens as mentioned below:

OptionROM Launch Optimization

The Option ROM launch is controlled at the PCI Slot level, and is enabled by default. In configurations that consist of a large number of network controllers and storage HBAs having Option ROMs, all the Option ROMs may get launched if the PCI Slot Option ROM Control is enabled for all. However, only a subset of controllers may be used in the boot process. When this token is enabled, Option ROMs are launched only for those controllers that are present in boot policy. This can be one of the following:

  • Disabled—OptionROM Launch Optimization is disabled.
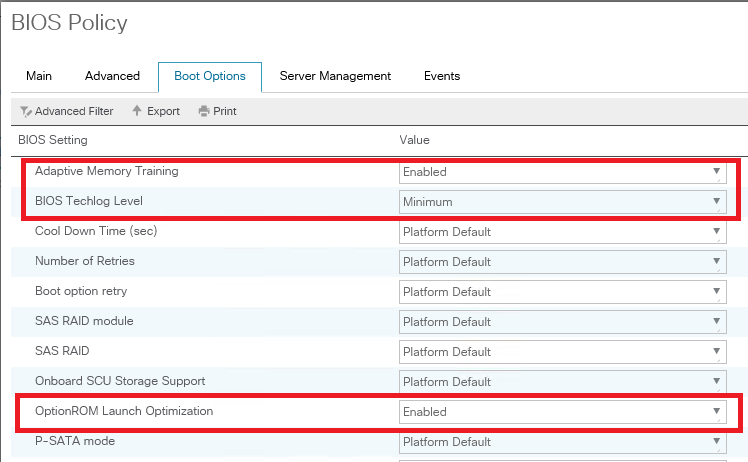
  • Enabled—OptionROM Launch Optimization is enabled.
  • Platform Default—The BIOS uses the value for this attribute contained in the BIOS defaults for the server type and vendor.

Results

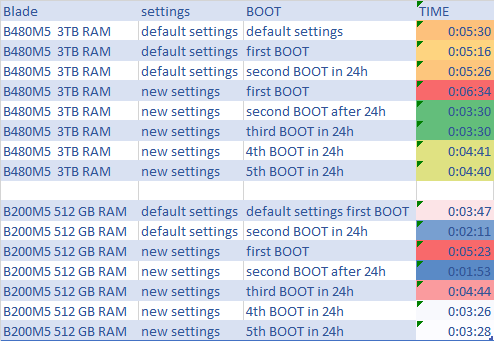
First BOOT after New settings is longer about 1-2 minutes.

Then We can save about 2 minutes on each BOOT from Second BOOT with 3TB RAM B480M5:

A first look at vSphere with Kubernetes in action

A first look at vSphere with Kubernetes in action

A first look at vSphere with Kubernetes in action

In my previous post on VCF 4.0, we looked at the steps involved in deploying vSphere with Kubernetes in a Workload Domain (WLD). When we completed that step, we had rolled out the Supervisor Control Plane VMs, and installed the Spherelet components which allows our ESXi hosts to behave as Kubernetes worker nodes. Let’s now take a closer look at that configuration, and I will show you a few simple Kubernetes operations to get you started on the Supervisor Cluster in vSphere with Kubernetes….Read More


VMware Social Media Advocacy