Daniel Micanek virtual Blog – Like normal Dan, but virtual.
Category: AI
Welcome to the AI category of my blog, where we delve into the rapidly evolving world of Artificial Intelligence. Here, I explore the latest AI trends, breakthroughs, and applications shaping our future. Whether you’re a tech enthusiast, a seasoned developer, or simply curious about AI, our posts aim to enlighten and inspire.
When planning to deploy a chatbot or simple Retrieval-Augmentation-Generation (RAG) pipeline on VMware Private AI Foundation with NVIDIA (PAIF-N) [1], you may have questions about sizing (capacity) and performance based on your existing GPU resources or potential future GPU acquisitions. For […]
Install llama.cpp, get a GGUF model from Hugging Face and run Llama 2 or newer models locally on CPU or NVIDIA GPU, with the current 2026 commands.
Short answer: the fastest way to run Llama 2 locally today is llama.cpp with a GGUF model file. Install llama.cpp (prebuilt release, Docker, or build from source with CMake), then run llama-cli -hf TheBloke/Llama-2-7B-Chat-GGUF: it downloads the Q4_K_M quantized model from Hugging Face and starts a chat. Add -ngl all to offload layers to an NVIDIA GPU. You no longer need Meta’s download script, convert.py or make.
Updated September 2026. The original 2023 version of this guide used commands that no longer exist in llama.cpp. The steps below follow the current ggml-org/llama.cpp documentation. A table mapping the old commands to the new ones is at the end.
What you need
OS: Linux, Windows (native or WSL 2) or macOS.
Memory: a 4-bit (Q4_K_M) Llama 2 7B GGUF file is about 4 GB, so plan for at least 8 GB of RAM or VRAM for the 7B model, and more for 13B and 70B.
GPU (optional): an NVIDIA GPU with the CUDA toolkit for the CUDA backend. Vulkan, Metal (Apple Silicon) and plain CPU also work.
To build from source: Git, CMake and a C/C++ compiler (on Windows, Visual Studio 2022 with the C++ workload).
Prebuilt binaries from the GitHub releases page. This is the easiest option on Windows: pick the archive that matches your backend (CPU, CUDA, Vulkan).
Docker, for example the ghcr.io/ggml-org/llama.cpp:server-cuda image for an NVIDIA GPU server.
Build from source with CMake (below). Use this when you need a specific CUDA version or GPU architecture, as with a homelab Tesla P40.
The binaries (llama-cli, llama-server, llama-quantize, llama-bench and others) end up in build/bin. On Windows, run the commands from the Developer Command Prompt for VS 2022. With the Visual Studio generator, the binaries are in build\bin\Release.
To build only for your GPU (a faster build and a smaller binary), set the compute capability explicitly. For example, -DCMAKE_CUDA_ARCHITECTURES="86;89" covers RTX 30xx and 40xx. For a Tesla P40 (Pascal, compute capability 6.1), use -DCMAKE_CUDA_ARCHITECTURES=61 and a CUDA 12.x toolkit, because CUDA 13 dropped support for Pascal GPUs. My Tesla P40 homelab article covers ESXi passthrough and benchmarks, and CUDA support for WSL 2 explains the WSL setup.
Step 2: Get a Llama 2 model in GGUF format
llama.cpp loads models in the GGUF format, with quantization from 1.5-bit to 8-bit. You have two options.
Option A: download a ready GGUF (recommended). The -hf flag downloads a model straight from Hugging Face and caches it. The quant tag is optional and defaults to Q4_K_M:
Option B: convert the original Meta weights yourself. The official meta-llama/Llama-2-7b-chat-hf repository on Hugging Face is gated: accept Meta’s license on the model page, then set an access token in HF_TOKEN. Convert the model to GGUF and quantize it:
./build/bin/llama-cli -m llama-2-7b-chat-Q4_K_M.gguf -ngl all -c 4096
-ngl (--n-gpu-layers) sets how many layers go to VRAM: a number, auto (the default) or all. Lower it if you run out of GPU memory.
-c sets the context size. Llama 2 was trained with a 4,096-token context.
-sys "You are a helpful assistant" sets a system prompt. --list-devices shows which GPUs llama.cpp can use.
Newer releases also include a unified llama launcher, so llama cli and llama serve do the same as the standalone binaries.
OpenAI-compatible API server
./build/bin/llama-server -m llama-2-7b-chat-Q4_K_M.gguf -ngl all --host 0.0.0.0 --port 8080
llama-server provides a built-in web UI at http://<host>:8080 and an OpenAI-compatible /v1/chat/completions endpoint, so existing OpenAI client libraries and tools can use your local model:
curl http://localhost:8080/v1/chat/completions \
  -H "Content-Type: application/json" \
  -d '{"messages":[{"role":"user","content":"Explain vSphere HA in two sentences."}]}'
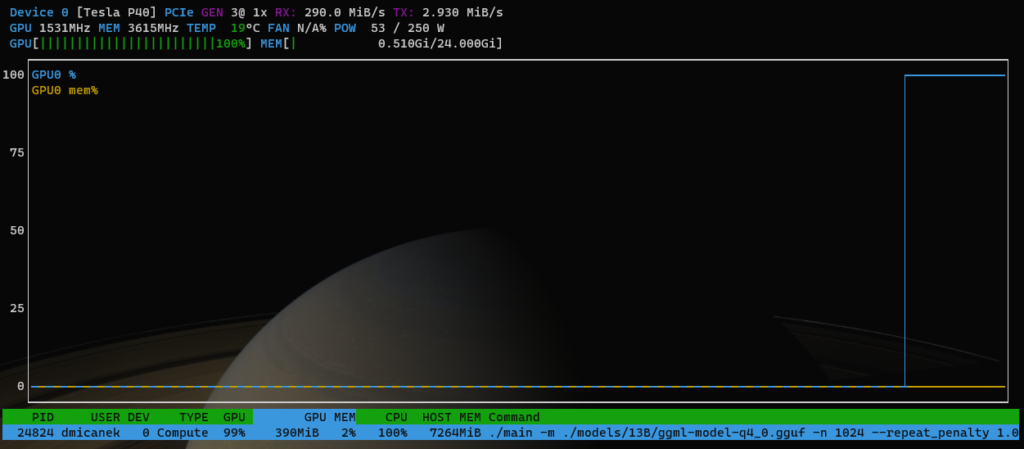
While the model runs, you can watch GPU utilisation and VRAM use with nvtop or nvidia-smi:
Install Llama 2 on Windows
On Windows you have two options. The first is to download the CUDA or CPU build from the releases page, unzip it and run llama-cli.exe -hf TheBloke/Llama-2-7B-Chat-GGUF from PowerShell. The second is to use WSL 2 with the NVIDIA Windows driver and follow the Linux steps above. For a source build, use the Developer Command Prompt for VS 2022.
Llama 2 still works well for learning and testing. For new projects, compare it with newer open-weight models on Hugging Face, since the same -hf workflow runs any GGUF model.
Tesla P40 specs (24 GB GDDR5, 250 W, 10.5-inch dual slot, compute 6.1), cooling and ESXi passthrough setup, llama.cpp benchmarks, and CUDA 13 limits.
Short answer: the NVIDIA Tesla P40 is a 2016 Pascal data-center GPU with 24 GB GDDR5, a 250 W power limit and a dual-slot, 10.5-inch PCIe Gen3 card with no fan of its own. It’s one of the cheapest ways to get 24 GB of VRAM for local LLMs in a homelab. It runs fine with ESXi PCIe passthrough and in my tests was 16–26× faster than the CPU in llama.cpp. The catch in 2026: CUDA 13 no longer targets Pascal, so you stay on CUDA 12.x.
Tesla P40 specifications
Architecture / GPU
Pascal, GP102
CUDA cores
3,840
Compute capability
6.1
Memory
24 GB GDDR5, 384-bit
Max power
250 W
Form factor
Dual-slot, 10.5-inch, full height, PCI Express Gen3 x16
Cooling
No fan: designed for server airflow
INT8 inference
47 TOPS
Source: NVIDIA Tesla P40 datasheet; compute capability as reported by CUDA in the benchmark output below.
Why I picked the P40
For Private AI in HomeLAB, I was searching for budget-friendly GPUs with a minimum of 24GB RAM. Recently, I came across the refurbished NVIDIA Tesla P40 on eBay, which boasts some intriguing specifications:
GPU Chip: GP102
Cores: 3840
TMUs: 240
ROPs: 96
Memory Size: 24 GB
Memory Type: GDDR5
Bus Width: 384 bit
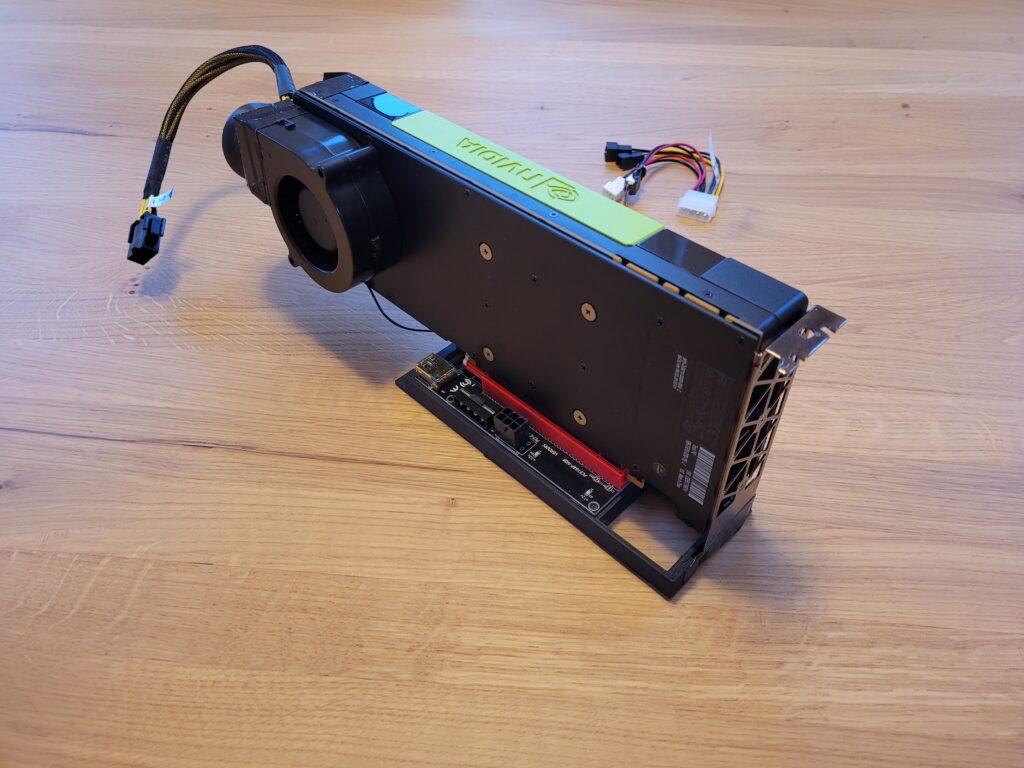
Fitting and cooling the P40 in a homelab
Since the NVIDIA Tesla P40 comes in a full-profile form factor, we needed to acquire a PCIe riser card.
A PCIe riser card, commonly known as a “riser card,” is a hardware component essential in computer systems for facilitating the connection of expansion cards to the motherboard. Its primary role comes into play when space limitations or specific orientation requirements prevent the direct installation of expansion cards into the PCIe slots on the motherboard.
Furthermore, I needed to ensure adequate cooling, but this posed no issue. I utilized a 3D model created by MiHu_Works for a Tesla P100 blower fan adapter, which you can find at this link: Tesla P100 Blower Fan Adapter.
As for the fan, the Titan TFD-B7530M12C served the purpose effectively. You can find it on Amazon: Titan TFD-B7530M12C.
ESXi PCIe passthrough settings
Currently, I am using a single VM with PCIe pass-through. However, it was necessary to implement specific Advanced VM parameters:
Now, you might wonder about the performance. It’s outstanding, delivering speeds up to 16x-26x times faster than the CPU. To provide you with an idea of the performance, I conducted a llama-bench test:
Feel free to explore this setup for your Private AI in HomeLAB.
Is the Tesla P40 still worth it in 2026?
CUDA: CUDA Toolkit 13.0 removed offline compilation and library support for Maxwell, Pascal and Volta. You can keep building for the P40 with CUDA 12.x, but newer toolkits can’t target it (CUDA 13.1 release notes).
Still good for: running quantized models that need a lot of VRAM on a budget, where 24 GB matters more than raw speed.
Plan for: power (250 W) and your own airflow, because the card has no fan.
Convert a Dell H200A to an H200I so it fits the R610/R710 dedicated storage slot and frees a PCIe slot, e.g. for an NVIDIA Tesla P40.
For my project involving the AI tool llama.cpp, I needed to free up a PCI slot for an NVIDIA Tesla P40 GPU. I found an excellent guide and a useful video from ArtOfServer.
Based on this helpful video from ArtOfServer:
ArtOfServer wrote a small tutorial on how to modify an H200A (external) into an H200I (internal) to be used into the dedicated slot (e.g. instead of a Perc6i)
ArtOfServer wrote a small tutorial on how to modify an H200A (external) into an H200I (internal) to be used into the dedicated slot (e.g. instead of a Perc6i)
Install compiler and build tools (those can be removed later)
# apt install build-essential unzip
Compile and install lsirec and lsitool
# mkdir lsi
# cd lsi
# wget https://github.com/marcan/lsirec/archive/master.zip
# wget https://github.com/exactassembly/meta-xa-stm/raw/master/recipes-support/lsiutil/files/lsiutil-1.72.tar.gz
# tar -zxvvf lsiutil-1.72.tar.gz
# unzip master.zip
# cd lsirec-master
# make
# chmod +x sbrtool.py
# cp -p lsirec /usr/bin/
# cp -p sbrtool.py /usr/bin/
# cd ../lsiutil
# make -f Makefile_Linux
# lsirec 0000:05:00.0 unbind
Trying unlock in MPT mode...
Device in MPT mode
Kernel driver unbound from device
# lsirec 0000:05:00.0 halt
Device in MPT mode
Resetting adapter in HCB mode...
Trying unlock in MPT mode...
Device in MPT mode
IOC is RESET
Read sbr:
# lsirec 0000:05:00.0 readsbr h200.sbr
Device in MPT mode
Using I2C address 0x54
Using EEPROM type 1
Reading SBR...
SBR saved to h200.sbr
Transform binary sbr to text file:
# sbrtool.py parse h200.sbr h200.cfg

Modify PID in line 9 (e.g using vi or vim):
from this:
SubsysPID = 0x1f1c
to this:
SubsysPID = 0x1f1e

Important: if in the cfg file you find a line with:
SASAddr = 0xfffffffffffff
remove it!
Save and close file.
Build new sbr file:
# sbrtool.py build h200.cfg h200-int.sbr
Write it back to card:
# lsirec 0000:05:00.0 writesbr h200-int.sbr
Device in MPT mode
Using I2C address 0x54
Using EEPROM type 1
Writing SBR...
SBR written from h200-int.sbr
Reset the card an rescan the bus:
# lsirec 0000:05:00.0 reset
Device in MPT mode
Resetting adapter...
IOC is RESET
IOC is READY
# lsirec 0000:05:00.0 info
Trying unlock in MPT mode...
Device in MPT mode
Registers:
DOORBELL: 0x10000000
DIAG: 0x000000b0
DCR_I2C_SELECT: 0x80030a0c
DCR_SBR_SELECT: 0x2100001b
CHIP_I2C_PINS: 0x00000003
IOC is READY
# lsirec 0000:05:00.0 rescan
Device in MPT mode
Removing PCI device...
Rescanning PCI bus...
PCI bus rescan complete.
CUDA on WSL2: Windows NVIDIA driver only, cuda-toolkit from the WSL-Ubuntu repo (13.3.1) or Ubuntu repo (13.4), nvidia-smi checks and fixes.
Short answer: CUDA in WSL2 needs exactly one driver: the normal NVIDIA driver on Windows. Windows exposes it inside WSL2 as libcuda.so, so you never install a Linux NVIDIA driver in the distro. Update WSL with wsl.exe --update. Inside Ubuntu, install only the cuda-toolkit-X-Y package. NVIDIA’s WSL-Ubuntu repository or the regular Ubuntu repository both work. Then check with nvidia-smi and deviceQuery. Never install the cuda, cuda-X-Y or cuda-drivers meta-packages.
I first wrote this in 2023 for CUDA 12.3, when I was testing Llama 2 on my notebook. This version is updated for September 2026 and checked against the NVIDIA CUDA on WSL User Guide (13.4 docs), the NVIDIA download pages and Microsoft Learn.
How CUDA in WSL2 works
Windows side: a GeForce or NVIDIA RTX/Quadro Windows driver. NVIDIA says R495 and later support CUDA on WSL 2, and it recommends the latest production driver. For CUDA 13.x toolkits, the release notes require driver branch R580 or newer (minor-version compatibility). CUDA 13.3 corresponds to the R610 branch.
Linux side: the Windows driver is stubbed into WSL2 as libcuda.so, and the WSL tools live in /usr/lib/wsl/lib/. NVIDIA is explicit: do not install any Linux display driver in WSL.
Toolkit: you only need it to build CUDA code. Existing Linux CUDA binaries built for the same GPU run unchanged.
Hardware: Pascal or newer GeForce and Quadro/RTX GPUs in WDDM mode. Maxwell is not officially supported. Quadro GPUs in TCC mode and Tesla GPUs are not supported on WSL 2 either, so a Tesla P40 belongs in a server with passthrough, not in WSL.
Install CUDA on WSL2 step by step
Install the latest NVIDIA Windows driver from nvidia.com/Download. Do not install any driver inside WSL.
In PowerShell, install or update WSL: wsl.exe --install, then wsl.exe --update.
Check the WSL kernel with wsl cat /proc/version. Microsoft asks for 5.10.43.3 or higher. NVIDIA’s minimum is 4.19.121, and it recommends 5.10.16.3 or later.
Open Ubuntu (wsl.exe) and check that the GPU is visible: nvidia-smi.
Install the CUDA toolkit using one of the two options below.
If the repository was added years ago, NVIDIA’s guide says to remove the old signing key first:
sudo apt-key del 7fa2af80
Install the CUDA toolkit in WSL2 (WSL-Ubuntu package)
This is NVIDIA’s recommended option. The WSL-Ubuntu installer contains no Linux GPU driver, so it cannot overwrite the libcuda.so stub. In September 2026, the newest WSL-Ubuntu build on NVIDIA’s site is CUDA 13.3 Update 1 (download archive, target Linux / x86_64 / WSL-Ubuntu / 2.0). The current CUDA 13.4.2 downloads page no longer lists a WSL-Ubuntu target. These are NVIDIA’s network-repository commands:
Each file is at https://developer.download.nvidia.com/compute/cuda/<version>/local_installers/<file>. For a 12.x toolkit, the Windows driver must be R525 or newer.
Option 2: CUDA 13.4 in WSL2 from the Ubuntu repository
NVIDIA’s guide also lets you use the regular Ubuntu repository. Install the toolkit meta-package only, because the cuda, cuda-X-Y and cuda-drivers packages try to install the Linux driver inside WSL 2. For Ubuntu 24.04 in WSL, these are the commands from the current download page:
CUDA 13.4 new features need an R615 or later driver. Since CUDA 13.4, NVIDIA no longer bundles the Linux driver with the toolkit.
Verify CUDA in WSL2: nvidia-smi, nvcc and deviceQuery
Add the toolkit to your PATH (change the version to match your install), then build deviceQuery from NVIDIA’s cuda-samples. The samples now build with CMake (3.20 or later), and a single-sample build needs your GPU’s SM version, for example 86 for RTX 30 or 89 for RTX 40.
export PATH=/usr/local/cuda-13.3/bin${PATH:+:${PATH}}
nvidia-smi
nvcc --version

sudo apt install cmake
git clone https://github.com/NVIDIA/cuda-samples.git
cd cuda-samples/cpp/1_Utilities/deviceQuery
mkdir -p build && cd build
cmake -DCMAKE_CUDA_ARCHITECTURES=89 ..
make
./deviceQuery
If deviceQuery lists your GPU and ends with Result = PASS, the driver stub, the toolkit and the GPU are all working.
Common CUDA WSL2 errors
Symptom
Cause and fix
nvidia-smi: command not found as root
Documented limitation. Run /usr/lib/wsl/lib/nvidia-smi or add /usr/lib/wsl/lib/ to PATH.
GPU disappears after installing CUDA
The cuda, cuda-X-Y or cuda-drivers meta-package was installed and pulled in a Linux driver. Remove those packages and install only cuda-toolkit-X-Y.
nvcc: command not found
The toolkit is not on PATH. Add /usr/local/cuda-X.Y/bin.
nvidia-smi shows no processes or GPU utilization
Expected. NVML on WSL 2 does not support all queries, and ECC, compute mode and persistence mode cannot be changed.
Out of memory or slow jobs with managed memory
WSL 2 has no full Unified Memory support and limited pinned system memory, so some large training jobs will not fit.
nvidia-container-cli: initialization error in Docker
Check the Windows driver, WSL and NVIDIA Container Toolkit versions, then restart the Docker daemon. With Docker, only --gpus all is supported.
Old WSL kernel warning
Run wsl.exe --update and check again with wsl cat /proc/version.
What Intel OpenVINO brings to VMware Private AI with Intel, illustrated with a face-recognition thesis accelerated on the Neural Compute Stick 2.
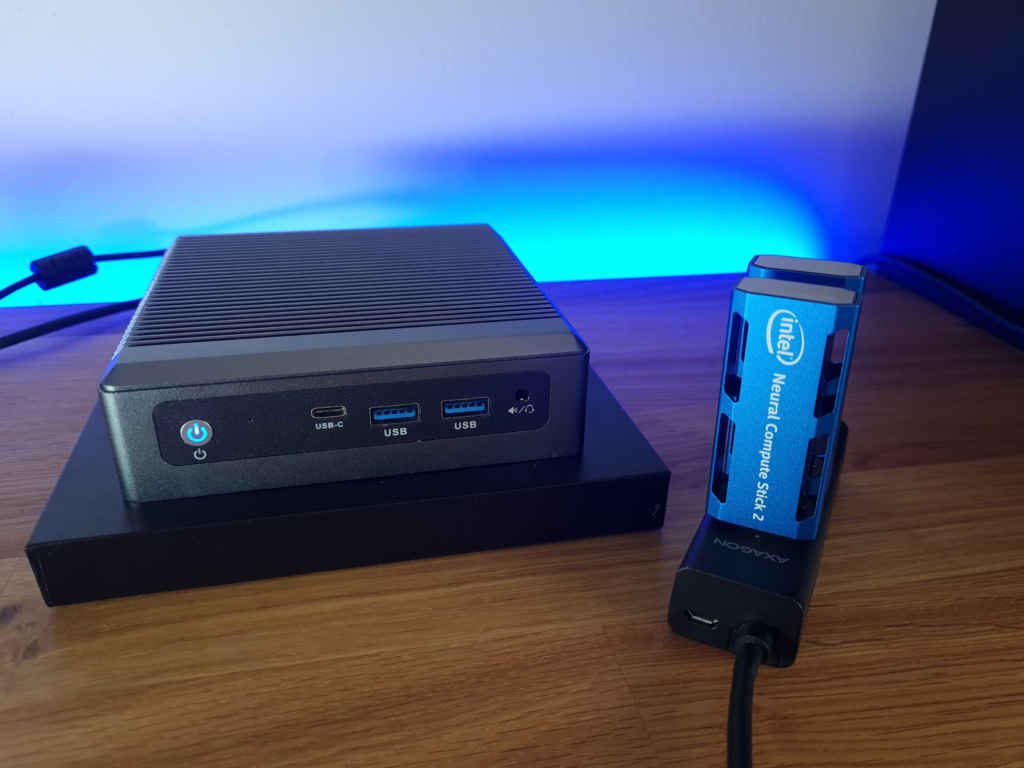
VMware Private AI with Intel is a very interesting support for OpenVINO. To illustrate what all OpenVINO enables, here is a summary of the thesis ACCELERATION OF FACE RECOGNITION ALGORITHM WITH NEURAL COMPUTE STICK 2 by my daughter Eva Micankova, with her permission here is a brief summary. The acceleration speed using NCS2, the Facenet model accuracy 97,08 % achieved a frame rate of 15.35 FPS and a latency of 65.164 ms – NUC Maxtang NX6412.
OpenVINO tools
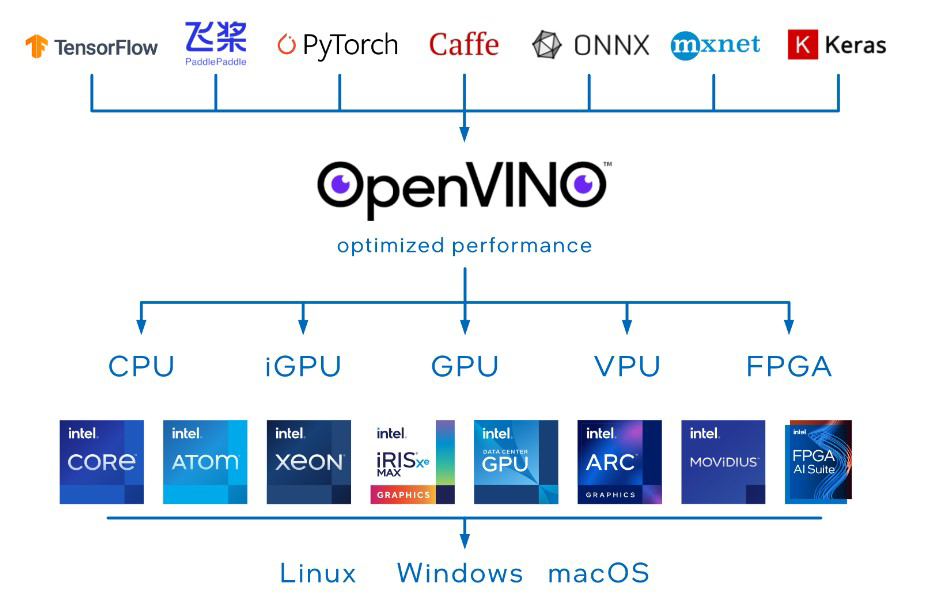
Intel’s suite of OpenVINO tools. This open-source set of tools offers development tools for the optimization and deployment of deep learning models. It delivers better performance for vision, audio, and language models from popular frameworks such as TensorFlow, Caffe, PyTorch, and others. OpenVINO optimizes deep learning pipelines through memory reuse, graph fusion, load balancing, and inference parallelism across CPUs, GPUs, VPUs, and others, as seen in the figure. Accelerators can have additional operations for pre-processing and post-processing transferred or integrated to reduce latency between endpoints and improve throughput.
Popular algorithms FaceNet, SphereFace, and ArcFace, which differ in architecture and training procedures, all aim to learn a vector representation of the face that is robust to changes in conditions.
FaceNet
The FaceNet model was developed by Google’s research group in 2015. The model maps faces of individuals into clusters of geometric points (Euclidean spaces) referred to as an embedding, which is obtained from the measure of similarity and difference of faces.
SphereFace
The authors of SphereFace introduced a loss function A-Softmax, derived from the softmax loss function, in their work published in 2017. The A-Softmax (Angular Softmax) loss function was designed to learn discriminative facial features with a clear geometric interpretation, which no available face recognition algorithm offered until then.
ArcFace
ArcFace (Additive Angular Margin loss) is a loss function first introduced in 2018. It builds on the previous work of SphereFace, which introduced the concept of angular margin, which helps improve class separability and thereby the performance of face recognition. However, their loss function required a series of approximations, which led to unstable network training. In addition, the standard softmax loss function dominated training, meaning that the concept of angular margin was not fully utilized. ArcFace introduces a new loss function that aims to address these shortcomings. It introduced the Additive Angular Margin loss function, which allows for better class separability and more stable training without the need for approximations used in SphereFace.
VPU
Vision Processing Unit (VPU) accelerators are chips created to accelerate image processing using computer vision and deep learning algorithms. The Intel Neural Compute Stick 2 is a powerful, affordable, and compact solution, with low power consumption, for accelerating neural networks. It is designed to run deep neural networks at high speeds with low energy consumption without losing accuracy, enabling real-time computer vision processing.
Result
One Intel NSC2 was used for accelerating face detection and a second Intel NSC2 was utilized for face recognition
Figure A.4
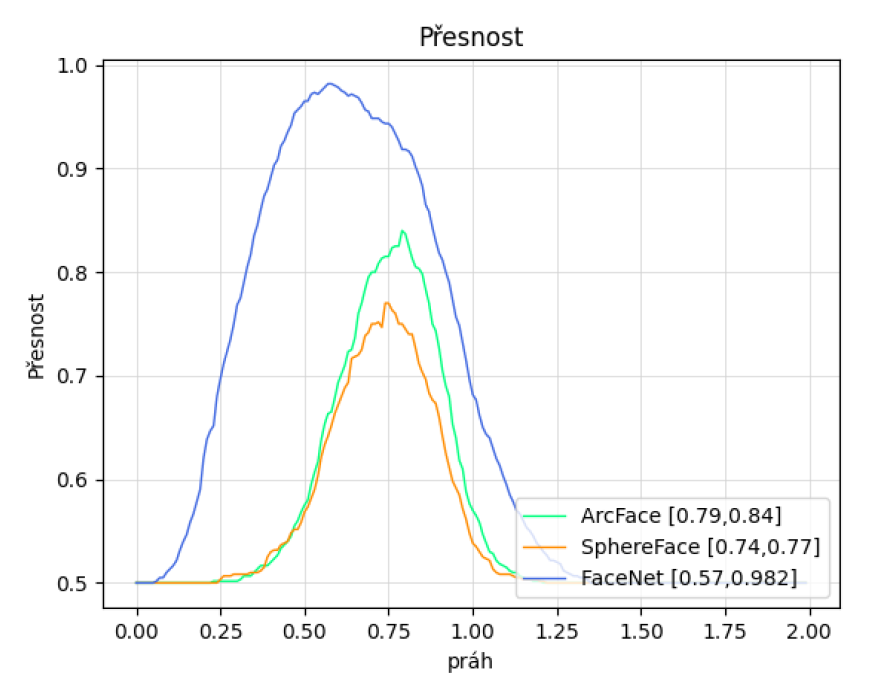
Graph showing the accuracy of all validated models depending on the changing threshold. ArcFace achieved the highest accuracy of 0.84 at a threshold value of 0.79. SphereFace achieved the highest accuracy of 0.77 for a threshold of 0.74. FaceNet achieved the best accuracy of all the compared models, at 0.982 for a threshold value of 0.57.
Figure 6.13
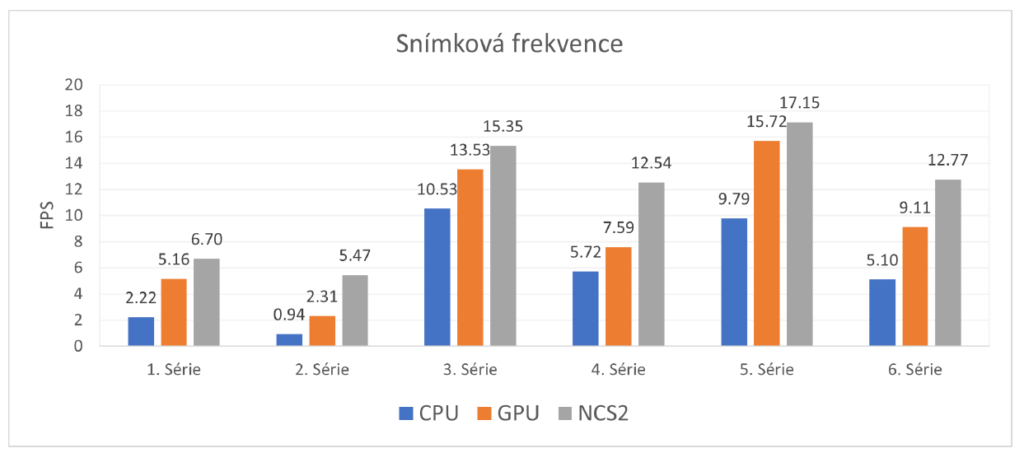
Graph comparing the achieved frame rate for each series.
1st series – ArcFace model, one person
2nd series – ArcFace model, two people
3rd series – FaceNet model, one person
4th series – FaceNet model, two people
5th series – SphereFace model, one person
6th series – SphereFace model, two people
Conclusion
The best results were achieved by the FaceNet model, which reached an accuracy of 97.08%. The second part of the experiments focused on evaluating the speed of recognition on different platforms. The experiments provided answers to questions about the accuracy achieved by each model, the results of system acceleration using CPU, GPU, and NCS2, which configuration is most suitable for each model, and which configuration achieves the highest frame rate and lowest latency among the compared models. The best frame rates and latency were achieved by the SphereFace model, accelerated using NCS2, with 17.15 FPS and a latency of 58.293 ms. The FaceNet model achieved a frame rate of 15.35 FPS and a latency of 65.164 ms. For achieving a balance between accuracy and speed, the best system configuration is with the FaceNet model, accelerated using NCS2.
Abstract
ACCELERATION OF FACE RECOGNITION ALGORITHM WITH NEURAL COMPUTE STICK 2 thesis focuses on the issue of facial recognition in a face image using neural networks and its acceleration. It provides an overview of previously used techniques and addresses the use of currently dominant convolutional neural networks to solve this issue. The work also focuses on acceleration mechanisms that can be used in this area. Based on the knowledge of the issue, a system based on the concept of edge computing was created, which can be used as a home security system connected to an IP camera, which sends a notification about the presence of an unknown person in a guarded area.