
Fastest workaround instructions to address CVE-2021-44228 (log4j) in vCenter Server

The fastest workaround for Log4j CVE-2021-44228 (VMSA-2021-0028) on vCenter Server 7.0, 6.7 and 6.5, and why patching is the real fix.

https://logging.apache.org/log4j/2.x/

Apache Log4j open source component has security bug (CVE-2021-44228 – VMSA-2021-0028). It is neccesary to fix vCenter Server 7.0.x, vCenter 6.7.x & vCenter 6.5.x.

Fastest and recommended is workaround with KB 87081 script (vc_log4j_mitigator.py).

Run ssh and create script via vim
Connected to service

    * List APIs: "help api list"
    * List Plugins: "help pi list"
    * Launch BASH: "shell"

Command> shell
Shell access is granted to root
root@localhost [ ~ ]# cd /tmp
root@localhost [ /tmp ]# vim vc_log4j_mitigator.py
Run script python vc_log4j_mitigator.py
root@localhost [ /tmp ]# python vc_log4j_mitigator.py
2021-12-21T10:38:20 INFO main: Script version: 1.6.0
2021-12-21T10:38:20 INFO main: vCenter type: Version: 7.0.2.00500; Build: 18455184; Deployment type: embedded; Gateway: False; VCHA: False; Windows: False;
A service stop and start is required to complete this operation.  Continue?[y]y
2021-12-21T10:38:23 INFO stop: stopping services
2021-12-21T10:38:46 INFO process_jar: Found a VULNERABLE FILE: /opt/vmware/lib64/log4j-core-2.13.0.jar
2021-12-21T10:38:46 INFO backup_file: VULNERABLE FILE: /opt/vmware/lib64/log4j-core-2.13.0.jar backed up to /tmp/tmpxi89fco8/opt/vmware/lib64/log4j-core-2.13.0.jar.bak
2021-12-21T10:38:47 INFO process_jar: VULNERABLE FILE: /opt/vmware/lib64/log4j-core-2.13.0.jar backed up to /tmp/tmpxi89fco8/opt/vmware/lib64/log4j-core-2.13.0.jar.bak
2021-12-21T10:39:03 INFO process_jar: Found a VULNERABLE FILE: /usr/lib/vmware/common-jars/log4j-core-2.13.1.jar
2021-12-21T10:39:03 INFO backup_file: VULNERABLE FILE: /usr/lib/vmware/common-jars/log4j-core-2.13.1.jar backed up to /tmp/tmpxi89fco8/usr/lib/vmware/common-jars/log4j-core-2.13.1.jar.bak
2021-12-21T10:39:04 INFO process_jar: VULNERABLE FILE: /usr/lib/vmware/common-jars/log4j-core-2.13.1.jar backed up to /tmp/tmpxi89fco8/usr/lib/vmware/common-jars/log4j-core-2.13.1.jar.bak
2021-12-21T10:39:04 INFO process_jar: Found a VULNERABLE FILE: /usr/lib/vmware/common-jars/log4j-core-2.8.2.jar
2021-12-21T10:39:04 INFO backup_file: VULNERABLE FILE: /usr/lib/vmware/common-jars/log4j-core-2.8.2.jar backed up to /tmp/tmpxi89fco8/usr/lib/vmware/common-jars/log4j-core-2.8.2.jar.bak
2021-12-21T10:39:04 INFO process_jar: VULNERABLE FILE: /usr/lib/vmware/common-jars/log4j-core-2.8.2.jar backed up to /tmp/tmpxi89fco8/usr/lib/vmware/common-jars/log4j-core-2.8.2.jar.bak
2021-12-21T10:39:06 INFO process_jar: Found a VULNERABLE FILE: /usr/lib/vmware/common-jars/log4j-core-2.11.0.jar
2021-12-21T10:39:06 INFO backup_file: VULNERABLE FILE: /usr/lib/vmware/common-jars/log4j-core-2.11.0.jar backed up to /tmp/tmpxi89fco8/usr/lib/vmware/common-jars/log4j-core-2.11.0.jar.bak
2021-12-21T10:39:06 INFO process_jar: VULNERABLE FILE: /usr/lib/vmware/common-jars/log4j-core-2.11.0.jar backed up to /tmp/tmpxi89fco8/usr/lib/vmware/common-jars/log4j-core-2.11.0.jar.bak
2021-12-21T10:39:07 INFO process_jar: Found a VULNERABLE FILE: /usr/lib/vmware/common-jars/log4j-core-2.11.2.jar
2021-12-21T10:39:07 INFO backup_file: VULNERABLE FILE: /usr/lib/vmware/common-jars/log4j-core-2.11.2.jar backed up to /tmp/tmpxi89fco8/usr/lib/vmware/common-jars/log4j-core-2.11.2.jar.bak
2021-12-21T10:39:07 INFO process_jar: VULNERABLE FILE: /usr/lib/vmware/common-jars/log4j-core-2.11.2.jar backed up to /tmp/tmpxi89fco8/usr/lib/vmware/common-jars/log4j-core-2.11.2.jar.bak
2021-12-21T10:39:08 INFO process_jar: Found a VULNERABLE FILE: /usr/lib/vmware/cis_upgrade_runner/payload/component-scripts/sso/lstool/lib/log4j-core-2.13.1.jar
2021-12-21T10:39:08 INFO backup_file: VULNERABLE FILE: /usr/lib/vmware/cis_upgrade_runner/payload/component-scripts/sso/lstool/lib/log4j-core-2.13.1.jar backed up to /tmp/tmpxi89fco8/usr/lib/vmware/cis_upgrade_runner/payload/component-scripts/sso/lstool/lib/log4j-core-2.13.1.jar.bak
2021-12-21T10:39:08 INFO process_jar: VULNERABLE FILE: /usr/lib/vmware/cis_upgrade_runner/payload/component-scripts/sso/lstool/lib/log4j-core-2.13.1.jar backed up to /tmp/tmpxi89fco8/usr/lib/vmware/cis_upgrade_runner/payload/component-scripts/sso/lstool/lib/log4j-core-2.13.1.jar.bak
2021-12-21T10:39:14 INFO process_jar: Found a VULNERABLE FILE: /tmp/tmpn2a_0ql2/WEB-INF/lib/log4j-core-2.13.3.jar
2021-12-21T10:39:14 INFO backup_file: VULNERABLE FILE: /tmp/tmpn2a_0ql2/WEB-INF/lib/log4j-core-2.13.3.jar backed up to /tmp/tmpxi89fco8/tmp/tmpn2a_0ql2/WEB-INF/lib/log4j-core-2.13.3.jar.bak
2021-12-21T10:39:15 INFO process_war: Found a VULNERABLE WAR file with: /usr/lib/vmware-updatemgr/bin/jetty/webapps/vum-fileupload.war
2021-12-21T10:39:15 INFO backup_file: VULNERABLE FILE: /usr/lib/vmware-updatemgr/bin/jetty/webapps/vum-fileupload.war backed up to /tmp/tmpxi89fco8/usr/lib/vmware-updatemgr/bin/jetty/webapps/vum-fileupload.war.bak
2021-12-21T10:39:15 INFO process_war: VULNERABLE FILE: /usr/lib/vmware-updatemgr/bin/jetty/webapps/vum-fileupload.war backed up to /tmp/tmpxi89fco8/usr/lib/vmware-updatemgr/bin/jetty/webapps/vum-fileupload.war.bak
2021-12-21T10:39:15 INFO process_jar: Found a VULNERABLE FILE: /tmp/tmpxn5_4ah_/WEB-INF/lib/log4j-core-2.13.3.jar
2021-12-21T10:39:15 INFO backup_file: VULNERABLE FILE: /tmp/tmpxn5_4ah_/WEB-INF/lib/log4j-core-2.13.3.jar backed up to /tmp/tmpxi89fco8/tmp/tmpxn5_4ah_/WEB-INF/lib/log4j-core-2.13.3.jar.bak
2021-12-21T10:39:16 INFO process_war: Found a VULNERABLE WAR file with: /usr/lib/vmware-updatemgr/bin/jetty/webapps/root.war
2021-12-21T10:39:16 INFO backup_file: VULNERABLE FILE: /usr/lib/vmware-updatemgr/bin/jetty/webapps/root.war backed up to /tmp/tmpxi89fco8/usr/lib/vmware-updatemgr/bin/jetty/webapps/root.war.bak
2021-12-21T10:39:16 INFO process_war: VULNERABLE FILE: /usr/lib/vmware-updatemgr/bin/jetty/webapps/root.war backed up to /tmp/tmpxi89fco8/usr/lib/vmware-updatemgr/bin/jetty/webapps/root.war.bak
2021-12-21T10:39:16 INFO process_jar: Found a VULNERABLE FILE: /tmp/tmpa4w275ot/WEB-INF/lib/log4j-core-2.13.3.jar
2021-12-21T10:39:16 INFO backup_file: VULNERABLE FILE: /tmp/tmpa4w275ot/WEB-INF/lib/log4j-core-2.13.3.jar backed up to /tmp/tmpxi89fco8/tmp/tmpa4w275ot/WEB-INF/lib/log4j-core-2.13.3.jar.bak
2021-12-21T10:39:17 INFO process_war: Found a VULNERABLE WAR file with: /usr/lib/vmware-updatemgr/bin/jetty/webapps/vum-filedownload.war
2021-12-21T10:39:17 INFO backup_file: VULNERABLE FILE: /usr/lib/vmware-updatemgr/bin/jetty/webapps/vum-filedownload.war backed up to /tmp/tmpxi89fco8/usr/lib/vmware-updatemgr/bin/jetty/webapps/vum-filedownload.war.bak
2021-12-21T10:39:18 INFO process_war: VULNERABLE FILE: /usr/lib/vmware-updatemgr/bin/jetty/webapps/vum-filedownload.war backed up to /tmp/tmpxi89fco8/usr/lib/vmware-updatemgr/bin/jetty/webapps/vum-filedownload.war.bak
2021-12-21T10:39:21 INFO process_jar: Found a VULNERABLE FILE: /tmp/tmpxv_znca3/WEB-INF/lib/log4j-core-2.13.1.jar
2021-12-21T10:39:21 INFO backup_file: VULNERABLE FILE: /tmp/tmpxv_znca3/WEB-INF/lib/log4j-core-2.13.1.jar backed up to /tmp/tmpxi89fco8/tmp/tmpxv_znca3/WEB-INF/lib/log4j-core-2.13.1.jar.bak
2021-12-21T10:39:22 INFO process_war: Found a VULNERABLE WAR file with: /usr/lib/vmware-sso/vmware-sts/webapps/ROOT.war
2021-12-21T10:39:22 INFO backup_file: VULNERABLE FILE: /usr/lib/vmware-sso/vmware-sts/webapps/ROOT.war backed up to /tmp/tmpxi89fco8/usr/lib/vmware-sso/vmware-sts/webapps/ROOT.war.bak
2021-12-21T10:39:24 INFO process_war: VULNERABLE FILE: /usr/lib/vmware-sso/vmware-sts/webapps/ROOT.war backed up to /tmp/tmpxi89fco8/usr/lib/vmware-sso/vmware-sts/webapps/ROOT.war.bak
2021-12-21T10:39:25 INFO process_jar: Found a VULNERABLE FILE: /usr/lib/vmware-sso/vmware-sts/webapps/ROOT/WEB-INF/lib/log4j-core-2.13.1.jar
2021-12-21T10:39:25 INFO backup_file: VULNERABLE FILE: /usr/lib/vmware-sso/vmware-sts/webapps/ROOT/WEB-INF/lib/log4j-core-2.13.1.jar backed up to /tmp/tmpxi89fco8/usr/lib/vmware-sso/vmware-sts/webapps/ROOT/WEB-INF/lib/log4j-core-2.13.1.jar.bak
2021-12-21T10:39:26 INFO process_jar: VULNERABLE FILE: /usr/lib/vmware-sso/vmware-sts/webapps/ROOT/WEB-INF/lib/log4j-core-2.13.1.jar backed up to /tmp/tmpxi89fco8/usr/lib/vmware-sso/vmware-sts/webapps/ROOT/WEB-INF/lib/log4j-core-2.13.1.jar.bak
2021-12-21T10:39:28 INFO process_jar: Found a VULNERABLE FILE: /usr/lib/vmware-dbcc/lib/log4j-core-2.8.2.jar
2021-12-21T10:39:28 INFO backup_file: VULNERABLE FILE: /usr/lib/vmware-dbcc/lib/log4j-core-2.8.2.jar backed up to /tmp/tmpxi89fco8/usr/lib/vmware-dbcc/lib/log4j-core-2.8.2.jar.bak
2021-12-21T10:39:29 INFO process_jar: VULNERABLE FILE: /usr/lib/vmware-dbcc/lib/log4j-core-2.8.2.jar backed up to /tmp/tmpxi89fco8/usr/lib/vmware-dbcc/lib/log4j-core-2.8.2.jar.bak
2021-12-21T10:39:32 INFO process_jar: Found a VULNERABLE FILE: /tmp/tmprq0yfnd1/WEB-INF/lib/log4j-core-2.13.1.jar
2021-12-21T10:39:32 INFO backup_file: VULNERABLE FILE: /tmp/tmprq0yfnd1/WEB-INF/lib/log4j-core-2.13.1.jar backed up to /tmp/tmpxi89fco8/tmp/tmprq0yfnd1/WEB-INF/lib/log4j-core-2.13.1.jar.bak
2021-12-21T10:39:33 INFO process_war: Found a VULNERABLE WAR file with: /usr/lib/vmware-lookupsvc/webapps/ROOT.war
2021-12-21T10:39:33 INFO backup_file: VULNERABLE FILE: /usr/lib/vmware-lookupsvc/webapps/ROOT.war backed up to /tmp/tmpxi89fco8/usr/lib/vmware-lookupsvc/webapps/ROOT.war.bak
2021-12-21T10:39:34 INFO process_war: VULNERABLE FILE: /usr/lib/vmware-lookupsvc/webapps/ROOT.war backed up to /tmp/tmpxi89fco8/usr/lib/vmware-lookupsvc/webapps/ROOT.war.bak
2021-12-21T10:39:34 INFO process_jar: Found a VULNERABLE FILE: /usr/lib/vmware-lookupsvc/webapps/ROOT/WEB-INF/lib/log4j-core-2.13.1.jar
2021-12-21T10:39:35 INFO backup_file: VULNERABLE FILE: /usr/lib/vmware-lookupsvc/webapps/ROOT/WEB-INF/lib/log4j-core-2.13.1.jar backed up to /tmp/tmpxi89fco8/usr/lib/vmware-lookupsvc/webapps/ROOT/WEB-INF/lib/log4j-core-2.13.1.jar.bak
2021-12-21T10:39:35 INFO process_jar: VULNERABLE FILE: /usr/lib/vmware-lookupsvc/webapps/ROOT/WEB-INF/lib/log4j-core-2.13.1.jar backed up to /tmp/tmpxi89fco8/usr/lib/vmware-lookupsvc/webapps/ROOT/WEB-INF/lib/log4j-core-2.13.1.jar.bak
2021-12-21T10:39:37 INFO _patch_file: Found VULNERABLE FILE: /usr/lib/vmware-vmon/java-wrapper-vmon
2021-12-21T10:39:37 INFO backup_file: VULNERABLE FILE: /usr/lib/vmware-vmon/java-wrapper-vmon backed up to /tmp/tmpxi89fco8/usr/lib/vmware-vmon/java-wrapper-vmon.bak
2021-12-21T10:39:37 INFO patch_vum: Found a VULNERABLE FILE: /usr/lib/vmware-updatemgr/bin/jetty/start.ini
2021-12-21T10:39:37 INFO backup_file: VULNERABLE FILE: /usr/lib/vmware-updatemgr/bin/jetty/start.ini backed up to /tmp/tmpxi89fco8/usr/lib/vmware-updatemgr/bin/jetty/start.ini.bak
2021-12-21T10:39:37 INFO print_summary:
=====     Summary     =====
Backup Directory: /tmp/tmpxi89fco8
List of processed java archive files:

/opt/vmware/lib64/log4j-core-2.13.0.jar
/usr/lib/vmware/common-jars/log4j-core-2.13.1.jar
/usr/lib/vmware/common-jars/log4j-core-2.8.2.jar
/usr/lib/vmware/common-jars/log4j-core-2.11.0.jar
/usr/lib/vmware/common-jars/log4j-core-2.11.2.jar
/usr/lib/vmware/cis_upgrade_runner/payload/component-scripts/sso/lstool/lib/log4j-core-2.13.1.jar
/usr/lib/vmware-updatemgr/bin/jetty/webapps/vum-fileupload.war
/usr/lib/vmware-updatemgr/bin/jetty/webapps/root.war
/usr/lib/vmware-updatemgr/bin/jetty/webapps/vum-filedownload.war
/usr/lib/vmware-sso/vmware-sts/webapps/ROOT.war
/usr/lib/vmware-sso/vmware-sts/webapps/ROOT/WEB-INF/lib/log4j-core-2.13.1.jar
/usr/lib/vmware-dbcc/lib/log4j-core-2.8.2.jar
/usr/lib/vmware-lookupsvc/webapps/ROOT.war
/usr/lib/vmware-lookupsvc/webapps/ROOT/WEB-INF/lib/log4j-core-2.13.1.jar

List of processed configuration files:

/usr/lib/vmware-vmon/java-wrapper-vmon
/usr/lib/vmware-updatemgr/bin/jetty/start.ini

Total fixed: 16

    NOTE: Running this script again with the --dryrun
    flag should now yield 0 vulnerable files.

Log file: /var/log/vmsa-2021-0028_2021_12_21_10_38_20.log
===========================
2021-12-21T10:39:37 INFO start: starting services
2021-12-21T10:52:47 INFO main: Done.
Verify python vc_log4j_mitigator.py -r
root@localhost [ /tmp ]# python vc_log4j_mitigator.py -r
2021-12-21T11:10:01 INFO main: Script version: 1.6.0
2021-12-21T11:10:01 INFO main: vCenter type: Version: 7.0.2.00500; Build: 18455184; Deployment type: embedded; Gateway: False; VCHA: False; Windows: False;
2021-12-21T11:10:01 INFO main: Running in dryrun mode.
2021-12-21T11:11:01 INFO print_summary:
=====     Summary     =====

No vulnerable files found!

Total found: 0
Log file: /var/log/vmsa-2021-0028_2021_12_21_11_10_01.log
===========================
2021-12-21T11:11:01 INFO main: Done.

vc_log4j_mitigator.py [-h] – helps and more options

root@localhost [ /tmp ]# python vc_log4j_mitigator.py -h
usage: vc_log4j_mitigator.py [-h] [-d dirnames [dirnames ...]] [-a] [-r] [-b BACKUP_DIR] [-l LOG_DIR]

VMSA-2021-0028 vCenter tool; Version: 1.6.0 This tool deletes the JndiLookup.class file from *.jar and *.war files. On Windows systems the tool will by default traverse the folders identified by the VMWARE_CIS_HOME, VMWARE_CFG_DIR, VMWARE_DATA_DIR and VMWARE_RUNTIME_DATA_DIR
variables. On vCenter Appliances the tool will search by default from the root of the filesystem. All modified files are backed up if the process needs to be reversed due to an error.

optional arguments:
  -h, --help            show this help message and exit
  -d dirnames [dirnames ...], --directories dirnames [dirnames ...]
                        space separated list of directories to check recursively for CVE-2021-44228 vulnerable java archive files.
  -a, --accept-services-restart
                        accept the restart of the services without having manual prompt confirmation for the same
  -r, --dryrun          Run the script and log vulnerable files without mitigating them. The vCenter services are not restarted with this option.
  -b BACKUP_DIR, --backup-dir BACKUP_DIR
                        Specify a backup directory to store original files.
  -l LOG_DIR, --log-dir LOG_DIR
                        Specify a directory to store log files.

Links:
Fix vCenter “Exception in invoking authentication handler User password expired”

VAMI login fails with “Exception in invoking authentication handler User password expired”? The vCenter root password expired. Here is the 2-minute fix.

If logging in to the vCenter Server Appliance Management Interface (VAMI, https://<vcenter>:5480) fails with “Exception in invoking authentication handler User password expired”, the appliance’s root password has expired. Since vSphere 6.5 the root password expires after 90 days by default. SSH and the VM console still let you in, so the fix takes two minutes: log in to the shell, run passwd root, and then set an expiry policy that fits your environment.

Reference: Broadcom KB 332308 (formerly VMware KB 75107).

Symptoms

  • The appliance was deployed more than 90 days ago with default settings.
  • VAMI login fails with Exception in invoking authentication handler User password expired.
  • Login to the appliance shell (SSH or VM console) still works, and may ask you to change the password immediately.

1. Check the password expiration

root@localhost [ ~ ]# chage -l root
You are required to change your password immediately (password expired)
chage: PAM: Authentication token is no longer valid; new one required

2. Change the root password

root@localhost [ ~ ]# passwd root
New password:
Retype new password:
passwd: password updated successfully

VAMI login works again straight away.

3. Set an expiry policy

After logging in to VAMI, you can change the root password settings under Administration: the expiry period, “never expire”, and an email address for the expiration warning. Keep expiry enabled in production and set the warning email so this doesn’t catch you again.

For labs only, you can disable expiry from the shell:

root@localhost [ ~ ]# chage -M -1 root

Verify the result:

root@localhost [ ~ ]# chage -l root
Last password change : Dec 21, 2021
Password expires : never
Password inactive : never
Account expires : never
Minimum number of days between password change : 0
Maximum number of days between password change : -1
Number of days of warning before password expires : 7

Still can’t log in?

If VAMI or the vSphere Client still fails after the root password is fixed, the cause may be a certificate rather than the password. See checking vCenter certificates with vCert and STS signing certificate expiration. If you don’t know the root password at all, or root is locked after too many failed logins, see Reset vCenter root password without restarting.

vSphere Cluster Services (vCLS) Explained: External vs Embedded vCLS (7.0 to 9.x)

What vCLS VMs do, how many run per cluster, what changed with embedded vCLS in vSphere 8.0 U3 and 9.x, and what you must not do to them.

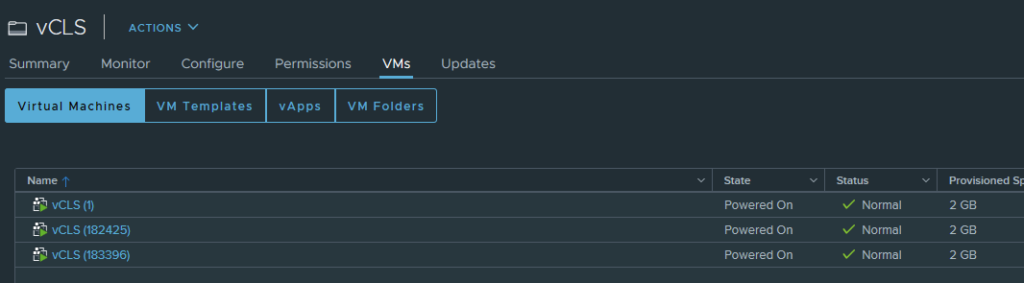
vSphere Cluster Services (vCLS) are small agent VMs that vCenter runs in every cluster so that cluster services such as DRS keep a healthy, distributed control plane. vCLS arrived in vSphere 7.0 Update 1 as external vCLS (up to three VMs per cluster). vSphere 8.0 Update 3 replaced it with embedded vCLS (two VMs per cluster, based on vSphere Pod technology). From vSphere 9.0 you can even disable vCLS without affecting DRS or HA. Leave vCLS VMs alone unless you are diagnosing them.

What vCLS does

Starting with vSphere 7.0 Update 1, vCLS is enabled by default and runs in all vSphere clusters. It keeps cluster services available and maintains the resources and health of the workloads in the cluster even if vCenter Server becomes unavailable. The vCLS VMs are created automatically when you add hosts to a cluster, including clusters with only one or two hosts.

External vs embedded vCLS

External vCLSEmbedded vCLS
vSphere versions7.0 Update 1 to 8.0 Update 28.0 Update 3 and later
TechnologyAgent VMs deployed by the ESX Agent Manager (EAM)vCLS VMs based on vSphere Pod technology, managed by the internal vpxd extension instead of EAM
VMs per clusterUp to 3 (1 or 2 in one- and two-host clusters)2, with at least 1 powered on for DRS
NamingvCLS-{UUID}vCLS-{UUID} (UUID of the ESXi host), plus the config option vCLSCRX.agent = true
Retreat ModeSupportedSupported (same per-cluster activate/deactivate)

Sources: TechDocs: Embedded vCLS and Broadcom KB 312147. If embedded vCLS VMs don’t deploy after an upgrade to 8.0 U3, start with KB 378133.

vCLS in vSphere 9.x

In vSphere 7.0 and 8.0, removing vCLS from a cluster (Retreat Mode) stops DRS and makes HA placement suboptimal. Starting with vSphere 9.0, vCLS can be disabled on a cluster without any impact on DRS or HA (KB 316514). The steps for every version are in vCLS Retreat Mode: how to disable vCLS on a vSphere cluster.

Retrieving the password for vCLS VMs (external vCLS)

You can retrieve the password to log in to external vCLS VMs. Use it only for explicit diagnostics; to keep cluster services healthy, avoid logging in to vCLS VMs.

Output of the vCLS password decryption script on vCenter Server Appliance
  1. Log in to the vCenter Server Appliance over SSH.
  2. Run /usr/lib/vmware-wcp/decrypt_clustervm_pw.py
  3. Read the password from the PWD: line of the output.

What not to do with vCLS VMs

These operations can disrupt the healthy functioning of vCLS VMs:

  • Changing their power state
  • Reconfiguring resources: CPU, memory, disk size or disk placement
  • VM encryption, changing the BIOS, configuring PMem, enabling FT
  • Triggering vMotion of vCLS VMs
  • Removing them from the inventory, deleting them from disk, cloning them, or recovering them from a snapshot
  • Renaming the VMs or the vCLS folders, or moving them to another folder or a resource pool
  • Applying DRS rules and overrides, HA admission control policies or HA overrides to vCLS VMs

If you need vCLS out of the way, for example during storage maintenance, use Retreat Mode instead of touching the VMs.

Further reading

Vulnerability in the VMware Directory Service (vmdir) (CVE-2020-3952) – VMSA-2020-0006

Critical vCenter vmdir information-disclosure vulnerability CVE-2020-3952 (VMSA-2020-0006): affected versions, how to check, and patching.

On April 9th, 2020 VMSA-2020-0006 was published. This advisory documents a critical severity sensitive information disclosure vulnerability identified by CVE-2020-3952.

Affected versions

The vulnerability received a CVSSv3 score of 10 out of 10. Which means this is a very serious security issue. Response matrix is VMSA-2020-0006.

How I can check it?

Additional Documentation for VMSA-2020-0006: Determining if a vCenter 6.7 deployment w/embedded or external Platform Services Controller (PSC) is affected by CVE-2020-3952 (78543)

https://kb.vmware.com/s/article/78543

Virtual Appliance Log File Location: /var/log/vmware/vmdird/vmdird-syslog.log or in /var/log/vmware/vmdird/vmdird-syslog.log.*.gz

zgrep "ACL" /var/log/vmware/vmdird/*.gz
/var/log/vmware/vmdird/vmdird-syslog.log.x.gz:2020-xx-xxTxxxxxx+00:00 info vmdird t@xxxxxx: ACL MODE: Legacy

Notes from KB:

  • In order to be affected by CVE-2020-3952, a deployment must meet 2 criteria. First, it must be a 6.7 deployment prior to 6.7u3f. Second, it must be running in legacy ACL mode.
  • Because the ACL MODE: Legacy log entry is only thrown at vmdir startup,  it is possible that it will be absent due to log file rollover even on affected deployments.
  • The ACL MODE: Legacy log entry will still be thrown after upgrading to 6.7u3f and/or 7.0 even though CVE-2020-3952 is resolved in these releases.

Path it NOW ! – PoC was published !

It is recommended to block any access over the LDAP port (389) except for administrative use.

Clean installations of vCenter Server 6.7 (embedded or external PSC) are not affected.

vCenter Server 6.7 (embedded or external PSC) prior to 6.7u3f is affected by CVE-2020-3952 if it was upgraded from a previous release line such as 6.0 or 6.5.

Path it ASAP because:

  • On April 15th, 2020 was relased information about How to reconstructed the faulty code flow that led to this vulnerability.

vSphere 6 Update Manager -> vSphere 7 Lifecycle Manager : upgrade ESXi 6.7 to ESXi 7

Move from vSphere 6 Update Manager to vSphere 7 Lifecycle Manager and upgrade ESXi 6.7 hosts to ESXi 7.0 step by step.

vSphere Update Manager – vSphere 6

In vSphere 6 we can use various methods and tools to deploy ESXi hosts and maintain their software lifecycle.

To deploy and boot an ESXi host, you can use an ESXi installer image or VMware vSphere® Auto Deploy™. The availability of choice options results in two different underlying ESXi platforms:

  • Using vSphere Auto Deploy – stateless mode
  • Using an installer ESXi image – statefull mode

vSphere Lifecycle Manager Images: A Single Platform, Single Tool, Single Workflow

By introducing the concept of images, vSphere Lifecycle Manager provides a unified platform for ESXi lifecycle management.
You can use vSphere Lifecycle Manager for stateful hosts only, but starting with vSphere 7.0, you can convert the Auto Deploy-based stateless hosts into stateful hosts, which you can add to clusters that you manage with vSphere Lifecycle Manager images.

How to Upgrade ESXi 6.7 to 7 with vSphere Lifecycle Manager?

After upgrade VCSA 7.0, We prepare upgrade for ESXi 6.7. It is simular logic like in vSphere Update Manager:

IMPORT ISO – We can upload ISO for example VMware-VMvisor-Installer-7.0.0-15843807.x86_64.iso
Step 1 of 2 – Uploading file to server
Step 2 of 2 – Adding to repository
After ISO upload We could check ISO image context
Next step is Create Baseline
Create Baseline – for ISO image
Select uploaded ISO image
Check summary
On Targer Cluster We attach our Baseline
Select ESXi 7 Baseline
– Check Compliance
– We can see Non-compliant for 3x ESXi host
REMEDIATE will start upgrade dialoge
It is necessary accept EULA
REMEDIATE will start ESXi 7 upgrade
In Recent Task We caould chek progress.
We can check ESXi 7.0 upgrade result.

VCSA Root Partition Full: Find the Cause, Clean Up Safely and What You Can (Not) Resize (vCenter 6.7, 7.0, 8.0)

vCenter Appliance root partition full? Find what fills / with df and du, clean audit.log, mail queue, UI cache and journald per Broadcom KBs, and know the resize limits.

Short answer: When the VCSA root partition (/) is full, find the culprit first: df -h and df -i to confirm the partition, then du to find the directory. The usual causes documented by Broadcom are a huge /var/log/audit/audit.log, a stuck mail queue in /var/spool/clientmqueue, the vSphere Client work cache, journald and old support bundles. Truncate or delete only what the KB says. Resizing the root disk is not supported on vCenter 7.0 and later.

Symptoms of a full VCSA root partition

  • VAMI (https://<vcenter>:5480) shows File system /root has run out of storage space, or vCenter raises a disk exhaustion alarm. Warnings start at 80%.
  • At 95%, vCenter stops vmware-vpxd to protect the database. The vSphere Client then returns 503 Service Unavailable, services do not start, and patching or upgrades fail.

Step 1: Confirm which partition is full

SSH to the appliance as root, type shell, and check both space and inodes. VAMI Monitor > Disks shows the same data. Output from one of my appliances:

root@vcsa [ ~ ]# df -h
Filesystem      Size  Used Avail Use% Mounted on
/dev/sda3        11G  8.2G  1.9G  82% /

root@vcsa [ ~ ]# df -i
Filesystem     Inodes IUsed  IFree IUse% Mounted on
/dev/sda3      712704 97100 615604   14% /

# only partitions at 78% or more (Broadcom KB 318953)
root@vcsa [ ~ ]# df -h | awk '0+$5 >= 78 {print}'

Here the inodes are fine and the problem is space. Note which mount point is actually full. /storage/log, /storage/core, /storage/db and /storage/seat are separate virtual disks with their own KBs (see the table below). /storage/archive near 100% is expected by design on 6.7 and later. The root filesystem shows as /dev/sda3 on many builds. Broadcom KBs also show /dev/mapper/vg_root_0-lv_root_0 as the root device on some 7.0/8.0 systems.

If you cannot log in at all because / is full, Broadcom KB 318953 points to KB 322247 (steps 1 to 7) to get a single-user-mode shell.

Step 2: Find what fills the root partition

# largest areas on / (KB 422898)
du -sh /usr /var /opt /tmp /etc /home 2>/dev/null | sort -h
du -sh /var/log/* 2>/dev/null | sort -h | tail -10
journalctl --disk-usage

# top 20 entries under a path (KB 318953)
du -a /var | sort -n -r | head -n 20

# files larger than 100 MB in the current directory tree
find ./ -type f -size +100M

In my case, /var/spool was the problem:

root@vcsa [ /var ]# du -sh *
2.1G    log
5.2G    spool

Common culprits and the matching Broadcom KB

WhereCauseVersions in KBKB
/var/log/audit/audit.logaudit.log not rotated (often cron failing because the root password expired)5.5 to 6.7318911
/var/spool/clientmqueueMail queued to an unreachable SMTP relay; sendmail may also crash and fill /storage/core with core.sendmail.*8.x318475
/usr/lib/vmware-vsphere-ui/server/workvSphere Client (Tomcat) work cache growth (normal about 100 MB to 1 GB, abnormal 10 GB+)8.x422898
/usr/lib/vmware-vsphere-ui/server/work/tmp/*.esaFailed plug-in redeploys; fixed in vCenter 8.0.3 build 242623227.0, 8.0319442
journaldSystem journal growth8.x422898, 316602
/opt/vmware/var/log/lighttpdVAMI access logs6.7318172
/etc/vmware-vpx/docRoot/diagnostics, /etc/vmware-vpx/bundle-stageOld support bundles not deletedall319886
/root (and other non-default files on /)Files copied there by admins (ISOs, bundles, backups)8.x422898

Not the root partition? For /storage/log use KB 313077, and for /storage/core use KB 318750.

Step 3: Safe cleanup

Before you delete anything, take a backup or snapshot of the vCenter VM. With Enhanced Linked Mode, follow Broadcom’s snapshot best practices. vCenter HA must be removed first. For active log files, the KBs truncate the file instead of deleting it. Do the same.

audit.log

cd /var/log/audit
ls -lh
truncate -s 0 audit.log

# check that the daily cron actually runs
ls -l /var/spool/cron/lastrun/
# an expired root password breaks cron
chage -l root

If chage shows the root password as expired, change it, then restart services (service-control --stop --all and service-control --start --all). Otherwise the log fills up again.

clientmqueue (sendmail queue)

systemctl stop sendmail.service
find /var/spool/clientmqueue/* -exec rm {} \;
ls -ltrh /var/spool/clientmqueue/
# if sendmail was crashing, also remove its cores
rm -rf /storage/core/core.sendmail.*
# fix vCenter > Configure > General > Edit > Mail, then:
systemctl start sendmail.service

In my case, the space in /var/spool was this mail queue. KB 318475 gives the typical reason: vCenter’s mail settings point to an SMTP relay it cannot reach, so every alarm email stays queued. Fix the mail settings, or the queue grows again.

vSphere Client work cache and journald

du -sh /usr/lib/vmware-vsphere-ui/server/work
service-control --stop vsphere-ui
rm -rf /usr/lib/vmware-vsphere-ui/server/work/*
service-control --start vsphere-ui

journalctl --vacuum-time=7d
df -h /

Clearing the work cache only restarts the vSphere Client (HTML5); running VMs, hosts and core vCenter services are not affected. The cache is regenerated when the service starts.

Can you resize the VCSA root partition?

Mostly not. Broadcom KB 316602 says:

vCenter versionResize root disk (VMDK1)
6.5Not supported
6.7Added in 6.7
7.0 and later (incl. 8.0)Not supported

In the vCenter 8.0 reference layout (Tiny, default storage), VMDK1 holds / (48 GB) and /boot (KB 316438). Check your real size with df -h, because Broadcom’s own 8.x KB examples also show much smaller root filesystems. On 7.0 and 8.0, cleanup is the only supported fix for /. KB 316602 even recommends journalctl --vacuum-time when an upgrade pre-check complains about free space on root.

The other disks (/storage/log, /storage/seat, /storage/db and so on) are LVM and can be grown online:

  1. Take a file-based backup. Remove all snapshots from the vCenter VM, because a disk with snapshots cannot be extended.
  2. Map the mount point to the virtual disk with df -h; lsblk; lsscsi (for example /storage/log is sde, SCSI(0:4)).
  3. Increase that hard disk in the VM settings.
  4. Run /usr/lib/applmgmt/support/scripts/autogrow.sh and confirm with df -h.

The KBs above list versions up to 8.0. For vCenter 9.0, check the current Broadcom KBs before you assume the same limits.

Prevent it from happening again

  • Monitor VCSA disks and act on the 80% alarm, not the 95% outage (KB 318930).
  • Keep the root password from expiring silently, so log rotation keeps working.
  • Keep the vCenter SMTP settings valid, delete support bundles after upload, and never use /root as a download folder.
  • Stay on current patches. Several root-partition bugs (e.g. the .esa files) are fixed in later builds.

Sources

Related on vdan.cz

Reset the vSphere Lifecycle Manager (VUM) Database on vCenter 6.5, 6.7, 7.0, 8.0 and 9.x

How to reset the VUM / vLCM database on VCSA: reset-db commands for 6.5 to 9.x, the 9.1 –force change, VKS and NSX caveats (KB 316581).

Short answer: On vCenter Server Appliance 6.7, 7.0, 8.0 and 9.0 you reset the VUM database in four steps. Stop the service with service-control --stop vmware-updatemgr, run python /usr/lib/vmware-updatemgr/bin/updatemgr-utility.py reset-db, empty /storage/updatemgr/patch-store/ and start the service again. On 6.5 the tool is updatemgr-util reset-db. From vCenter 9.1, plain reset-db only resets online depots, and a full reset needs reset-db --force. Take an offline snapshot first.

The procedure is Broadcom KB 316581 (formerly VMware KB 2147284; the old number redirects). Its current title is Reset VMware Lifecycle Manager depot in vCenter Server Appliance 6.5/6.7/7.0/8.0/9.x. The service is still called vmware-updatemgr even though the product is now vSphere Lifecycle Manager (vLCM).

When to reset the VUM database

I first needed this after upgrading a VCSA from 6.5 to 6.7. Every Scan for Updates failed with:

There are errors during the scan operation. Check the events and log files for details.

Broadcom KB 345496 (formerly 67771) documents this exact case. The cause is missing dependency VIBs, and /var/log/vmware/vmware-updatemgr/vum-server/vmware-vum-server.log shows MISSING_DEPENDENCY_VIBS precheck entries. The fix in that KB is the database reset described below. More generally, reset the database only as a last resort, when the depot or patch store is inconsistent and normal troubleshooting has not helped.

Before you reset: what gets deleted

KB 316581 calls a full reset a destructive task. Plan for the following:

  • Custom baselines, custom download settings and manually imported patches and ISOs are removed. Cluster images are kept.
  • On vSAN clusters the vSAN default baselines are removed as well. vCenter re-creates them automatically on the next vSAN configuration change, such as adding a host or disk or an HCL DB update.
  • The new “download token” based depot URLs count as custom URLs, so you have to add them again after the reset.
  • Write down proxy settings, third-party download URLs and custom baselines before you start.
  • Take a backup or an offline snapshot (powered off) of the VCSA. In Enhanced Linked Mode, do it for all replicating nodes.

NSX warning: the KB says not to reset the database without VMware Support if NSX-T is installed on a cluster that uses a vLCM image. After a reset, those clusters cannot save or validate their image until the NSX depot is uploaded again (see the NSX section below).

Reset VUM database commands by vCenter version

vCenter Server ApplianceReset commandNotes
6.5/usr/lib/vmware-updatemgr/bin/updatemgr-util reset-dbFull reset
6.7, 7.0, 8.0python /usr/lib/vmware-updatemgr/bin/updatemgr-utility.py reset-dbFull reset
9.0 without VKSpython /usr/lib/vmware-updatemgr/bin/updatemgr-utility.py reset-dbFull reset
9.0 with VKSSame command, then the SQL fix from KB 316581The reset removes a column used by VKS upgrades
9.1 and laterreset-db = online depot reset
reset-db --force = full reset
Default behaviour changed in 9.1

Full reset on vCenter 6.5, 6.7, 7.0 and 8.0

  1. SSH to the VCSA as root and type shell to get a Bash shell.
  2. Stop the Update Manager service.
  3. Run the reset command for your version (see the table).
  4. Empty the patch store.
  5. Start the service, then log out of the vSphere Client and back in.
shell
service-control --stop vmware-updatemgr

# 6.7 / 7.0 / 8.0 (and 9.0 without VKS)
python /usr/lib/vmware-updatemgr/bin/updatemgr-utility.py reset-db
# 6.5 only:
# /usr/lib/vmware-updatemgr/bin/updatemgr-util reset-db

rm -rf /storage/updatemgr/patch-store/*
service-control --start vmware-updatemgr

Double-check the rm -rf path before you press Enter. It has to be exactly /storage/updatemgr/patch-store/*.

vCenter 9.0 with vSphere Kubernetes Service (VKS)

KB 316581 lists a known issue: on vCenter 9.0, reset-db removes a database column that VKS upgrades use. When VKS is in use, take an offline snapshot, run the reset, and then apply the SQL script from the KB to the VCDB. The KB names the file flb-vcdb-fix.sql and runs it with psql -U postgres -d VCDB -f flb-vcdb-fix.sql. The expected output is SET followed by six ALTER TABLE lines. Copy the SQL from the KB itself rather than from a blog. If your output does not match, open a support request with Broadcom and reference the KB.

vCenter 9.1 and later: online depot reset vs reset-db --force

From vCenter 9.1, updatemgr-utility.py reset-db no longer wipes everything by default. It cleans all online depots (built-in and custom) and syncs them with the latest content. It does not restart the vLCM service, so running vLCM operations are not interrupted. The tool asks for SSO administrator credentials and returns a task that you can follow in the UI or with dcli.

shell
python /usr/lib/vmware-updatemgr/bin/updatemgr-utility.py reset-db
# monitor the SyncDepots task
dcli com vmware cis tasks get --task <task id>

If the online reset does not fix the depot, you have two options:

  1. Full reset with reset-db --force. This removes all online and offline depot content, including custom online depots and the NSX and IOFilter depots. Only the built-in online depot content comes back. The command restarts the vLCM service. Use the same stop / reset / empty patch store / start sequence as above, with reset-db --force as the reset command.
  2. Delete only the offline depot that causes the problem:
dcli com vmware esx settings depots offline list
dcli com vmware esx settings depots offline delete-task --depot <depot UUID>
# if the depot is in use:
dcli com vmware esx settings depots offline delete-task --depot <depot UUID> --force true

NSX in vLCM-managed clusters: re-upload the NSX depot

This applies to vCenter 7.0 U1 and later with NSX-T. It is not needed for NSX-V. NSX Manager uploads its depot to vCenter only when NSX is configured on a vLCM cluster and the depot is missing. The KB therefore uses an empty helper cluster to trigger the upload again:

  1. In vCenter, create a new, empty cluster that is managed with a vLCM image.
  2. In NSX Manager, open the Hosts and Clusters view, select the new cluster, click Add NSX and pick a Transport Node Profile. Live traffic is not affected because the cluster has no hosts.
  3. When the related vCenter tasks complete, delete the helper cluster.

After the reset

  • Log out of the vSphere Client and back in.
  • Re-add the download-token depot URLs, the proxy and any third-party depots.
  • Re-import ISOs and offline bundles. Re-create and re-attach custom baselines on clusters that still use baselines.
  • Let the depot sync finish, then run a new compliance check.

Sources

Related on vdan.cz