Which vCenter file to download for an upgrade or patch (full VCSA ISO or patch-FP.iso), where it is on the Broadcom portal, and every 8.0 and 9.x build.
Short answer: For a vCenter update within the same major version (for example 8.0 U2 to 8.0 U3k) download the patch ISO (…-patch-FP.iso) from Broadcom Support Portal > My Downloads > Solutions and install it from the VAMI. For a new install or a major upgrade (7.0 to 8.0, 8.0 to 9.0) download the full installer ISO (VMware-VCSA-all-…iso) from My Downloads > Products. The download list below gives every vCenter 7.0, 8.0 and 9.x build with its patch ISO file name.
Which vCenter file do you need?
File
Name pattern
Use it for
Full installer ISO
VMware-VCSA-all-<x.y.z>-<build>.iso
New install, major upgrade (7.0 to 8.0, 8.0 to 9.0) and migration. The installer deploys a new appliance and copies the configuration and data from the old one.
Update or patch within the same major version (for example 8.0 U2 to 8.0 U3k). Attach it to the appliance CD-ROM and install it from the VAMI or with software-packages.
Published for some releases. Unzip it on an internal web server and point the VAMI update settings at that URL.
A version appears in the portal only if your account has an entitlement for it, and the portal asks you to sign in first. For the ESXi side of the same upgrade see the ESXi ISO download list.
vCenter download list: every build for 7.0, 8.0 and 9.x
Builds and dates from Broadcom KB 326316, checked on 30 September 2026. The patch ISO names follow Broadcom’s fixed pattern, which I checked against eleven real downloads from 7.0 U1c to 8.0 U3b. A GA release is the base version, so it has only a full installer ISO. Each link opens the Broadcom Support Portal.
In VCF 9, SDDC Manager and VCF Operations fleet management usually download the vCenter upgrade bundles through their depot, so you rarely fetch a vCenter file by hand. A standalone vCenter 9 in vSphere Foundation is patched from the VAMI as before.
Full installer ISO file names for vCenter 8.0 and 9.x
Broadcom does not publish a full installer ISO for every patch, so only the releases below have one. The names are confirmed from real downloads. In 8.0 the name uses the update level and the build (8.0.3-24853646); from 9.0 it uses the full four-part version and a dot before the build (9.1.0.0300.25629530). Search the portal for the exact name.
Take a file-based backup from the VAMI and an offline snapshot of the appliance (all nodes together if you use Enhanced Linked Mode).
Check the certificates, including the STS signing certificate, with vCert. An expired certificate is a common reason for a failed upgrade; see STS signing certificate expiration.
Why an ESXi host stops at VMware Hypervisor Recovery or No hypervisor found, and how to fix it: KB 324877, Shift+R rollback, repair install.
Short answer: if an ESXi host stops at “VMware Hypervisor Recovery” or reports “No hypervisor found”, the host could not load a valid image from its boot device. First check the firmware boot mode and the boot device itself. If the hang started right after a 7.0 Update 2 upgrade on a UEFI host, apply the boot loader workaround from KB 324877. If the image is damaged, roll back with Shift+R (only if the altbootbank still holds the previous build), or reinstall with “Install ESXi, preserve VMFS datastore” and restore the configuration backup.
What the “VMware Hypervisor Recovery” screen means
ESXi 7.0 and later keep the hypervisor in two boot banks on the boot device. According to the ESXi 7.0 system storage documentation, the layout is a System Boot partition (boot loader and EFI modules), Boot-bank 0 and Boot-bank 1 (ESXi boot modules, mounted as /bootbank and /altbootbank) and ESX-OSData (scratch, VMware Tools locker, core dumps, logs). The active bank holds the running build. The other bank holds the build from before the last update.
Broadcom documents the “VMware Hypervisor Recovery” message in one specific case, KB 324877: a UEFI host hangs at the boot loader showing this message after an ESXi install or upgrade. Broadcom does not publish a general definition of the screen. Treat it, and the related “No hypervisor found” error, as a sign that the host could not boot a working image. Look at the boot loader, the boot bank contents, the boot device and the firmware settings, in that order.
VMware Hypervisor Recovery: cause and fix table
Symptom
Likely cause
Fix
Source
UEFI host hangs at “VMware Hypervisor Recovery” right after upgrading to 7.0 Update 2
7.0 U2 boot loader loads EFI files in a way some firmware does not support
Boot the 7.0 U1 installer and copy its boot loader files to the boot partition
KB 324877
“No hypervisor found”
Missing or corrupted ESXi files, failed SD card or disk, boot LUN lost, boot order or boot mode changed
Check boot mode (UEFI vs BIOS) and boot order, check hardware and storage, then reinstall
KB 404825
Host fails or misbehaves after a patch or upgrade
Problem with the new image in the active bank
Shift+R rollback to the build in the altbootbank
KB 316592
Host silently reverts to the old build after an upgrade
Faulty dual SD card RAID mirror, or not enough contiguous space to repartition for the 7.0 layout
Move to supported boot media, or clean install without a datastore on the boot device
KB 418807, KB 426659
Upgrade precheck reports a vFAT bootbank problem, or PSOD while backing up vFAT partitions
Corrupted vFAT boot bank partitions
Repair the partitions with dosfsck
KB 91136 (345227)
“Out of resources” when booting a newer release in legacy BIOS mode
Image too large for legacy BIOS boot
Switch to UEFI on the old release first, then upgrade
KB 84233 (313152)
UEFI boot hang after ESXi 7.0 Update 2 (KB 324877)
KB 324877 covers ESXi 7.0.x. Broadcom states that the way ESXi 7.0 U2 loads EFI files is not supported by some system firmware. The workaround replaces the boot loader on the system boot partition with the one from the 7.0 U1 installer. In outline:
Boot the host from the ESXi 7.0 U1 installer ISO and open the shell with Alt+F1 (log in as root, no password).
Identify the boot disk with ls /dev/disks and partedUtil getptbl. Partition 1 (systemPartition) is the boot partition.
Back up the existing BOOTx64.EFI, mboot64.efi and safeboot64.efi, then copy the versions from /usr/lib/vmware/bootloader-installer onto the boot partition with mcopy.
Reboot from the disk.
Follow the exact commands in the KB, because the device name differs on every host. This only applies to this 7.0 U2 case. It does not fix a damaged boot bank or a failed boot device.
Shift+R: roll back to the previous bootbank
KB 316592 describes the rollback for ESXi 6.x, 7.x, 8.x and ESX 9.x. Reboot the host and press Shift+R while the hypervisor progress bar is loading, not after it finishes. The KB suggests pressing it repeatedly once the “system is preparing to boot” message appears. ESXi then warns that the current hypervisor will be permanently replaced with the older build. Press Y to confirm and Enter to boot.
Rollback only works if the altbootbank still holds a different, working build. Before you rely on it, check the build= line of both banks from the ESXi Shell:
grep build= /bootbank/boot.cfg /altbootbank/boot.cfg
esxcli software profile get
Limits documented in KB 316592, KB 376175 and KB 386377:
Only one previous state (n-1) is kept. Each upgrade or VIB install or removal discards the older copy.
After the first reboot following an upgrade, any change that needs another reboot commits the new build to both banks. After that, rollback is gone.
In an HA cluster, exiting maintenance mode installs the FDM VIB. After an upgrade to 8.0 this discards the previous build (KB 386377). The workaround is to disable vSphere HA before the upgrade.
You cannot roll back from 7.0 to 6.x because the partition layout changed. Rollback between 7.0, 8.0 and 9.0 is possible.
Rollback does not revert the tools-light VIB, and it will not help if the boot device itself is failing.
VMware Hypervisor Recovery: “No hypervisor found”
KB 404825 lists the causes: missing or corrupted ESXi files, a failing SD card or disk, a power outage, a boot LUN lost through network or storage problems, a changed boot order, or a changed boot mode. Work through it in this order:
Confirm the firmware is still in UEFI mode and the ESXi device is first in the boot order.
Check the hardware logs (iDRAC, iLO, CIMC and similar) for a failed SD module, M.2 device or disk. For boot from SAN, have the storage team check the LUN and its paths.
Try Shift+R if the other bank has a valid build.
If nothing else works, reinstall ESXi (next section).
ESXi repair install: reinstall without losing VMs
Broadcom does not document a separate “repair” mode. The documented path is to boot the installer and run it over the existing installation. When the installer finds ESXi and a VMFS datastore on the selected disk, KB 392956 lists three options:
Upgrade ESXi, preserve VMFS datastore: upgrades the installation and keeps both the settings and the datastore.
Install ESXi, preserve VMFS datastore: fresh ESXi install that keeps the datastore. The host configuration is lost.
Install ESXi, overwrite VMFS datastore: wipes the installation and the datastore on that disk.
The TechDocs page for ESX 9.0 interactive upgrade adds that if the datastore cannot be preserved, you can only overwrite it or cancel. In that case, back up the datastore first.
A configuration backup can only be restored to the same build, so reinstall from the same build you backed up (KB 313510, KB 413897). If you need a specific ISO, see the download tip linked below.
Boot device causes
SD card and USB boot media
KB 85685 (now 317631) explains why SD/USB boot devices wear out on 7.0 and later: ESX-OSData takes constant writes and the wear cannot be monitored. SD/USB boot is still supported through VCF 9.0 on previously certified servers. Broadcom recommends a persistent device for OSData, or better, an SSD/NVMe boot device (8.x: 32 GB minimum, 128 GB recommended; 9.x: 128 GB minimum). KB 317891 lists the warnings 7.0 U3 and later raise without one. KB 413897 covers the migration: back up, reinstall the same build on the new disk, fix the boot order, restore.
Corrupted vFAT boot banks
If an upgrade precheck reports a vFAT bootbank problem, see the KB 91136 walkthrough linked below. It covers identifying the boot bank partitions with esxcli storage filesystem list and vmkfstools -P, then checking and repairing them with dosfsck in maintenance mode.
Legacy BIOS vs UEFI
KB 84233 (313152) warns that newer releases may fail to boot in legacy BIOS mode, for example with “Out of resources”. Switch to UEFI while still on the old release, reboot, fix any device naming issues, and only then upgrade. An unexpected BIOS/UEFI mode change is also listed as a cause in KB 404825.
Restore the configuration afterwards
After a clean install, restore the configuration bundle as described in KB 313510. The build must match the backup, and the host UUID should match. From 7.0 U2, a TPM-encrypted configuration cannot be force-restored to different hardware. The ESXi Shell workflow is:
# before the failure (or on a healthy host, regularly)
vim-cmd hostsvc/firmware/sync_config
vim-cmd hostsvc/firmware/backup_config

# on the reinstalled host, same build (check with: vmware -vl)
vim-cmd hostsvc/maintenance_mode_enter
# reboot, copy the bundle to /tmp/configBundle.tgz, then:
vim-cmd hostsvc/firmware/restore_config 0
The restore reboots the host automatically. KB 413897 notes that the bundle does not include SSH keys, custom scripts or third-party agents.
Preventing ESXi boot recovery problems
Boot from an endurance-rated SSD, NVMe or M.2 RAID device, not SD/USB. At minimum, give OSData a persistent device.
Run hosts in UEFI mode and switch before a major upgrade, not during it.
Schedule regular configuration backups with vim-cmd hostsvc/firmware/backup_config and keep the matching ISO for each build.
Check both boot bank builds before and after an upgrade. If you need a rollback option, validate the new build before any further reboot-requiring change, and consider disabling HA during the upgrade (KB 386377).
Do not create extra VMFS datastores on the boot device (KB 426659).
How a custom CA changes VCF 9 certificate operations: what Fleet Management auto-renews, what stays manual, and how new ESX hosts must be onboarded.
Short answer: In VCF 9, the certificate authority you choose decides who renews each certificate. Certificates signed by a CA configured in VCF Operations (VMCA, Microsoft CA or OpenSSL CA) can be renewed manually or automatically from Fleet Management, 60 days before expiry. Certificates signed by an external CA that you import are yours to renew. And once ESX hosts get CA-signed certificates through Fleet Management, vCenter switches to custom certificate mode, so every new host needs a CA-signed certificate before you commission it.
Fleet-wide certificate work is done in the VCF Operations console. The menu path depends on the version of the documentation you follow:
VCF 9.0:Fleet Management > Certificates, then VCF Management (fleet components) or VCF Instances and pick an instance or domain.
VCF 9.1:Manage in the top navigation bar, then Fleet management > Certificates in the left pane. The same VCF Management / VCF Instances split applies.
The scope split matters. The CA and the auto-renewal setting are configured separately for VCF management components (VCF Operations, VCF Automation, identity broker, logs, networks, fleet management services) and for each VCF Instance (vCenter, ESX, NSX Manager, SDDC Manager). Three instances means three instance-level CA configurations to keep consistent. The same screens show certificates and Certificate Alerts, and let you generate CSRs, import and replace; 9.1 adds bulk operations.
Configured CA versus imported certificate
This is the distinction that drives the whole operating model. The VCF 9.1 documentation lists three configured CA types:
VMCA: the default signing CA, embedded in vCenter.
Microsoft CA (AD CS): integrated through the /certsrv web enrollment URL, a least-privileged service account and a certificate template you create on the CA.
OpenSSL CA: the CA embedded in SDDC Manager.
Scope is version-specific. The VCF 9.0 “Configure a Certificate Authority” page says that VCF management components support only Microsoft CA, while VCF Instance components support Microsoft CA and OpenSSL. The VCF 9.0 blog adds that the Fleet Management appliance acts as the CA for the management components when you leave them at their defaults. In 9.1, check the supported combinations for your build before you standardise.
Anything else counts as an external CA: a public CA, or an enterprise PKI that is not wired into VCF Operations. The 9.1 documentation is explicit about what that means in practice:
Operation in VCF Operations
Configured CA
External CA
Self-signed
Generate CSR / import
Yes
Yes
No
Manual renew
Yes
No
No
Auto-renew
Yes
No
No
Replace with VMCA-signed (9.1.1+)
Yes
Yes
Yes
Auto-replace with VMCA before expiry (9.1.1+)
n/a
Yes
No
Monitor for expiry
Yes
Yes
Yes
Summarised from the VCF 9.1 “Managing Certificates in VMware Cloud Foundation” page.
So an imported certificate is monitored but not renewed. For an external CA the cycle is manual: generate a CSR, have it signed outside VCF, import it (base64 .crt, .cer, .pem, .p7b or .p7c), then use Replace with imported certificate. Expired certificates cannot be replaced, so this must happen before expiry. The 9.1.1 auto-replace with VMCA is a fallback that changes the issuer, which your security team may not accept.
What auto-renewal actually covers
When you use Activate Auto-renewal at the management or instance level, VCF renews TLS certificates that meet two conditions: they were signed by a configured CA, and the component supports non-disruptive certificate (NDC) updates. Renewal starts 60 days before expiry. The 9.0 documentation lists the NDC-managed certificates: ESX SSL, vCenter machine SSL, NSX Manager (local manager and VIP), SDDC Manager, VCF Identity Broker, VCF Operations, VCF Automation, VCF Operations for logs, VCF Operations for networks, and Fleet Management.
Limits to plan around:
Microsoft CA and OpenSSL auto-renewal needs the CA configured first. A Microsoft CA must be reachable from VCF Operations and time-synchronised with SDDC Manager.
Root and intermediate certificates are never renewed.
In 9.1, if a certificate is already inside the 60-day window, renew it manually before you turn auto-renewal on.
System-managed certificates, such as internal certificates without a customer-facing API, are renewed by their own component. VCF Operations only monitors them and raises an alert if that renewal fails.
vCenter also has its own native auto-renewal (vCenter 8.0 U3h / VCF 9.0.2 and later). According to KB 427937, it renews ESXi certificates 10 days before expiry (vpxd.certmgmt.certs.autoRenewThreshold) and the machine SSL certificate 5 days before, and it does not work when the certificate mode is custom. For VCF, Broadcom recommends configuring the CA in Fleet Management instead. The auto-renewal article in this series covers the vCenter side.
Custom certificate mode and new ESX hosts
This is the part that catches teams during expansion. KB 427937 says that the first time you configure an ESX host with a CA-signed certificate through Fleet Management, vCenter’s vpxd.certmgmt.mode advanced setting changes to custom. As a result, you must apply a CA-signed certificate to new hosts before you commission them. KB 417983 adds that the switch happens even when the replacement certificate comes from VMCA, because vCenter does not allow ESX certificate changes outside custom mode. After the switch, vCenter raises the alarm “When ESXi Certificate Mode is set to custom it is mandatory to add the custom CA certificates to vCenter trusted root store before updating the host certificates”. The KB treats this as expected and says you can reset it to green.
In custom mode, vCenter no longer provisions VMCA certificates to hosts, and certificate management becomes your responsibility (see vSphere 9.0 “Change the ESX Certificate Mode”). If you try to commission a host that still has its default certificate, it can fail validation with Host SSL certificate is not trusted by SDDC Manager / SDDC_TRUST_HOST_SSL_CERT_FAILED (KB 415767, VCF 5.2.x and 9.x). The commissioning documentation states the same rule for deployments done with external ESX certificates: all hosts added later must also use external certificates.
A repeatable onboarding procedure for a fleet in custom mode:
Check the mode on the target vCenter: Configure > Advanced Settings, filter on vpxd.certmgmt.
Prepare the host as usual: DNS forward and reverse records, host name equal to the FQDN, self-signed certificate regenerated for the FQDN.
Issue a certificate for the host from the same CA chain the rest of the domain uses. Include the FQDN in the SAN; in 9.1, VCF Operations requires both the FQDN and the IP in the SAN for certificates it generates or imports.
Install it on the host (/etc/vmware/ssl/rui.crt and rui.key, then restart hostd and vpxa), following “Configure ESX Hosts with Signed Certificates”.
Make sure the issuing root and any intermediates are trusted by vCenter and SDDC Manager, then commission the host.
After the host is added, confirm it appears under the instance in Fleet Management with Show ESX Hosts turned on, and that it falls under auto-renewal if its issuer is a configured CA.
KB 415767 also describes a workaround for environments that moved to external certificates after bring-up: temporarily set the mode back to vmca, commission the host, then revert. The new host then carries a VMCA certificate that you still have to replace, so treat this as an exception.
Certificate ownership matrix
A template to complete for your own fleet. Rows reflect the documented behaviour described above. Where the documentation does not settle a cell for every deployment, the cell says “check your deployment”.
Component
Issuer
Renewal mechanism
Monitoring
Onboarding procedure
vCenter machine SSL
VMCA, Microsoft CA or OpenSSL CA (configured)
Fleet Management auto-renewal, 60 days before expiry (NDC)
VCF 9.0: Microsoft CA or Fleet Management default CA; 9.1: check your deployment
Management-level auto-renewal (NDC)
Certificate Alerts (VCF Management)
Check your deployment
Any component with an imported external-CA certificate
External / public CA
Manual: CSR, sign, import, replace, before expiry
Expiry monitoring in VCF Operations
Your PKI process; record the owner and expiry date
System-managed internal certificates
Component-internal
Renewed by the component itself
VCF Operations alerts on failed renewal
Check your deployment
In your own copy, add a named owner and the CA template used for each row. Use the same CA settings (URL, template, service account) in every VCF Instance, and keep imported external-CA certificates to a minimum, because each one is a manual renewal. If the CA wizard fails in VCF 9.0, see the KB 406901 write-up.
vCenter 8.0 U3h and VCF 9.0.2 renew VMCA Machine SSL and ESXi certificates automatically. What is covered, which thresholds apply, where vCert fits.
Short answer: Partly. From vCenter 8.0 Update 3h and VCF 9.0.2, vCenter renews VMCA-issued Machine SSL and ESXi host certificates automatically, but only when vpxd.certmgmt.mode is vmca, and only just before expiry: 5 days for Machine SSL, 10 days (configurable) for ESXi. Solution user, STS signing, externally issued and legacy-store certificates are not covered. You still need to know which mechanism owns each certificate, and keep vCert ready for recovery.
Before vCenter 8.0 Update 3h, an expiring VMCA-issued Machine SSL certificate was an administrator task. If nobody acted, the certificate expired and services such as vpxd-svcs and sps stopped starting. Broadcom KB 396907 describes that failure and the manual fix with vCert.
The vCenter 8.0 U3h and VCF 9.0.2 release notes add native auto-renewal for two certificate types:
vCenter Machine SSL: extended by 2 years once fewer than 5 days remain.
ESXi host SSL: extended by 5 years once fewer than 10 days remain. This applies to hosts that support non-disruptive certificate renewal. The 8.0 U3h notes limit it to ESXi 8.0 Update 3 and later.
Both renewals apply only to certificates that VMCA issues. Both stop working if the vCenter advanced setting vpxd.certmgmt.mode is custom. KB 427937 adds that vCenter services are not restarted during the renewal.
Three renewal mechanisms, not one
“Auto-renewal” can mean three separate things, and they have different thresholds and eligibility rules. Before you trust any of them, check which one owns the certificate in front of you.
Mechanism
Covers
When it renews
Condition
Source
Native vCenter, Machine SSL
vCenter Machine SSL certificate issued by VMCA
5 days before expiry; fixed, not configurable
vpxd.certmgmt.mode = vmca; vCenter 8.0 U3h+ or VCF 9.0.2+
KB 427937, 8.0 U3h and 9.0.2 release notes
Native vCenter, ESXi
ESXi host certificates issued by VMCA
10 days before expiry (8.0 U3h / 9.0.2); configurable via vpxd.certmgmt.certs.autoRenewThreshold
vmca mode; host supports non-disruptive renewal
KB 427937, release notes
VCF Operations Fleet Management
VCF components with VMCA, Microsoft CA, OpenSSL or self-signed certificates that support non-disruptive updates
60 days before expiry
Auto-renewal toggle turned on per VCF Management or per VCF Instance; for Microsoft CA or OpenSSL, a CA configured first
KB 427937, VCF 9.0 TechDocs
One side effect is easy to miss. KB 427937 says that the first time you give an ESXi host a CA-signed certificate through Fleet Management, vCenter switches vpxd.certmgmt.mode to custom. After that, new hosts need a CA-signed certificate before you commission them, and the native vCenter renewal in the first two rows stops applying. Fleet Management and native renewal are alternatives, not layers. Article 4 of this series covers the Fleet Management side.
The ESXi threshold depends on version and source
Published values for the native ESXi renewal threshold differ:
Source
Version
ESXi renewal threshold
vCenter 8.0 U3h release notes
vCenter 8.0 U3h
fewer than 10 days
VCF 9.0.2 vCenter release notes
VCF 9.0.2
fewer than 10 days
KB 427937
vCenter 8.0 U3h, VCF/VVF 9.0.2
10 days, changeable with vpxd.certmgmt.certs.autoRenewThreshold
“What’s New with vSphere in VCF 9.1” (VMware blog, May 2026)
vSphere in VCF 9.1
30 days, configurable with the same setting
The most likely explanation is that the default changed in 9.1, but I have not found release notes that state this directly. Don’t rely on either number. Check the value your vCenter actually uses:
In the vSphere Client, select the vCenter Server and open Configure > Settings > Advanced Settings.
Filter on vpxd.certmgmt.
Check vpxd.certmgmt.mode. It must be vmca for native renewal.
Check vpxd.certmgmt.certs.autoRenewThreshold (days). Broadcom does not say whether this key is listed when it has never been set. If it is missing, assume the documented default for your version.
While you are there, note vpxd.certmgmt.certs.hardThreshold. TechDocs gives it a default of 30 days and describes it as the point where vCenter raises a red alarm.
Why the alarm fires before renewal is due
KB 427937 says the certificate pre-expiration alarm fires 30 days before expiry by default. KB 397104 ties the Certificate Status alarm to vpxd.cert.threshold and vpxd.certmgmt.certs.hardThreshold, both 30 by default. Native renewal does not start until 5 days (Machine SSL) or 10 days (ESXi, 8.0 U3h / 9.0.2) before expiry. That means a healthy, eligible certificate can keep a red alarm raised for about three weeks before renewal happens.
KB 427937 also says renewal follows the certificate’s expiration date, not the time the alarm fired. You have two options: renew early yourself, or confirm eligibility and let the alarm run its course. What you must not do is assume the alarm will clear on its own. It will not if the certificate is not eligible, for example a solution user certificate (KB 397104). It also will not clear if the certificate that triggers it lives in a store that renewal never touches. Article 3 covers the BACKUP_STORE case.
Where auto-renewal does not help, and vCert does
An expired Machine SSL certificate. If the vCenter is below 8.0 U3h, or the certificate already expired while in custom mode, KB 396907 still points to manual replacement with vCert (Manage certificates > Machine SSL certificate) followed by a restart of all services.
Solution user certificates. KB 397104 resolves expiring solution user certificates by replacing them, for example with vCert. Native renewal covers only Machine SSL and ESXi.
Legacy STS configuration. On vCenters upgraded from 6.x, the STS service can still use the old STS_INTERNAL_SSL_CERT store, and Machine SSL renewal never updates it. See article 1.
STS signing certificate. This is a separate certificate with its own failure pattern (“no healthy upstream”). See the STS signing certificate guide.
Externally issued certificates. The VCF 9.1 vSphere blog is explicit that certificates from an external CA are not auto-renewed natively. The administrator owns them, or Fleet Management does in VCF.
Trust problems and health checks. Stale trusted roots, mismatched trust anchors and certificates left in unused stores do not expire into an outage on a schedule, so no renewal job fixes them. A regular vCert health check (option 1) after each upgrade finds them. The vCert guide explains how to read the report.
The same blog notes that in 9.1 the VMCA root and its solution user certificates are renewed during a vCenter upgrade if the root expires in less than a year. Machine SSL and ESXi certificates are not renewed in that step.
A quick eligibility check
To see what is actually in VECS and when each entry expires, KB 396907 gives this loop. Run it on the vCenter appliance shell:
for i in $(/usr/lib/vmware-vmafd/bin/vecs-cli store list); do echo STORE $i; sudo /usr/lib/vmware-vmafd/bin/vecs-cli entry list --store $i --text | egrep "Alias|Not After"; done
Illustrative output (placeholder dates, trimmed):
STORE MACHINE_SSL_CERT
Alias : __MACHINE_CERT
            Not After : <date within 30 days>   <- alarm raised; native renewal at 5 days if mode = vmca
STORE STS_INTERNAL_SSL_CERT
Alias : __MACHINE_CERT
            Not After : <date>                   <- legacy store; not touched by renewal (see article 1)
STORE BACKUP_STORE
Alias : bkp___MACHINE_CERT
            Not After : <past date>              <- old copy; see article 3
For each certificate that expires soon, answer three questions: who issued it (VMCA or external), which mechanism owns it (native, Fleet Management or nobody), and does that mechanism’s condition hold. If the answer to the second question is “nobody”, renew it yourself with vCert, or through Fleet Management in VCF.
So, can you stop renewing manually?
For VMCA-issued Machine SSL and ESXi certificates on a vCenter in vmca mode: mostly yes, provided you accept an alarm that fires weeks before the renewal. For everything else, including VCF components with a custom CA, solution users, STS and legacy stores: no. Those need an owner, a monitor and a tested recovery procedure.
Renewed Machine SSL but port 3128 still shows an old cert? What vCert’s LEGACY STS result means and how to move STS to MACHINE_SSL_CERT.
Short answer:STS_INTERNAL_SSL_CERT is a legacy VECS store that older vCenter releases used for the Security Token Service (STS) TLS listener. After an upgrade, the STS service can still point at that store, so renewing the Machine SSL certificate does not change what STS presents on port 3128. vCert reports this as LEGACY. Broadcom’s fix is to switch the STS configuration to MACHINE_SSL_CERT with vCert, restart vmware-stsd, and then remove the old store (KB 423742, KB 424604).
The symptom: new Machine SSL certificate, old STS certificate
The usual sequence goes like this. You replace or renew the Machine SSL certificate, the vSphere Client shows the new certificate on 443, and everything looks healthy. Then a vulnerability scanner flags an expired or soon-to-expire certificate on port 3128, or an identity-related compliance check fails. Or you run vCert and the STS configuration check comes back as LEGACY.
Nothing went wrong with the renewal. There are simply two different certificate sources involved, and the one on 443 is not the one STS is using.
Where STS_INTERNAL_SSL_CERT comes from and why it survives upgrades
In vCenter 6.x and earlier, the vmware-stsd service took its TLS certificate from a dedicated VECS store named STS_INTERNAL_SSL_CERT. Upgrades migrate that configuration so that STS keeps working, which means the old store reference can live on for years. Broadcom’s sources describe the origin slightly differently:
KB 423742: usually left behind after upgrading from vCenter 5.5 or 6.x to 7.x or 8.x.
The vCert KB 385107: the legacy store is present if the system was upgraded from 5.5; greenfield 6.x/7.x deployments use MACHINE_SSL_CERT.
KB 316625: found on appliances that were originally Windows vCenter Servers and were later migrated to the VCSA. According to that KB, new 8.x deployments do not have this store.
So the practical rule is simple: if the vCenter has a long upgrade history, check for it. KB 423742 also explains why it causes trouble. Newer vCenter versions do not refresh this store when the Machine SSL certificate is renewed, so the certificate inside it can expire without anyone noticing. On 7.x/8.x, the STS store reference is defined in /usr/lib/vmware-sso/vmware-sts/conf/server.xml (KB 316625). On vCenter 9.0 and later, STS runs on an embedded Tomcat and the reference moved to /usr/lib/vmware-sso/vmware-sts/conf/catalina.properties (KB 438122).
STS TLS certificate vs. STS signing certificate
These two are often confused because both have “STS” in the name. They are different objects with different jobs, and vCert handles them in different menus.
STS TLS (server) certificate
STS signing certificate
Purpose
Secures the TLS connection to the STS listener
Signs SAML tokens issued by SSO
Where it lives
MACHINE_SSL_CERT (expected) or legacy STS_INTERNAL_SSL_CERT in VECS
TenantCredential entries in VMware Directory
Who sees it
Anything connecting to port 3128, including scanners
Services validating SSO tokens
vCert: check/view
5. Check configurations → 2. Check STS server certificate and configuration
2. View certificate info → 8. STS signing certificates
vCert: fix
Switch STS to MACHINE_SSL_CERT and restart vmware-stsd
Replace the STS signing certificate (Manage certificates)
Symptom when expired
Scanner/compliance finding on 3128
Login failures, “No Healthy Upstream”
A LEGACY result is about the left column only. If users cannot log in and the vSphere Client shows “No Healthy Upstream”, you are looking at the signing certificate instead; see vCenter STS signing certificate expiration.
How to read the vCert configuration check
If you have not used vCert yet, start with installing and using the vCert tool. The main menu option 1. Check current certificate status checks certificate health, meaning expiry, SAN and key usage. It does not tell you which store STS reads from. That question is answered by 5. Check configurations → 2. Check STS server certificate and configuration. This check does two things (KB 385107):
It checks which VECS store the STS service is configured to use. Anything other than MACHINE_SSL_CERT is reported as LEGACY, and vCert offers to update the configuration and restart the service.
It checks the vmwSTSConnectionStrings attribute in VMware Directory. A standalone vCenter should reference its own hostname; a node in Enhanced Linked Mode should reference localhost. If the value is wrong, vCert prompts you to correct it.
Inspect what port 3128 actually presents
KB 423742 identifies the STS listener as port 3128 and gives this command to run on the appliance:
For a shorter comparison, you can pipe the output through standard openssl x509 and put it side by side with the Machine SSL certificate on 443. This is plain OpenSSL usage, not a Broadcom-specific procedure:
for p in 443 3128; do
  echo "== port $p"
  openssl s_client -connect localhost:$p </dev/null 2>/dev/null | openssl x509 -noout -subject -issuer -enddate
done
To see whether the legacy store exists and what its entry expires, use the VECS listing from KB 424604 / KB 316625:
for i in $(/usr/lib/vmware-vmafd/bin/vecs-cli store list); do echo STORE $i; /usr/lib/vmware-vmafd/bin/vecs-cli entry list --store $i --text | egrep "Alias|Not After"; done
Broadcom’s workflow: KB 423742 and KB 424604
There are two KBs, and they cover two stages. KB 423742 (“STS_INTERNAL_SSL_CERT replacement using vCert”) switches the STS configuration interactively through the vCert menu. KB 424604 (“Removing STS_INTERNAL_SSL_CERT from vCenter Server with vCert”) removes the store, with a Lookup Service check first. Both apply to vCenter 7.x and 8.x, and both restart vmware-stsd. Combined, the procedure is:
Take a backup or snapshot. KB 424604 makes an offline snapshot mandatory. In Enhanced Linked Mode, take offline snapshots of all nodes.
Check the Lookup Service with lsdoctor: python lsdoctor.py -l. If it finds stale registrations, run python lsdoctor.py -s (stale configuration left over from 5.x) and then python lsdoctor.py -t (SSL trust mismatch). See the lsdoctor guide, and note that KB 320837 requires a service restart after -s and -t.
Run vCert. Either use the menu (./vCert.py → 5 → 2, then SSO administrator credentials) as in KB 423742, or run the check directly as in KB 424604: python vCert.py --run config/check_config/sts_config/op_check_sts_config.yaml
Answer y to “Update STS server configuration to use the MACHINE_SSL_CERT store?”
Answer y to “Restart service(s) vmware-stsd”.
Validate: port 3128 should now present the Machine SSL certificate, and the vCert check should no longer say LEGACY.
Do not delete the store by hand first. KB 316625 warns that removing STS_INTERNAL_SSL_CERT while server.xml still references it stops STS from starting, and the other vCenter services then fail with it. The configuration change always comes before the removal. That KB (and KB 438122 for vSphere 9.x) documents script and manual alternatives in case vCert is not an option.
Annotated example: before and after
Illustrative example only. Host names and dates are placeholders. The LEGACY line follows the format shown in KB 423742. Your vCert version may word the post-fix line differently.
# BEFORE - vcsa01.lab.local, upgraded from 6.x
== port 443
subject=CN = vcsa01.lab.local
issuer=CN = CA, DC = vsphere, DC = local, ...
notAfter=<new date, e.g. 2028>          <-- renewed Machine SSL, fine
== port 3128
subject=CN = vcsa01.lab.local
issuer=CN = CA, DC = vsphere, DC = local, ...
notAfter=<old date, already past>     <-- what the scanner reports

vCert: 5. Check configurations -> 2. Check STS server certificate and configuration
Checking STS Server Configuration
-----------------------------------------------------------------
Checking VECS store configuration                          LEGACY
                                    ^-- STS reads STS_INTERNAL_SSL_CERT, not MACHINE_SSL_CERT
Update STS server configuration to use the MACHINE_SSL_CERT store? [y/n]: y
Restart service(s) vmware-stsd [y/n]: y

# AFTER
== port 3128
subject=CN = vcsa01.lab.local
notAfter=<same date as port 443>       <-- 3128 and 443 now match
vCert STS check: no longer LEGACY           <-- configuration uses MACHINE_SSL_CERT
vecs-cli store list: no STS_INTERNAL_SSL_CERT entry (after KB 424604 removal)
A short checklist after the change: the 3128 and 443 certificates should have the same expiry date, vmware-stsd should be running, a vSphere Client login should work, and the scanner should be clean on its next pass. KB 423742 also says that once STS uses the Machine SSL store, later Machine SSL renewals carry over to STS as expected. For how renewals themselves are scheduled and monitored, see vCenter Certificate Auto-Renewal: When You Still Need vCert. If an expiry alarm still points at an old certificate after the fix, check the BACKUP_STORE article.
Why a vCenter certificate alarm can point to an old rollback copy in BACKUP_STORE or BACKUP_STORE_H5C, and how to verify and clear it with vCert.
Short answer: the Certificate Status alarm checks every store in VECS, not only the certificates vCenter actively uses. Replacing certificates saves the old ones in BACKUP_STORE and BACKUP_STORE_H5C so you can roll back, and when those copies expire they can raise the alarm. Find out which store and alias the alarm refers to. Confirm the active Machine SSL and solution user certificates are valid. Then use vCert to clear the expired backup entries. Your vCenter version decides which backup store can still raise the alarm.
A Machine SSL or solution user replacement on the vCenter Server Appliance doesn’t simply discard the old certificate. According to KB 326268, the replacement creates two VECS stores, BACKUP_STORE and BACKUP_STORE_H5C. The old certificates go into them so the change can be reverted. The vSphere documentation describes BACKUP_STORE as the store that supports certificate revert. It keeps only the most recent state, so you can go back one step and no further.
Nothing removes these entries automatically. They keep their original validity dates. The certificate you replaced a year ago still sits in the backup store, and its expiry date keeps getting closer. vCenter watches all VECS stores (KB 318973). When a backup copy nears or passes its expiry date, you can get a Certificate Status alarm even though every certificate vCenter actually uses is fine.
Step 1: find the store the alarm refers to
Before you change anything, find out which certificate raised the alarm. KB 318973 documents the vpxd warning that the expiry check writes. The warning includes the certificate subject and the VECS store name:
grep "will expire on" /var/log/vmware/vpxd/vpxd.log | tail -20

# Message format documented in KB 318973:
# ... opID=CheckCertificateExpiry-... Certificate [Subject: <Certificate Subject>] from store <VECS Store Name> will expire on YYYY-MM-DD HH:MM:SS
If the store is MACHINE_SSL_CERT or a solution user store, the problem is real and you need to renew. If it is BACKUP_STORE or BACKUP_STORE_H5C, read on.
Step 2: compare active and backup certificate expiry
Run this over SSH as root to list the alias and the “Not After” date for every store except TRUSTED_ROOT_CRLS. KBs 318973 and 326268 both use it:
for store in $(/usr/lib/vmware-vmafd/bin/vecs-cli store list | grep -v TRUSTED_ROOT_CRLS); do echo "[*] Store :" $store; /usr/lib/vmware-vmafd/bin/vecs-cli entry list --store $store --text | grep -ie "Alias" -ie "Not After";done;
Compare the results with the active stores. MACHINE_SSL_CERT holds the __MACHINE_CERT alias. The solution user stores are machine, vpxd, vpxd-extension, vsphere-webclient and, depending on the version, hvc and wcp. Backup aliases have a bkp_ prefix, for example bkp___MACHINE_CERT or bkp_vpxd. If the active entries show future dates and only bkp_* entries have expired, the alarm is about a rollback copy.
Menu option 1 in vCert, “Check current certificate status”, gives the same view. It has its own “Checking BACKUP_STORE entries” section. The excerpt below is illustrative and follows the format shown in KB 425134:
# Illustrative example - vcsa01.lab.local, not real output
Checking Machine SSL certificate                 VALID
Checking Solution User certificates:
   machine                                       VALID
   vpxd                                          VALID
   vpxd-extension                                VALID
   vsphere-webclient                             VALID
Checking BACKUP_STORE entries:
   bkp___MACHINE_CERT                            EXPIRED   <-- old rollback copy
   bkp_machine                                   VALID
   bkp_vpxd                                      VALID
Step 3: know how your version behaves
This is where the version matters. The KBs describe it this way:
KB 326268 (applies to vCenter 6.x, 7.x, 8.x): from vCenter Server 7.0 Update 3 and in 8.0, an expired certificate in BACKUP_STORE no longer raises the alarm. An expired certificate in BACKUP_STORE_H5C still does, and you have to delete it to clear the alert.
KB 425734: vCert can flag BACKUP_STORE certificates that are expiring or expired. The KB says this has no impact on the system. Wait until they expire and then remove them with vCert, or open a support case if you want them removed earlier.
KB 445656 (7.x and 8.x): the backup entries are historical, inactive copies. The KB still recommends clearing them with vCert to prevent Certificate Status alarms.
KB 425134: expired BACKUP_STORE entries reported by vCert can also appear during vCenter upgrade prechecks. The fix is the same vCert cleanup.
So don’t assume every certificate warning is a false alarm, and don’t assume every one needs a renewal. On 7.0 U3 or 8.0, an alarm that persists while BACKUP_STORE is the only store with expired entries means you should keep looking. Check BACKUP_STORE_H5C and the other stores, and check the store name in vpxd.log. On older builds, an expired BACKUP_STORE entry alone can explain the alarm.
Troubleshooting table: store, active status, action
Store with expired/expiring entry
Active Machine SSL / solution users
Can it raise the alarm?
Action
MACHINE_SSL_CERT or solution user store
Expired or expiring
Yes. This is a real issue.
Renew first (vCert option 3 or vSphere Client). Leave the backups alone until the new certificates work.
Any backup store
Expired or expiring
Yes
Treat it as a real issue. Fix the active certificates first. The backup is your rollback path.
BACKUP_STORE
Valid
Before 7.0 U3: yes. 7.0 U3 and 8.0: not for expired entries (KB 326268).
Clear the expired entries with vCert 3 → 12. On 7.0 U3/8.0, if the alarm persists, look for another store.
BACKUP_STORE_H5C
Valid
Yes, including 7.0 U3 and 8.0 (KB 326268)
Clear the expired entries with vCert 3 → 12. vCert cleans this store too when it exists.
BACKUP_STORE, entries only approaching expiry
Valid
Reported by vCert. KB 425734 says there is no impact.
Wait until they expire and then clear them, or ask Broadcom Support to remove them early.
MACHINE_SSL_CERT, alias __MACHINE_CSR
Valid
Yes (KB 318973)
This is an old CSR entry. Clear it with vCert 3 → 14 or the KB 318973 command.
vCert is documented in KB 385107. The menu numbers below are from vCert 6.1.2, the version current in that KB when this post was written. Check them against the version you run. For installation, see my vCert guide.
Take a VAMI file-based backup or a snapshot of the vCenter. In Enhanced Linked Mode, take powered-off snapshots of all vCenter nodes in the SSO domain.
Optional: export the entry you are about to remove (KB 318973): /usr/lib/vmware-vmafd/bin/vecs-cli entry getcert --store BACKUP_STORE --alias bkp___MACHINE_CERT --output /root/old_machine.crt
Run ./vCert.py, then choose 3. Manage certificates and then 12. Clear expired certificates in BACKUP_STORE in VECS. KB 385107 says this option clears expired entries in BACKUP_STORE, and in BACKUP_STORE_H5C if that store exists.
Verify the result. Run vCert 1. Check current certificate status again, or rerun the vecs-cli loop. No expired bkp_* entries should remain.
If an alarm still shows after the stores are clean, reset it to green in the vSphere Client. KB 423484 notes that the alarm does not clear by itself after a certificate fix.
If vCert doesn’t clear an entry, KB 326268 gives a manual fallback. List the store, note the alias, and delete that one entry:
According to the vecs-cli reference, entry delete removes the entry from VECS permanently. Delete only the aliases you identified as expired backup copies. Never delete entries from the active stores, and don’t touch TRUSTED_ROOT_CRLS unless a KB tells you to.
Preventing a repeat
Every Machine SSL or solution user replacement leaves another backup copy behind. Once you have confirmed that the new certificates work, add a backup-store check to your runbook. This matters most when renewal is automated or done in batches, as covered in the auto-renewal article. On VCF 9, fleet-level certificate operations are covered in the custom CA article.
The ESXi shell commands admins really run over SSH, grouped by task: esxcli, vim-cmd, vmkping, esxtop and agent restarts, checked for ESXi 8 and ESX 9.
Short answer: the ESXi Shell commands you actually use fall into a small set: esxcli for host, network, storage and software state, vim-cmd for VMs when hostd works, vmkping for VMkernel connectivity and MTU tests, esxtop for live performance, and /etc/init.d/hostd restart or /etc/init.d/vpxa restart for stuck management agents. Enable SSH only for troubleshooting. Every esxcli command below exists in ESX 9.0 and in ESXi 8.0 U3 unless noted otherwise.
This is a curated list, grouped by task, not a full reference. For the complete namespace tree see ESXCLI commands for ESXi 8.0 and ESXCLI commands for ESX 9.0. Commands were checked against Broadcom’s ESXCLI Command Reference (8.0.3, 9.0.0 and 9.1.0); non-esxcli commands are taken from the Broadcom KB articles cited in each section. Placeholders: vmk0, vmnic0, datastore1, 10.0.0.10, naa.xxx.
Enable the ESXi Shell and SSH
The ESX Shell is deactivated by default and Broadcom recommends activating it for troubleshooting only. The shell is independent of lockdown mode: if the service is running, you can still log in to it even when the host is in lockdown mode. Two services matter: ESXi Shell (local console, Alt+F1) and SSH (remote, TCP 22).
vSphere Client: select the host, Configure > System > Services, select SSH or ESXi Shell, Edit Startup Policy > Start and stop manually, then Start.
Host Client:Manage > Services, select TSM (ESXi Shell) or the SSH service, Actions > Start.
DCUI:F2 > Troubleshooting Options > Enable ESXi Shell / Enable SSH. The same menu has Modify ESXi Shell and SSH timeouts.
Set a timeout so the service does not stay open. The availability timeout is the advanced option UserVars.ESXiShellTimeOut (seconds, 0 = disabled). To check SSH daemon settings from the shell:
esxcli system settings advanced list -o /UserVars/ESXiShellTimeOut
esxcli system ssh server config list
vmware -v / vmware -vl come from KB 345263 (determining the build number) and KB 323110; df -h and vdf -h (ramdisk usage, useful when /, /tmp or /var/log is full) from KB 318926 (investigating disk space).
Maintenance mode and reboot
esxcli system maintenanceMode get
esxcli system maintenanceMode set --enable true
esxcli system shutdown reboot --reason "Patching"
esxcli system maintenanceMode set --enable false
esxcli system shutdown reboot and poweroff take a --reason; the reference states the host must be in maintenance mode. On vSAN hosts, --vsanmode controls data evacuation; decide it before you enter maintenance mode, not after. Take a configuration backup first (vim-cmd hostsvc/firmware/sync_config then vim-cmd hostsvc/firmware/backup_config, KB 313510; details in Backup and restore ESXi host configuration data).
Networking
Task
Command
Physical NICs, link, speed, driver
esxcli network nic list
NIC details, firmware, driver version
esxcli network nic get -n vmnic0
NIC counters and errors
esxcli network nic stats get -n vmnic0
VMkernel interfaces, MTU, netstack
esxcli network ip interface list
vmk IPv4 addresses
esxcli network ip interface ipv4 get
vmk service tags (Management, vMotion…)
esxcli network ip interface tag get -i vmk0
Routing table
esxcli network ip route ipv4 list
DNS servers
esxcli network ip dns server list
Standard vSwitches and port groups
esxcli network vswitch standard list; esxcli network vswitch standard portgroup list
Distributed switches seen by the host
esxcli network vswitch dvs vmware list
VMs with active ports
esxcli network vm list
ARP table
esxcli network ip neighbor list
Open connections
esxcli network ip connection list
Firewall rulesets
esxcli network firewall ruleset list
vmkping and the MTU test
vmkping sends ICMP from a specific VMkernel interface. For a 9000 MTU path, use -d (do not fragment) and a payload of 8972 bytes (9000 minus 28 bytes of IP and ICMP headers); for 1500 use 1472. Add -S vmotion when the vmk is on the vMotion TCP/IP stack.
If 1472 works and 8972 fails, something in the path (vSwitch, uplink, physical switch port) is still at 1500. Sources: KB 313061 (testing jumbo frame pings), KB 344313 (testing VMkernel connectivity with vmkping). KB 313061 also lists esxcfg-vswitch -l and esxcfg-vmknic -l for a quick MTU overview.
Storage
Task
Command
Devices (LUNs, NVMe, local disks)
esxcli storage core device list
One device
esxcli storage core device list -d naa.xxx
Paths and their state
esxcli storage core path list
Multipathing policy per device
esxcli storage nmp device list
HBAs
esxcli storage core adapter list
HBAs, detailed (9.0+)
esxcli storage core adapter listdetailed
Rescan all adapters
esxcli storage core adapter rescan --all
Mounted datastores (VMFS, NFS, vSAN)
esxcli storage filesystem list
VMFS extents to device mapping
esxcli storage vmfs extent list
VAAI status
esxcli storage core device vaai status get -d naa.xxx
Caution:storage vmfs unmap generates I/O on the array; run it outside peak hours. Do not remove an NFS datastore that still has registered or running VMs.
VMs from the shell
vim-cmd needs a responsive hostd. esxcli vm process works on the running VM world and is the fallback for a VM that ignores power operations.
Caution: use kill -t soft first, then hard, and force only as a last resort. If esxcli itself does not respond, Broadcom suggests localcli with the same syntax. Sources: KB 308360 (common VM tasks via CLI), KB 308457 (powering off an unresponsive VM).
Restart hostd or vpxa individually when the host shows as disconnected or not responding in vCenter, then wait 1–2 minutes. Caution: Broadcom warns not to use services.sh restart (or Restart Management Agents in the DCUI) on hosts running vSAN, LACP, NSX, or shared graphics (vGPU, vDGA, vSGA); restart single services instead. Source: KB 320280 (restarting management agents).
Task
Command
Syslog configuration
esxcli system syslog config get
Set remote syslog target
esxcli system syslog config set --loghost udp://10.0.0.10:514
Apply syslog changes
esxcli system syslog reload
Write a marker into all logs
esxcli system syslog mark --message "start of test"
Advanced settings changed from default
esxcli system settings advanced list --delta
Core dump target
esxcli system coredump partition get; esxcli system coredump file list
Performance: esxtop basics
Run esxtop in the SSH session and switch views with single keys: c CPU, m memory, n network, d disk adapter, u disk device, v disk per VM, V show only VMs, f fields, h help, q quit.
For support cases, collect batch data to a datastore (-b batch, -a all metrics, -d interval in seconds, -n number of samples). 300 samples at 2 s = 10 minutes:
esxtop -b -a -d 2 -n 300 > /vmfs/volumes/datastore1/esxtop-$(hostname)-$(date +"%FT%H:%M").csv
Make sure the target datastore has free space and is not the one you are troubleshooting. Sources: KB 382249 (using esxtop), KB 370279 (collecting esxtop batch data).
Software and VIBs
Task
Command
Base image (ESXi version in the image)
esxcli software baseimage get
Installed components
esxcli software component list
Installed VIBs
esxcli software vib list
One VIB in detail
esxcli software vib get -n <vib-name>
Image profile
esxcli software profile get
Host acceptance level
esxcli software acceptance get
Verify VIB signatures
esxcli software vib signature verify
Profiles in an offline depot
esxcli software sources profile list -d /vmfs/volumes/datastore1/depot.zip
--dry-run exists on component apply, vib install, vib remove and profile update; use it before every change. On vLCM-managed clusters, remediate from vCenter instead. A quick check for NSX VIBs before any management-agent restart: esxcli software vib list | grep -E 'nsx|vsipfwlib'.
ESX 9 notes
ESX 9.0 adds two top-level namespaces, licensing and nsx; 9.1 adds memtier. None exist in 8.0 U3, and memtier is not in 9.0.
Task
Command
License credentials (9.0+)
esxcli licensing credential list
License entitlement assignments (9.0+)
esxcli licensing entitlement list
Stop NSX services (9.0+)
esxcli nsx services stop
Memory tiering status (9.1)
esxcli memtier status get
Memory tiering devices (9.1)
esxcli memtier device list
Memory tiering configuration (9.1)
esxcli memtier config get
Caution: the reference describes esxcli nsx services stop as stopping NSX services with the tn-delete option. It is not a diagnostic command; use it only under an NSX procedure or support guidance. Other 9.0 additions worth knowing: esxcli storage core adapter listdetailed, esxcli nvme auth get and the esxcli vsan dedup namespace. The full diff is in ESXCLI changes from ESXi 8.0 U3 to ESX 9.0 and 9.1.
ESX 9.0 adds 27 ESXCLI commands and drops 11 vs 8.0 U3 (SLP, WBEM/CIM); 9.1 adds 27 more incl. memtier. Full tables from Broadcom’s reference.
Short answer: compared with ESXi 8.0 U3, the ESX 9.0 ESXCLI reference adds 27 commands and drops 11. The additions are a new licensing namespace, an nsx namespace, NVMe host authentication, duplicate iSCSI sessions and a reorganised vSAN ESA dedup tree. The removals are SLP and WBEM/CIM, which ESX 9.0 no longer ships, plus one deprecated iSER setting. ESX 9.1 adds another 27 commands, led by a new memtier namespace for NVMe memory tiering and iSNS discovery for iSCSI.
Every command and option below comes from Broadcom’s published ESXCLI Command Reference for 8.0.3, 9.0.0 and 9.1.0. I compared the three versions namespace by namespace: 814 commands in 8.0.3, 830 in 9.0.0 and 857 in 9.1.0. What a host actually offers depends on its build and installed VIBs, so check with esxcli --help before you script against a command.
The biggest groups are licensing, which manages license credentials and entitlement assignments on the host for the VCF 9 licensing model, and vSAN ESA dedup. The dedup store commands moved from esxcli vsan dedupstore to esxcli vsan dedup dedupstore, next to new object- and space-level commands. Broadcom’s own description of vsan dedup object create says to use it only to replace a corrupted dedup hash object, following a runbook or KB, or with support. Treat that group as support tooling, not day-to-day commands.
Command (new in 9.0)
What it does
esxcli iscsi session duplicate add
Add duplicate sessions on current iSCSI configuration
esxcli iscsi session duplicate list
List duplicate sessions on current iSCSI configuration
esxcli iscsi session duplicate remove
Remove duplicate sessions on current iSCSI configuration
esxcli licensing credential add
Add a new license credential
esxcli licensing credential list
List the installed license credentials
esxcli licensing credential remove
Remove an existing license credential
esxcli licensing entitlement add
Adds a new license entitlement assignment
esxcli licensing entitlement list
Lists the license entitlement assignments
esxcli licensing entitlement remove
Removes a license entitlement assignment
esxcli licensing entitlement set
Updates an existing license entitlement assignment
esxcli nsx services stop
CLI to stop NSX services with tn-delete option
esxcli nvme auth get
Get NVMe host authentication information
esxcli nvme auth set
Set NVMe host authentication information
esxcli nvme device log commandeffects get
Get NVMe commands supported and effects log
esxcli storage core adapter listdetailed
Detailed listing of all HBAs registered with PSA
esxcli vsan dedup dedupstore distribution get
Get the dedup store distribution info of vSAN ESA (Express Storage Architecture) cluster
esxcli vsan dedup dedupstore get
Get vSAN ESA dedup store view
esxcli vsan dedup dedupstore resync list
Get detailed information of vSAN ESA resyncing dedup objects
esxcli vsan dedup dedupstore resync summary get
Get summary information of vSAN ESA resyncing dedup objects
esxcli vsan dedup object create
Create a dedup object
esxcli vsan dedup object distribution get
Get the chunk objects where the given regular object has data on
esxcli vsan dedup object reference get
Get the regular objects whose data the given chunk object holds
esxcli vsan dedup object space get
Get vSAN ESA regular object dedup space efficiency information
esxcli vsan dedup space get
Get vSAN ESA dedup space efficiency information
esxcli vsan iscsi vip list
List configured vSAN iSCSI VIPs
esxcli vsan witness license get
Get vSAN witness license info on the host
esxcli vsan witness license set
Set vSAN witness license config on the host
ESXCLI commands removed in ESX 9.0
The VCF 9.0 vSphere product support notes explain most of this list. ESX 9.0 removes CIM, the Small Footprint CIM Broker (SFCB), WSMan and the OpenSLP stack, which were deprecated in 8.0, and CIM providers for ESX 8.x and earlier aren’t supported on 9.0. Any script or monitoring check that calls esxcli system slp or esxcli system wbem fails on a 9.0 host. If hardware monitoring relied on CIM, ask the server vendor for a replacement.
Command (gone in 9.0)
Replacement / reason
esxcli rdma iser params set
Was already marked deprecated in 8.0.3
esxcli system slp get
OpenSLP stack removed in ESX 9.0
esxcli system slp search
OpenSLP stack removed in ESX 9.0
esxcli system slp set
OpenSLP stack removed in ESX 9.0
esxcli system slp stats get
OpenSLP stack removed in ESX 9.0
esxcli system wbem get
CIM/SFCB and WSMan removed in ESX 9.0
esxcli system wbem provider list
CIM/SFCB and WSMan removed in ESX 9.0
esxcli system wbem provider set
CIM/SFCB and WSMan removed in ESX 9.0
esxcli system wbem set
CIM/SFCB and WSMan removed in ESX 9.0
esxcli vsan dedupstore distribution get
Moved to esxcli vsan dedup dedupstore …
esxcli vsan dedupstore get
Moved to esxcli vsan dedup dedupstore …
Existing commands with new or removed options (8.0 U3 → 9.0)
These commands keep their name but their options changed. The removals matter most for scripts. For example, esxcli system health report get no longer lists --all-reports in 9.0.
The 9.1 reference adds a top-level memtier namespace to enable, configure and check NVMe memory tiering. The 9.0 reference has no memory-tiering namespace. For what memory tiering is and how it behaves, see NVMe memory tiering in vSphere 9.0. 9.1 also adds iSNS discovery for software iSCSI, NVMe flexible data placement, NFS restore commands and NFSv4.1 Kerberos credential commands. Nothing was removed between 9.0 and 9.1.
Command (new in 9.1)
What it does
esxcli iscsi adapter discovery isns add
Add iSNS discovery address
esxcli iscsi adapter discovery isns list
List iSNS discovery addresses
esxcli iscsi adapter discovery isns param get
Get parameters on iSNS discovery address
esxcli iscsi adapter discovery isns param set
Set iSNS discovery parameters
esxcli iscsi adapter discovery isns remove
Remove iSNS discovery address
esxcli iscsi adapter isnsparam get
Get the iSNS parameters for the iSCSI Host Bus Adapter
esxcli iscsi adapter isnsparam set
Set the iSNS parameter for the iSCSI Host Bus Adapter
esxcli licensing registration get
Show details about license registration
esxcli memtier config delete
Delete the memory tiering configuration
esxcli memtier config get
Get the memory tiering configuration
esxcli memtier config set
Set the memory tiering configuration
esxcli memtier device list
List memory tiering devices
esxcli memtier disable
Disable memory tiering
esxcli memtier enable
Enable memory tiering
esxcli memtier status get
Show the currently deployed Memory Tiering configuration
esxcli nvme device feature fdp get
Get NVMe device feature flexible data placement information
esxcli nvme device feature fdp set
Set NVMe device feature flexible data placement information
esxcli rdma device sniffer get
Get RDMA device sniffer settings
esxcli rdma device sniffer set
Set RDMA device sniffer settings
esxcli storage nfs restore
Restore previously mounted NFSv3 volumes
esxcli storage nfs41 credential get
Get NFSv4.1 kerberos default user credentials
esxcli storage nfs41 credential set
Set NFSv4.1 kerberos default user credentials
esxcli storage nfs41 credential unset
Unset NFSv4.1 kerberos default user credentials
esxcli storage nfs41 restore
Restore previously mounted NFS41 volumes
esxcli storage osdata get
Get OSData information
esxcli vsan dedup scan get
Get vSAN ESA dedup scanner information
esxcli vsan maintenancemode recommission
Recommission vSAN node, the command only set vSAN decommission state to non-decommissioned but not set host…
Option changes between 9.0 and 9.1. Note that esxcli vsan vdx create replaced three of its options and esxcli storage core claimrule add lost --if-unset:
Broadcom notes that the list of commands depends on the system you run it on. To see what a specific host supports, and to compare a host before and after an upgrade, use ESXCLI’s built-in introspection:
# Every namespace and command this host knows
esxcli esxcli command list

# Help for one namespace or command
esxcli licensing --help
esxcli system health report get --help

# Save the list before and after an upgrade, then diff the two files
esxcli esxcli command list > /tmp/esxcli-before.txt
Copy the output files off the host, for example with scp, and compare them with diff. That also catches commands that come from vendor VIBs, which Broadcom’s reference doesn’t list.
What to update in your scripts
Remove or guard any call to esxcli system slp … and esxcli system wbem … before you upgrade hosts to 9.0.
SAP HANA on VCF 9 with NFS: why storage needs its own NICs, separate from vMotion. The 2, 4 and 6 NIC models compared on Cisco VIC and HPE Synergy.
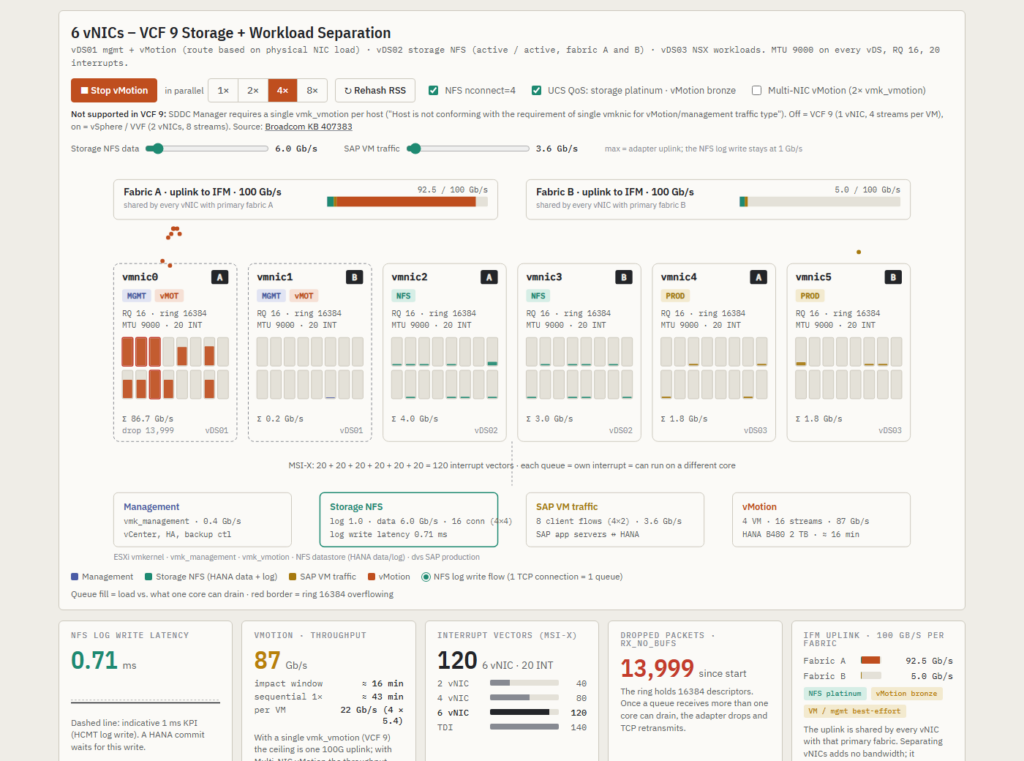
Short answer: on VCF 9 hosts that run SAP HANA on NFS, give storage its own pair of physical NICs (vNICs on Cisco UCS), separate from vMotion. The VCF 9.1 Design Library’s 6‑NIC Storage and Workload Separation model does this and also isolates NSX workloads, so I recommend it as the baseline. The 4‑NIC Storage Separation model also isolates NFS storage, but it puts SAP client traffic on the same switch as vMotion. The reason is host maintenance. A vMotion of a 2 TB HANA VM lands on the same receive queues as the NFS log writes of every HANA database on that host, unless storage has a vNIC of its own. HANA commits wait for those log writes. A faster adapter does not change that, and VCF 9 makes it worse by allowing only one vMotion VMkernel adapter per host. You can watch all of it happen in an interactive model: vdan.cz/vcf9-sap-hana-tdi-design.
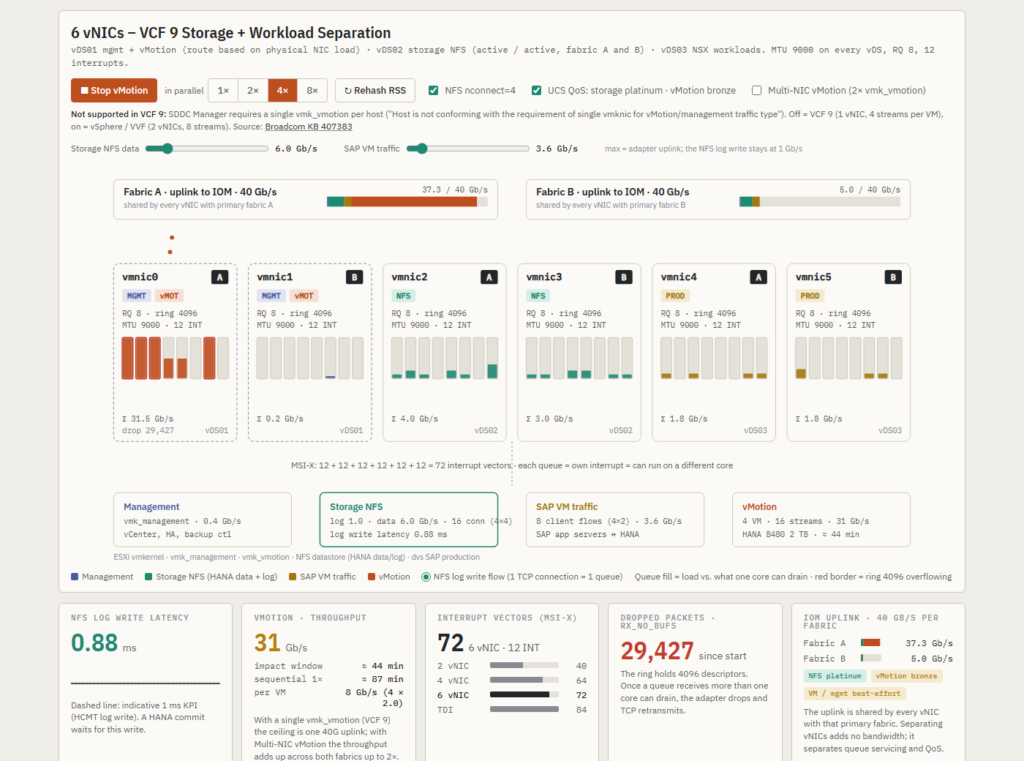
6 vNICs, four HANA VMs migrating at once. vMotion saturates vmnic0, the storage vNICs on vDS02 carry only the 16 NFS connections of those four VMs, and the log write stays under 1 ms.
Why vMotion is a HANA problem and not just a network problem
HANA writes its redo log synchronously. A transaction commit returns only after storage has acknowledged the log write, so log write latency turns directly into application response time. The SAP HCMT tool checks this, and the indicative KPI for log write latency is about 1 ms. Under normal load a well built NFS path delivers a few hundred microseconds.
Now migrate a HANA VM with 1 to 2 TB of RAM. On a 40 Gb/s uplink a vMotion runs at 16 to 35 Gb/s for 10 to 20 minutes, including the dirty page iterations at the end. If that traffic shares the network path with storage, the log write latency jumps from sub‑millisecond to several milliseconds, commits stall, and the application servers see timeouts. This is why SAP and the FlexPod CVD separate vMotion from storage in the first place. The interesting part is where the sharing happens, because it is not only bandwidth.
What happens inside the adapter
On a Cisco UCS blade with a VIC, every vNIC in the service profile gets its own set of receive queues. The adapter policy used in the FlexPod TDI design gives each vNIC on a VIC 1380 8 receive queues with a ring of 4096 descriptors and 12 MSI‑X interrupts. On a VIC 15231 the policy is 16 queues, a ring of up to 16384 and 20 interrupts. Three details matter:
The adapter spreads incoming flows across the queues with an RSS hash of IP addresses and ports. It does not know what a flow is. One NFS log connection always lands on exactly one queue.
Each queue has its own interrupt and is serviced by one CPU core. A queue that receives more than its core can drain fills its ring and the adapter drops packets. That shows up as rx_no_bufs in esxcli network nic stats.
Queues belong to the vNIC. Two vNICs on the same physical adapter never compete for queues or cores. They share only the uplink to the IOM or IFM, and that is where QoS can help.
So if vMotion streams and the NFS log flow arrive on the same vNIC, the hash will sooner or later put a vMotion stream on the queue that also carries the log write. Network I/O Control cannot see that. NIOC shares bandwidth between port groups on the uplink, it does not assign queues. Only a separate vNIC does.
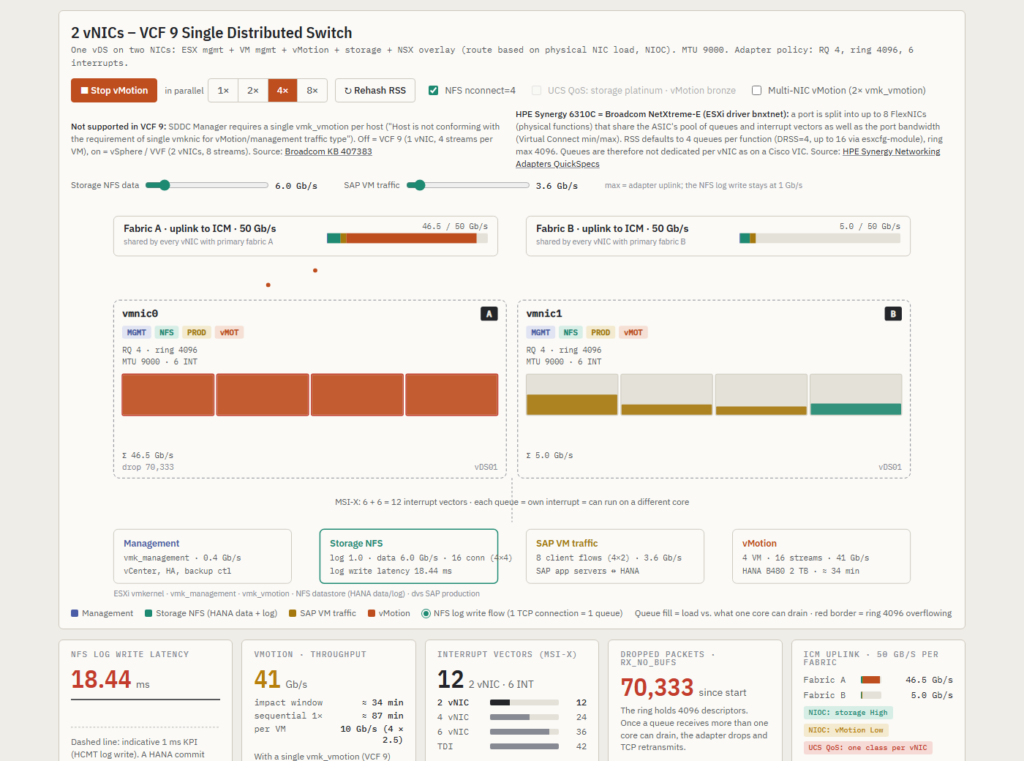
One remark for readers on HPE Synergy. The Synergy 6310C is a Broadcom NetXtreme‑E adapter (ESXi driver bnxtnet). A port is split into up to eight FlexNICs that share the ASIC’s pool of queues and interrupt vectors, and RSS defaults to 4 queues per function. A FlexNIC is still a separate function with its own RSS, so the storage FlexNIC does not receive vMotion packets, but the queues behind it are not dedicated in the way a Cisco VIC vNIC’s are, and there are fewer of them. The model treats it that way and I come back to it below.
The four layouts
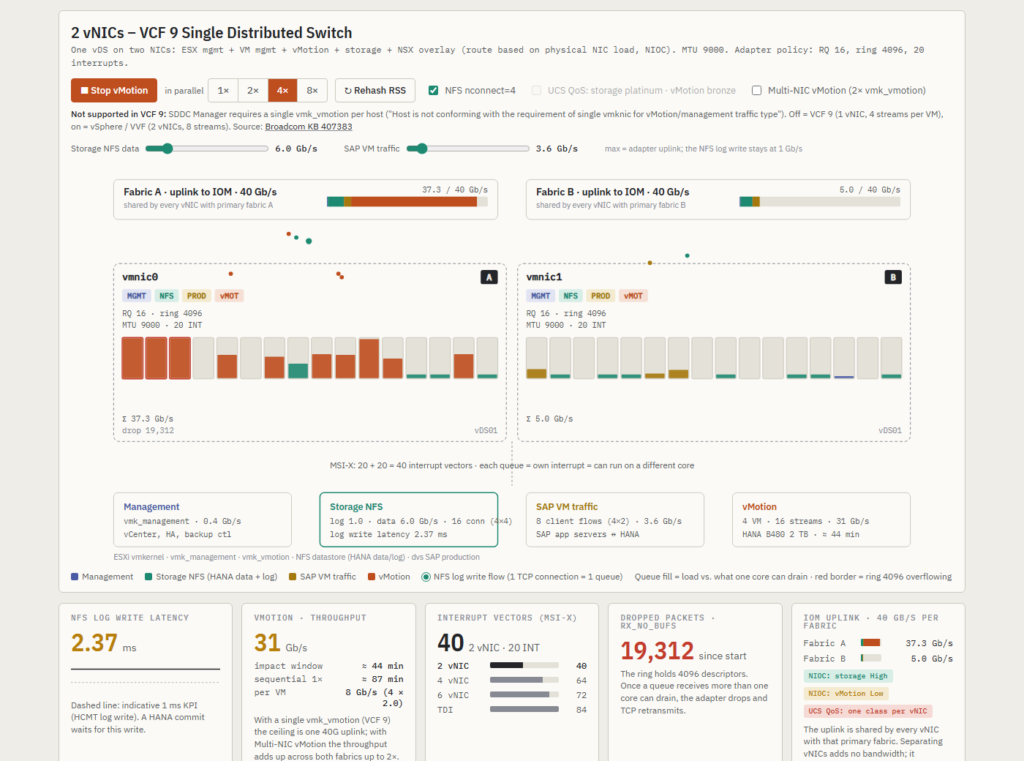
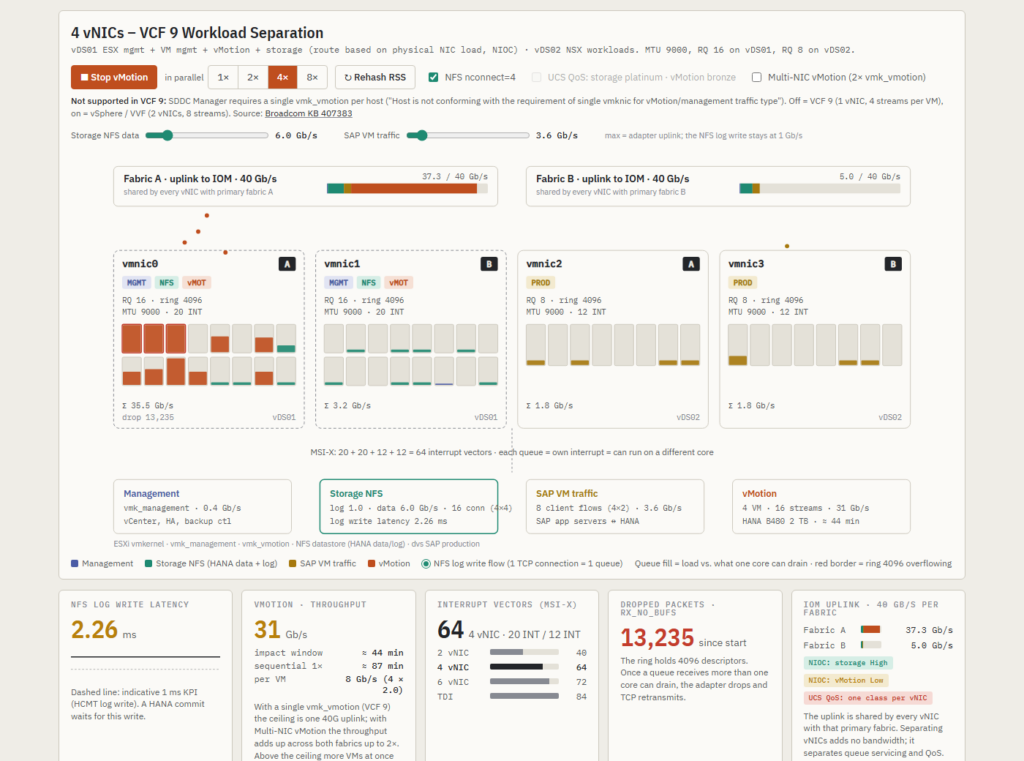
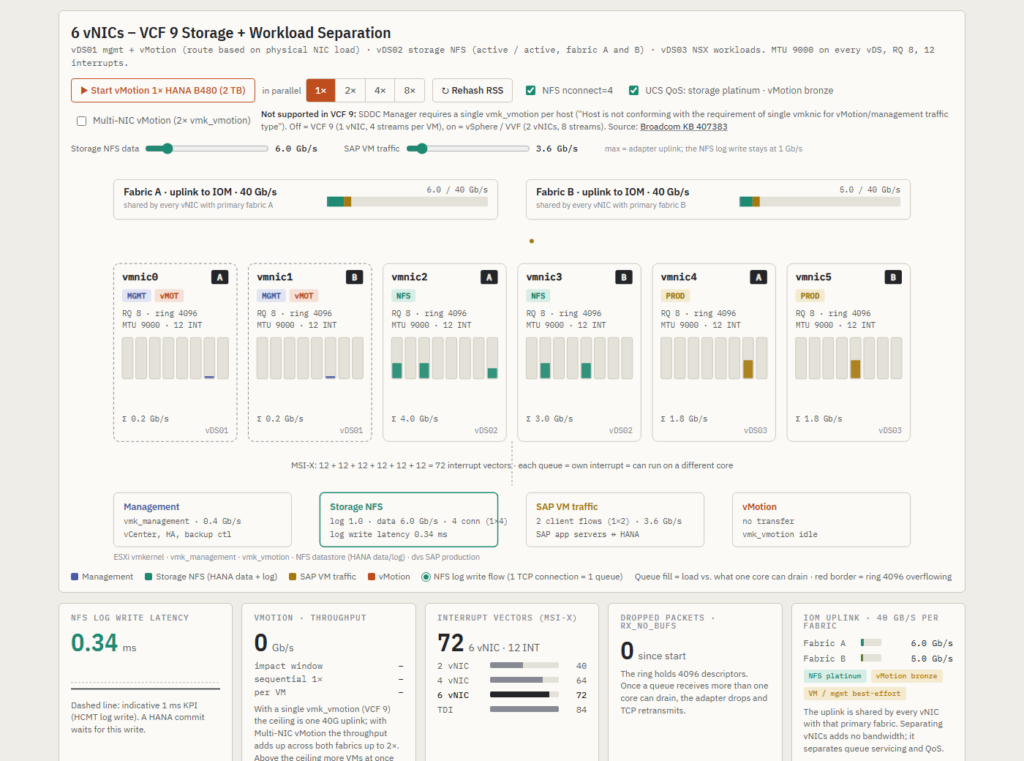
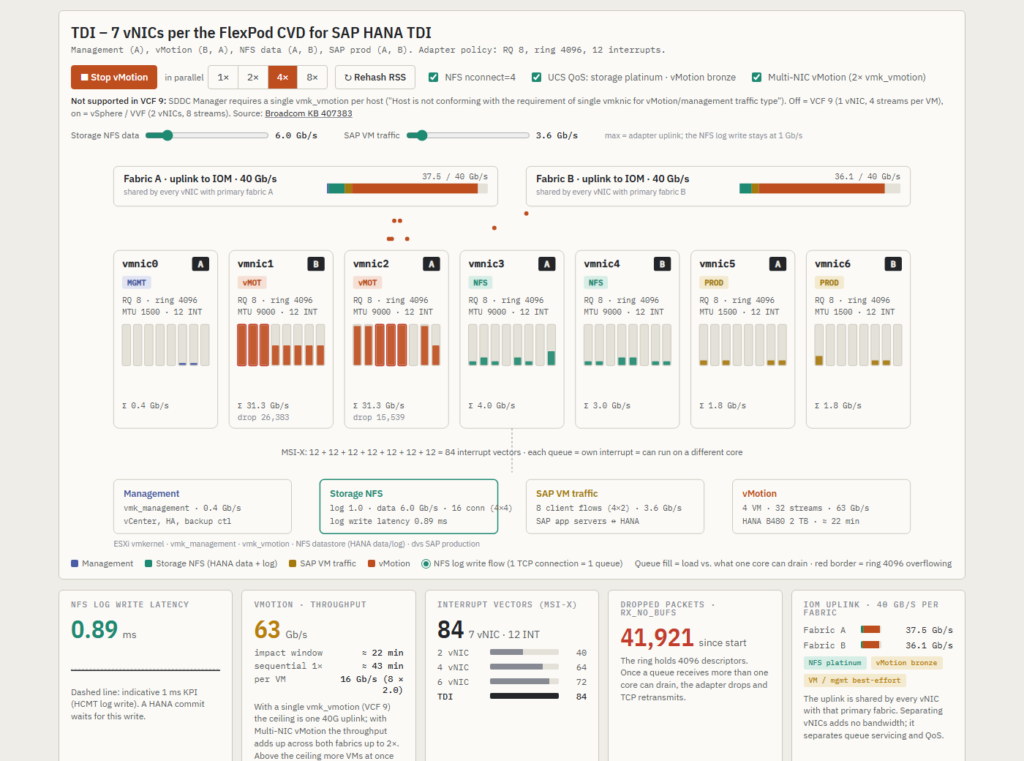
I modelled the three VCF 9.1 network models and the classic FlexPod TDI layout side by side. Same host, same VIC 1380 with 2 × 40 Gb/s, same traffic: NFS log 1 Gb/s, NFS data 6 Gb/s, SAP client traffic 3.6 Gb/s and management. Every HANA VM on the host mounts its data and log with nconnect, so it brings four NFS connections and two client flows of its own. The number of VMs is the parallel selector: with four VMs the storage class has 16 NFS data connections and the VM class 8 flows, with eight VMs 32 and 16. Then those one to eight HANA B480 VMs with 2 TB RAM are migrated at once. The VCF 9 rows use the single vMotion VMkernel adapter VCF 9 allows, the TDI row uses Multi‑NIC vMotion as the CVD configures it. The numbers are model output, not measurements. The model exists to show the mechanism.
Layout
vNICs
Storage isolated from vMotion
Log write · idle
1× vMotion
4× vMotion
8× vMotion
VCF 9 Single Distributed Switch
2
no
0.34 ms
1.82 ms
2.37 ms
3.49 ms
VCF 9 Workload Separation
4
no
0.34 ms
1.82 ms
2.26 ms
3.49 ms
VCF 9 Storage + Workload Separation
6
yes
0.34 ms
0.35 ms
0.88 ms
0.83 ms
FlexPod SAP HANA TDI (Multi‑NIC vMotion)
7
yes
0.34 ms
0.35 ms
0.89 ms
0.84 ms
The split is clean. The two layouts that put vMotion and storage on the same vNIC cross the 1 ms KPI with a single migration. The two that give storage its own vNIC stay under it with eight. What remains in the 6 and 7 vNIC rows has two parts: uplink pressure, which is what the UCS QoS policy is for, and the fact that eight VMs bring 32 NFS data connections into the 16 storage queues, so the log flow starts sharing a queue with data connections of other databases. That second part is the argument for more queues on the storage vNIC, and I come back to it with the VIC 15231.
2 NICs: Single Distributed Switch
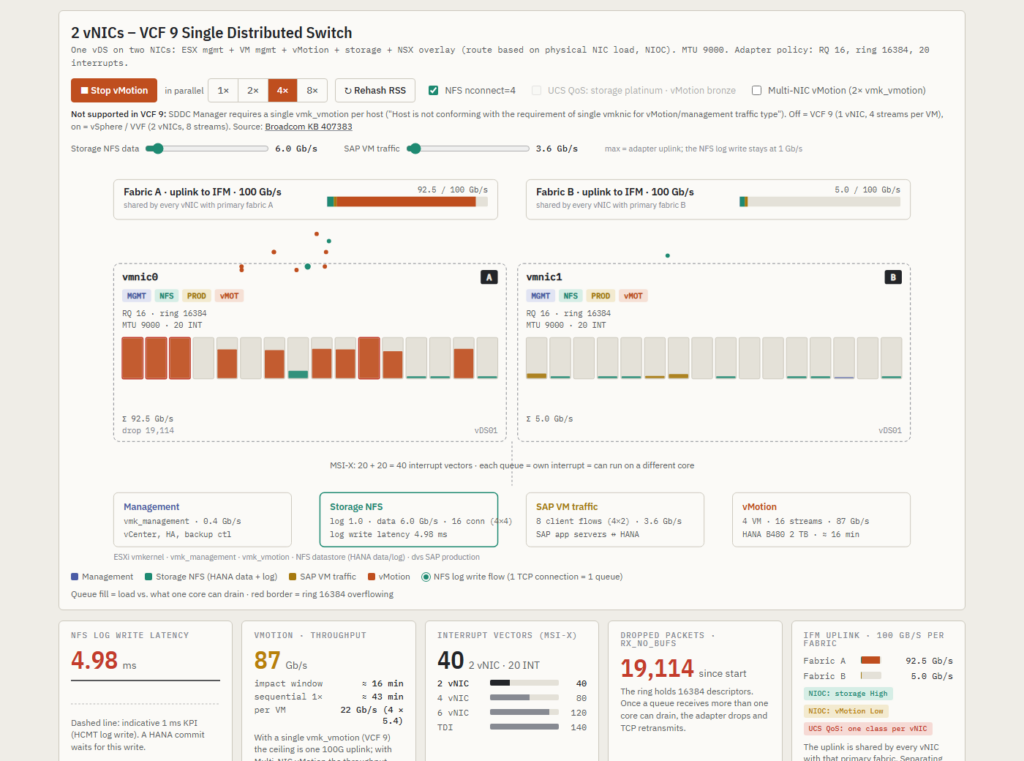
One vDS, everything on two uplinks, NIOC with storage and VMs at High and vMotion at Low, MTU 9000. It is the simplest model to run and the worst one for HANA. All four traffic classes hash into the same queues of the same vNIC. NIOC holds vMotion at the uplink limit, the queue collision remains.
2 vNICs, four migrations. All 16 vMotion streams enter through vmnic0, they sit in the same queues as the NFS log and the 16 data connections, the rings overflow and the log write is at 2.4 ms.
4 NICs: Workload Separation
Two vDS. The NSX workloads get their own pair, which is good for the VMs. Management, vMotion and storage still share vDS01, so for the HANA log it changes almost nothing. The numbers are within hash luck of the 2‑NIC model. Note the greyed out QoS switch in the screenshot: UCS assigns a QoS class per vNIC, so storage and vMotion on one vNIC cannot be told apart on the uplink either.
4 vNICs, four migrations. vDS02 is quiet, vDS01 carries vMotion and the NFS log in the same queues.
4 NICs the other way: Storage Separation
The Design Library also has a 4‑NIC Storage Separation Distributed Switch Model. It uses the same two vDS as Workload Separation but splits them differently: one vDS is dedicated to storage, and the other carries everything else (management, vMotion and workloads). The Design Library lists it for NFS as well as vSAN, so it is a valid option for NetApp NFS datastores. I did not simulate this layout, so it has no row in the table. By the mechanism described above, it protects the HANA log write the way the 6‑NIC model does, because the storage vNICs never receive vMotion packets. It is still not the layout I recommend for HANA. The SAP application server traffic on the NSX segments now shares a vDS, its uplinks and its receive queues with vMotion, so every host evacuation affects the client path instead of the log. If a host has only four ports, Storage Separation is the better of the two 4‑NIC models, but plan for six.
6 NICs: Storage and Workload Separation
Three vDS on three NIC pairs. vDS01 carries management and vMotion, vDS02 carries storage on both uplinks active/active, vDS03 carries the NSX workloads. Storage now has its own pair of vNICs on both fabrics, its own queues and cores and its own UCS QoS class. vMotion shares a pair only with management, which is negligible traffic. The log write stays under 1 ms with eight parallel migrations. What moves the number from 0.35 to about 0.9 ms is not vMotion at all, it is the 32 NFS data connections of eight databases sharing 16 queues with the log flow. This is the layout I would make the baseline for any VCF 9 cluster that hosts HANA.
6 vNICs at idle with one HANA VM. The NFS log and the four data connections spread over vmnic2 and vmnic3, so storage has 16 queues on two fabrics and nothing else in them.
7 NICs: FlexPod SAP HANA TDI
The Cisco CVD layout goes one step further and gives management its own vNIC as well, and it runs vMotion with two VMkernel adapters on two vNICs. A 2 TB VM then migrates in about 11 minutes instead of 22. For the HANA log it behaves like the 6‑NIC layout, because the storage vNICs are separate either way. If you build on FlexPod without VCF, use it. If you build on VCF 9, the 6‑NIC model gets you the same protection for HANA with one vNIC template less.
7 vNICs per the FlexPod CVD, four migrations with Multi‑NIC vMotion. The streams spread over vmnic1 and vmnic2 on both fabrics, the storage vNICs carry only NFS.
QoS and NIOC are two different things
Separate vNICs alone are not enough. The uplink is still shared, and four parallel migrations will fill it. With a UCS QoS policy that puts the storage vNIC in the platinum class and vMotion in bronze, storage keeps its bandwidth and the log stays under 1 ms. Without it, vMotion takes the whole uplink and even the TDI layout ends up above 4 ms.
The same TDI layout, eight migrations, QoS off. The queues are still isolated, the uplink is not.
The reverse holds as well. NIOC on the 2 and 4‑NIC models does protect bandwidth, and the model gives it credit for that, but it cannot protect queues. You need both: a vNIC of its own for storage, and a QoS class of its own on the uplink.
Multi-NIC vMotion is currently not supported by VCF 9.x SDDC Manager workflows
On plain vSphere you would give vMotion two VMkernel adapters on two uplinks, so a migration can use both fabrics. vSphere and VVF support Multi-NIC vMotion, but VCF 9.x SDDC Manager requires exactly one VMkernel adapter tagged for vMotion per host. When a host has a second one, SDDC Manager flags it after an inventory sync with the message “Host is not conforming with the requirement of single vmknic for vMotion/management traffic type”. The fix is to remove the second adapter and re-run host commissioning. Broadcom KB 407383 describes the issue. It notes that hosts with multiple vMotion adapters reach far lower vMotion concurrency in VCF 9.x than in vSphere 8.x, and that Load-based Teaming on the single vMotion VMkernel adapter is the exception to that limit.
For HANA hosts this has two consequences. A single migration gets only half the stream helpers and one 40 Gb/s path, about 16 Gb/s in the model, so a 2 TB VM takes about 22 minutes instead of 11. And on the 2 and 4‑NIC layouts every one of those streams enters through the single vNIC that also carries the NFS log, which is why the table above shows the KPI broken from the first migration. The simulator has a Multi‑NIC vMotion switch so you can compare both cases. It is off by default because that is what VCF 9 gives you.
Parallel vMotion during maintenance
vSphere allows up to eight concurrent vMotions per host. With one vMotion adapter on a 40 Gb/s uplink, one 2 TB HANA VM uses about 16 Gb/s and takes about 22 minutes. Two in parallel fill the uplink at about 31 Gb/s and still finish in about 22 minutes, so the second one is free. From there on more parallelism buys nothing: four VMs take about 44 minutes and eight about 89 minutes, the same as running them two at a time. What grows is the impact window on the shared layouts, because every additional VM puts more vMotion streams into the queues the log flow lives in. When you evacuate a host with HANA VMs on VCF 9, two at a time is the sensible limit.
Does a faster adapter fix it?
The first question I got after showing the model was whether a 100 Gb/s adapter makes the discussion go away. The simulator now has three adapters to switch between: the Cisco VIC 1380 with 2 × 40 Gb/s, the Cisco VIC 15231 with 2 × 100 Gb/s and 16 receive queues per vNIC, and the HPE Synergy 6310C with 2 × 50 Gb/s. The table shows the 2 vNIC and 6 vNIC layouts on each, single vMotion adapter, UCS or NIOC bandwidth protection on.
Adapter
Layout
Idle
1× vMotion
4× vMotion
8× vMotion
2 TB VM, one migration
Cisco VIC 1380 · 2 × 40G · RQ 8
2 vNIC
0.34 ms
1.82 ms
2.37 ms
3.49 ms
16 Gb/s · ≈ 22 min
6 vNIC
0.34 ms
0.35 ms
0.88 ms
0.83 ms
Cisco VIC 15231 · 2 × 100G · RQ 16
2 vNIC
0.27 ms
1.74 ms
4.98 ms
3.42 ms
32 Gb/s · ≈ 11 min
6 vNIC
0.27 ms
0.27 ms
0.71 ms
0.71 ms
HPE Synergy 6310C · 2 × 50G · RSS 4
2 vNIC
1.81 ms
3.92 ms
18.44 ms
40.17 ms
16 Gb/s · ≈ 22 min
6 vNIC
0.34 ms
0.34 ms
0.87 ms
0.87 ms
The VIC 15231 halves the migration time and the wider ring drops far fewer packets, but on the 2 vNIC layout the log write still sits well above the KPI from the first migration. Bandwidth was never the only problem. The vMotion streams still land in the same queues and on the same cores as the log flow, and at 8 Gb/s per stream they fill a core faster than before. On the 6 vNIC layout the 15231 is better in every column, and the 16 storage queues per vNIC are exactly what the 32 NFS connections of eight databases need.
2 vNICs on a VIC 15231, four migrations. Sixteen queues, a ring of 16384 and a 100G uplink. The vMotion streams still share queues with the NFS log flow, log write at 5.0 ms.6 vNICs on a VIC 15231, four migrations at 87 Gb/s. The storage vNICs are untouched and the impact window shrinks to about 16 minutes.
The Synergy 6310C is the other direction. With four RSS queues per FlexNIC, the 2 vNIC layout is above the KPI before any vMotion starts: the log flow of a single HANA VM already shares its queue with NFS data and client traffic. Every migration then lands in the same four queues, and at four and eight migrations the model’s latency formula runs off the scale, so take the direction from those cells and not the digits. The 6 vNIC layout still protects the log, because the storage FlexNIC never sees vMotion packets, but the headroom is smaller than on either VIC. If you run HANA on Synergy, raise the RSS queue count of the storage function from the default and give storage its own FlexNIC pair in Virtual Connect with a bandwidth minimum.
2 vNICs on a Synergy 6310C, four migrations. Four queues per FlexNIC, every one of them carries vMotion next to the NFS flows, and the log write is at 18.4 ms in the model.
Lifecycle note for the VIC 1380:Broadcom KB 391170 lists the UCS VIC 1340 and VIC 1380 as Restricted in ESX 9.0, under both nenic and nfnic. They still work on 9.0 and stay listed in the compatibility guide, but they get no new features or driver enhancements and only best-effort fixes, and Restricted devices are removed in the next major release. The VIC 15231 isn’t in either the Restricted or the End of Life list. If you are planning new HANA hosts for VCF 9, start from the 15231, and check your exact adapter and firmware in the Broadcom Compatibility Guide. The full list is on ESXi 9.0 – Deprecated and unsupported devices.
What I recommend
For HANA hosts on VCF 9, use the 6‑NIC Storage and Workload Separation model. If a host has only four ports, Storage Separation is better than Workload Separation because it keeps the NFS log away from vMotion, but SAP client traffic then shares the path with vMotion, so plan for six. On FlexPod without VCF, keep the 7‑vNIC TDI layout from the CVD.
Put the storage vNICs in a platinum QoS class in UCS and vMotion in bronze. NIOC is not a substitute on the uplink, and it is no help at all in the queues.
Do not buy a faster adapter to avoid the layout decision. A VIC 15231 shortens the maintenance window, it does not separate the queues. Where it does pay off is the storage vNIC: 16 queues for the NFS connections of many databases on one host.
Mount HANA data and log with nconnect, or with several mounts. One TCP connection is one queue and one core. Count the connections: eight databases with nconnect=4 are 32 data connections plus their log flows on the storage vNIC.
Limit concurrent HANA vMotions per host to two during maintenance windows. With the single vMotion adapter VCF 9 allows, two migrations fill the uplink and a third one only stretches the window.
Run HCMT at idle and during a vMotion of one and two HANA VMs, and keep the result as a baseline. On a performance ticket SAP and Broadcom ask about deviations from best practice first.
Watch rx_no_bufs on the storage vNICs. If the counter increases during the test, the receive ring is being exhausted. Correlate this with per-queue statistics and traffic load before attributing the drops to RSS/queue contention.
Try it yourself
The interactive model is on this site: vdan.cz/vcf9-sap-hana-tdi-design. You can switch between the four layouts and the three adapters, set one to eight HANA VMs and migrate them in parallel, toggle the UCS QoS policy, nconnect and Multi‑NIC vMotion, move the NFS data and SAP client traffic sliders up to the adapter’s line rate, and re‑roll the RSS hash to see how much of the effect is luck. The numbers update live, including the log write latency, the number of NFS and client connections per layout, the interrupt vector count and the dropped packets on the rings. It is available in Czech and English.
A word on the model: queue capacity, stream rates and the latency formula are illustrative and documented on the page. They are there to explain why the layouts behave differently, not to replace a measurement on your own hardware.